Sep 30, 2019

Saying Hello and Goodbye!

Hello Dies R Us Friends!
Darlene with you sharing some sad and happy news!
 I would like you to help me in thanking eight of our current DT members who will be leaving us today.  Their creations have been inspiring us all for several months and I for one can't thank them enough!  
Wishing the best of everything life holds in their future to:
 
 
A HUGE THANKS from Dies R Us!
 
The happy news is, today we have five of the current DT ladies staying on and we also have five NEW DT members joining us!  Please extend a warm welcome to:


WELCOME LADIES!
I'm looking forward to seeing what you create with dies and
other products carried at the Dies R Us Store!


X-Stitch Santa Teddy

Hello and welcome back crafting friends.
 Lena here today sharing a X-stitch Christmas card. 
I hope you took advantage of the wonderful sale of international dies that Dies R Us  recently had.  It's during these sales that you'll find dies from companies such as Marianne Designs, Lea'bilities, and Joy Crafts among others. The best way to know about these fabulous sales is to subscribe to the Dies R Us Newsletter.


As you can see, I used a variety of dies to make and adorn this card.
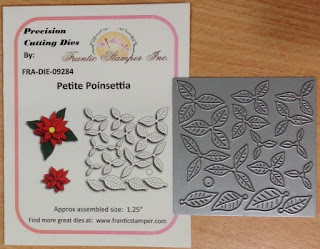
For the top of this centre fold card, I used the Merry Christmas Text  from Jeanine's Art.  For stitching the Santa Teddy, I used the Cross Stitch L  from Marianne Designs.  To add a little extra on the sides, I added a Winterfun Corner from Precious Marieke to each side. This is a corner die but for my little straight sides, I snipped off the little corner flourish.  The tiny poinsettias on the bottom were cut using the Petite Poinsettia from The Frantic Stamper.  I also added a few snowflakes here and there for fill in some gaps that I felt needed a little extra something :-)  To cut those, I used a die set from Art Impressions.  I'm not sure that you can get it at the DRU store anymore because it is an old set.  A good replacement set is the Mini Snowflakes  from Lawn Fawn.  I have linked to it below.  The beaded trim around the stitched square was cut using Karen Burniston's Party Border Blends.  All that was left was to add a few gems here and there and it was done.


On the inside I made a frame for my message using the Doodle Square  from Marianne Design and then added a snowflake from the same set that I used above.


I love centre fold cards. They're fun to open, not hard to make and fold completely flat for mailing, so no extra postage needed as long as you don't add bulky embellishments.


When I saw this Santa Teddy pattern, it called my name.  Well, it is a little bigger than the Cross Stitch L  die.  So in order to add another 3/4" of the pin holes, I moved my die around the original square and ran it through the die cut machine again.  It's really easy to do since the holes from the die nestle beautifully into those that are already cut in the cardstock.  I do strongly suggest you secure your die with removable tape, or you will end ruining your original cut.  Yup, I learnt the hard way :-)

As always, here is a  quick guide to the crafty supplies used,
 each linked to the Dies R Us store for your convenience.


I hope you enjoyed my Christmas card today.  Christmas will be here before you know it, so I hope that I was able to inspire you to use your dies, create a project, and come play along with us at the Dies R Us Challenge Blog for your chance to win a gift voucher to the Dies R Us Store.  A new challenge begins on the 1st and 15th of every month.  Be sure to follow us on Facebook and Pinterest too.

Sep 29, 2019

Happy Fall Card

Hello Crafty Friends - Annie here with a fun fall card.


Let's get started!

I gathered all the supplies I need for the project. 

I started by die cutting all the components I needed for the card. Then, I stamped, colored and trimmed squirrel, acorns, and leaves.  

Next, I added a bit of Tumbled Glass Distress ink to the white card panel which 
I trimmed to 4"x 5-1/4". I then added some ink to the die cuts for some added dimension. I then layered the white panel onto a kraft panel. 
 

Next, I start adding the die-cut pieces with some foam adhesive to the card front panel. Then, the squirrel, acorns, and leaves
  

Next, I add the curtains and the tie backs with some foam adhesive.
  

Then, the twigs and sunflowers to the top of the curtains. Finally, I stamped the sentiment onto a die-cut banner and adhere it with some foam adhesive.
  

For finishing touches, I add a few drops of Nuvo Crystal Drops in Copper Penny to the center of the sunflowers and to the sentiment strip.

Now, the card is complete!

Materials Used:

Creative Expressions Dies: Stitched Collection Christmas Window
Creative Expressions - Stitched Collection  - Christmas Window Craft Die

Lawn Fawn - Forest Feast Stamps


Nuvo Crystal Drops - Metallic Copper Penny

Lawn Fawn - Magic Color Slider Dies

Inks: Memento Tuxedo Black
Tim Holtz Distress Inks: Aged Mahogany, Fossilized Amber,
Brushed Corduroy & Tumbled Glass
Spectrum Noir Markers
Recollections Brand Cardstock: White, Kraft, Dark Red, Tan, Dark Yellow

Thank you for stopping by the blog today I hope you found some inspiration!

Don't forget to come and join in the fun at the Dies R Us Challenge Blog. There's a new challenge theme offered on the 1st and 15th of each month and one lucky randomly drawn winner will receive a gift voucher prize to the Dies R Us Store. For your convenience, all the important Dies R Us links are provided below.

Sep 28, 2019

Warmest Wishes

Hello everyone, Shanta here! 
I'm back on the blog today to share a A2 size card with you using dies carried at Dies R Us.
For details on how I created my card please check out my You Tube video which will be listed below the photo.
Hope you all have an amazing day!

Here is my project below:


Here Is My Video:


Supplies Used:


Until Next Time...

Don't forget to come join in the fun at the Dies R Us Challenge Blog. There's a new challenge theme offered on the 1st and 15th of each month and one lucky randomly drawn winner will receive a gift voucher prize to the Dies R Us Store. For your convenience, all the important Dies R Us links are provided below.

Sep 27, 2019

Merry Christmas

Hi everyone!! Dawn here with you today and I have a A Christmas card to share with you. 


I used the following dies:


Next I cut out the poinsettias 3 times out of some red mirror card stock and some leaves out of green mirror card stock. I also cut out the Merry Christmas out of some red mirror card stock .


Next assemble the poinsettias. 

Next I layered some red mirror card stock on top of my card base of 6x6.  I then layered some pearl grey card stock on top of the red.  I then assembled my card. 


Below are the supplies that I used to make the card:

                   Karen Burniston - Dies - Merry Christmas


Karen Burniston - Dies - Merry Christmas


                Creative Expressions - Cut and Lift Collection -                                           Poinsettias Craft Die


Creative Expressions - Cut and Lift Collection - Poinsettias Craft Die


Don't forget to come join in the fun at the Dies R Us Challenge Blog. There's a new challenge theme offered on the 1st and 15th of each month and one lucky randomly drawn winner will receive a gift voucher prize to the Dies R Us Store. For your convenience, all the important Dies R Us links are provided below.
https://blogger.googleusercontent.com/img/b/R29vZ2xl/AVvXsEjygNLxcuoMF0QGkWjeKFQy4lZE9xPm4QkjkK4ZIy3_i6CUH4dbIlD2GtvtJDSNeEyKsnkATkFOo0ED3Uqr_dYSKeke1onYgxnGYC_PyWMxI9FSEcJGEYbPSTfYFWjlWZZWcd5jnDd6RmiC/s1600/-logo+collage.jpg


Thanks for stopping by and have a great day!

Sep 26, 2019

Let It Snow!

Welcome back Dies R Us friends!
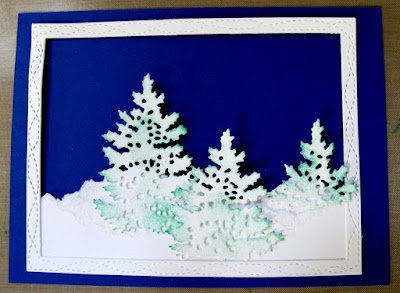
Darlene with you today sharing a fun wintertime scene.  As much as I hate to think about it, that time of year is right around the corner as are the holidays so I'm thinking ahead and hoping to not be rushed for holiday creations.  I create both Winter and Merry Christmas cards to send at holiday time.  This one was fun to make and I hope you draw inspiration from it!!


The dies used on this creation are:

Memory Box - Dies - Open Studio - Wrapped Stitch Frames

Yvonne Creations - Dies - Celebrating Chirstmas - Pine Trees

Poppystamps - Dies - Curious Fawn
Poppystamps - Dies - Cute Fawn
Sue Wilson Designs - Mini Expressions - Let It Snow
Here are a few details on creating this card . . .

After die cutting my trees from scraps of white card stock, I added sponged touches of Tim Holtz Distress Oxide ink - Lucky Clover to indicate some of the pine branch showing through the snow.


My cute little deer were also cut from scraps of white card stock then colored using another Tim Holtz distress oxide ink - Walnut Stain.


To create my snowy ground cover, I simply cut a scrap of white card stock to length that would fit inside my frame then tore it.  Gluing down the first panel then place/gluing the second panel in behind the first.
 

Next I positioned my trees and glued down the lower portion.  Leaving the upper portion loose for dimension since I intended to pop up my frame after adding my falling snow.
 

 I've used a white gel pen to create my snow.  I placed my frame die down on my paper to use as a guide since I didn't want snow around the outside of the frame. 


Next it was time to put all my pieces together and finish my card.
With the finishing touch being the sentiment.


Don't forget to come join in the fun at the Dies R Us Challenge Blog. There's a new challenge theme offered on the 1st and 15th of each month and one lucky randomly drawn winner will receive a gift voucher prize to the Dies R Us Store
For your convenience, all the important Dies R Us links are provided below.

click below for:

Thanks for stopping by!
Until next time ...