Showing posts with label Lawn Fawn. Show all posts

Sep 29, 2021

Halloween Houses

Hi all! I am so excited to share my little Halloween Houses with you! Halloween is my favorite holiday; I love all the spookiness, the decor and costumes and since the weather is cooler, yet not that cold yet, it just can't get much better!  I think we should have Halloween at least once a month so everyone could dream up great costumes and buy candy without feeling guilty :)  These Halloween Houses are so easy to make and you can find all the dies you need at Dies R Us - truly one stop shopping with great prices! 


What I Used to Make my Houses:
I used the following on both houses;
Lawn Fawn Scalloped Treat Box, #LF1232
Lawn Fawn Scalloped Treat Box Halloween Add On Dies, #LF1487
Card in Black, Yellow, White, Orange, Brown and Grey


I am calling this house House #1.  In addition to the above products I used the following:
Lawn Fawn Spooky Village Stamp Set, #LF2014 {sentiment}
Die-Namics Stitched Fishtail Sentiment Strips, #MFT-1123


I cut the actual house out of heavy black card, as well as the the doorknob and one bat.  The roof, door and windows were cut out of grey card; yellow card was used to add a warm glow to the windows.  I added some spooky brown trees to each side of the house, the back has a window and a cute ghost.  Lastly, I added the sentiment.  These houses are so cute in person, they are small, the perfect size for  gift card and you can make them to match almost any occasion, including just because! You can make a beach house, a winter house, a spring themed house and even a dog house!  I am sure Lawn Fawn will continue making add on options for the treat box as it's a great seller and so adorable, even with no add on! 

On to House #2.  I used the products listed about as well as some orange card and the following:
Lawn Fawn Pick of the Patch Stamp Set, #LF1754

Lawn Fawn Pick of the Patch Die Set, #LF1755
Lawn Fawn Costume Party Stamp Set, #LF1458 {sentiment}
Embossing Ink
Hero Arts White Embossing Powder
Acetate

I constructed the little house using grey card, used a darker grey for the roof and black for the door and windows.  I backed the windows and door with yellow card and used some brown trees on each of the sides.  I also made a pumpkin and added it to one side along with a tree.  The back of the house has a black cat and a window.  This one is my favorite of the two houses because I also added 2 black bats "flying" above the house with the help of some acetate strips.  I love them!  I embossed the sentiment with white embossing powder on black card and trimmed it to fit the spot on the roof.

These are perfect for a small, snack sized candy bar or a few truffles {dark chocolate, of course!} and if I don't give them away, I know they will come out to decorate for Halloween year after year.  They are easy enough to make using an assembly line, enlist some help from the kids or friend, and you can make a whole class worth in no time! And who knows, I may construct an entire village of spooky little treat boxes! I hope I have inspired you to dig out some dies and enter the Dies R Us monthly giveaway; just be sure you use products that Dies R Us carries and you could win!  Thanks so much for stopping by and I'd love to know which house you like the best, just drop a note in the comments :) Thank you all for all your support during my Design Team time here at Dies R Us!  This is my last post and I had a lovely time.  Stay safe and see you soon! Oh and HAPPY HALLOWEEN!!!  Christi

Don't forget to come join in the fun at the Dies R Us Challenge Blog. There's a new challenge theme offered on the 1st and 15th of each month and one lucky randomly drawn winner will receive a gift voucher prize to the Dies R Us Store. For your convenience, all the important Dies R Us links are provided below.

https://blogger.googleusercontent.com/img/b/R29vZ2xl/AVvXsEjCjT8pw_L9T-z6-KjvbFtjxltch0jDrbOVSRoR7-pMeQw8lEYfIDENxvu0UYve6R3ZP9GqtyyTDEJbdtSMk3bGQBx_Y3u5-ayMxatDG7IHMgflmEHGKjuk1fXzqacoc_aa78anm5BPmKz1/s320/*logo%2Bcollage.pages.jpg

click below for:

STORE

CHALLENGE BLOG

FACEBOOK

INSPIRATION BLOG

FRIENDS OF DIES R US PINTEREST PAGE


Sep 27, 2021

Season's Greetings

Hello, Alicia posting my final card for the Inspiration Team today.  I jumped ahead a season to create this Karen Burniston winter card.  I have always had so much fun playing with her animals and characters.  The first time I use one of her dies, I will go to Karen Burniston YouTube channel and watch her assembly video.  This is my first time using the Winter Animals set so I watched that video. 


I very much enjoy her tips such as using the die as a stencil.  I used it here to detail the hat on the penguin with a white gel pen.  I used the same plaid paper for Ms. Claus's suit and the penguin's hat and scarf.


I layered some trees cut from a green patterned paper on white glitter stitched hillside border.  I used the same white glitter paper for Ms. Claus's trim and the penguin's pom on his hat. I colored Ms. Claus's cheeks and cut her glasses from silver metallic paper.  I layered all the pieces on patterned paper.  I layered the the snowy hill cut on the patterned paper then die cut the stitched rectangle for a uniform look.

Store products used:


Don't forget to come join in the fun at the Dies R Us Challenge Blog. There's a new challenge theme offered on the 1st and 15th of each month and one lucky randomly drawn winner will receive a gift voucher prize to the Dies R Us Store. For your convenience, all the important Dies R Us links are provided below.

https://blogger.googleusercontent.com/img/b/R29vZ2xl/AVvXsEjCjT8pw_L9T-z6-KjvbFtjxltch0jDrbOVSRoR7-pMeQw8lEYfIDENxvu0UYve6R3ZP9GqtyyTDEJbdtSMk3bGQBx_Y3u5-ayMxatDG7IHMgflmEHGKjuk1fXzqacoc_aa78anm5BPmKz1/s320/*logo%2Bcollage.pages.jpg

click below for:

STORE

CHALLENGE BLOG

FACEBOOK

INSPIRATION BLOG

FRIENDS OF DIES R US PINTEREST PAGE

Thank you for reading our blog today.


Sep 7, 2021

Thankful Card

 Hello Friends,

Diane here to share a my newest card, "Thankful".  The die I used for this card is so fun and cute.  It can be used for any occasion.  A "Welcome home" card for a loved one, a "Congratulations on your new home" card, add a pumpkin or two for a "Fall" card or a "Christmas tree" and it becomes a Christmas card.

This is a lovely die from Impressions Obsessions called "Saltbox Houses" and it's available at Dies R Us.

Come see what I created:


Card Recipe:

This card measures 4 1/4 x  5 1/2 (A2 sized).  I began with a white 110 lb card base measuring 4 1/4 x 11 and scored it in half at 5 1/2.

Next, I decided on the colors and designer paper to use.  You can use any background paper your heart desires. I chose a colorful floral pattern.  Next, cut the die out several times in matching colors.  I cut red, blue, yellow, grey, etc.  Then save and place all the pieces on your work station.

Next, I used the Lawn Fawn Stitched Scalloped Circle Frames to cut a white circle background for my houses. You can cut this out in ivory if that matches better with your paper selection. The "Lawn Fawn" die cuts two pieces.  I just used some tape on the back to adhere the center circle to the scalloped frame. 

Then, I put together the houses on the center front of my scalloped circle.  This takes a little bit of time to place and adhere all the tiny pieces together, but it's well worth the final result.  A tweezers is helpful in this step.

Once the houses are in place. It's time to stamp the sentiment.  I used a "Thankful" sentiment. I stamped it using black Momenta ink on yellow cardstock.  You can use any sentiment stamp you desire.

Then the last step is adding a little bling.  I chose to add some Graphic 45 gold flat back pearls, but you can add Nuvo drops, flowers, rhinestones, or sequins.

That's it. An easy, fun, quick card.


Below is a photo of the Supplies I used for this card:


Below are the links to the elements that are available at Dies R Us:

Impression Obsession Saltbox Houses:  https://www.diesrus.com/search?q=Saltbox+houses

Lawn Fawn Stitched Scalloped Circle Frames:  https://www.diesrus.com/products/lawn-fawn-stitched-scalloped-circle-frames-dies?_pos=1&_sid=01123b59f&_ss=r

I pulled my sentiment stamp from my stash, but here are some choices for you if you are looking for a "Thankful" or "Thank you" sentiment.

Sentiment:  https://www.diesrus.com/search?q=Thankful


Thank you for stopping by today.  Be sure to visit Dies R Us for this and many more fabulous dies and stamps for all your crafting needs.


Don't forget to come join in the fun at the Dies R Us Challenge Blog. There's a new challenge theme offered on the 1st and 15th of each month and one lucky randomly drawn winner will receive a gift voucher prize to the Dies R Us Store.  


For your convenience, all the important Dies R Us links are provided below.


click below for:

STORE

CHALLENGE BLOG

FACEBOOK

INSPIRATION BLOG

FRIENDS OF DIES R US PINTEREST PAGE


Happy Fall Ya'all!

Happy Tuesday everyone!  Lisa here, sharing a fall themed card with lots of shimmer!  I combined products from Frantic Stamper, Lawn Fawn and Tutti Designs to make this card!


I started my project by choosing a fall-themed background die by Frantic Stamper called Swirling Leaves Stitched Background.  It's 3.5" by 5" so I ran it through my die cut machine twice on my 6.75" x 4.75" mat.  You can't even see the line between the two, the die lines up beautifully.


I decided I wanted to use a stamp since September is National Stamping Month, so I pulled out my Lawn Fawn Before 'N Afters stamp set.  


I chose to pair the stamp set with one of my favorite die sets, Tutti Designs Cross Stitch Banners.  Unfortunately, I somehow deleted the photos I took of the stamping, coloring and inking processes.  My apologies!  I do have a photo of the card before I adhered it together and embellished it.


I felt it needed something so I added the stones.

I hope this card inspires to make a fun fall card with any of the fun and amazing dies that Dies R Us carries.  --Lisa

Products Used:


Don't forget to come join in the fun at the Dies R Us Challenge Blog. There's a new challenge theme offered on the 1st and 15th of each month and one lucky randomly drawn winner will receive a gift voucher prize to the Dies R Us Store.  


 For your convenience, all the important Dies R Us links are provided below.


click below for:

STORE

CHALLENGE BLOG

FACEBOOK

INSPIRATION BLOG

FRIENDS OF DIES R US PINTEREST PAGE


Aug 10, 2021

A Fairy Hello

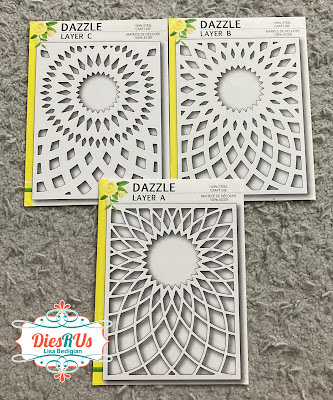
Happy Tuesday everyone!  Lisa here, with a fun fairy hello card.  The fairy isn't even the star of the show, the layered background dies from Birch Press are!!!  Check out how Dazzle-ing they are.


Aren't they amazing?  These are the Birch Press Dazzle layering dies.  You get a set of three and omg they're all fabulous because yes, you can use them individually, but layered is pure papery greatness!!


So let me tell you how this card even came to be.  I was going to do something completely different but I got some new cardstock and when I saw these three colors together, the card just kind of blew up from there.


I found that the layers were missing something, so I cut the top out of black glitter paper instead of the textured cardstock and added it on top for dimension.  I don't find the centers of these dies really need a lot of adhesive, so instead of putting adhesive on the paper before cutting the dies, I just put Scor Tape all around the frame and a few pieces in the center.  Easy Peasy!


I wanted to add a fairy, so I pulled out my Tutti Designs Mini Fairies set.  I had a hard time deciding which one to use and where to put him or her.


My card needed a sentiment so I pulled out an oldie but goodie, Lawn Fawn Scripty Hello.  I decided here to cut off the flowers in the hands of the fairy on the left.  I wanted it to look like the fairy was holding the greeting.


The final finishing touch it needed was some bling!  I used three sizes of clear AB gems to accent the sentiment on the card.  I love how it came together.

I hope this card inspires to check out all the amazing Birch Press layering dies that Dies R Us carries.  They're so fun and versatile.  --Lisa


Products Used:


Don't forget to come join in the fun at the Dies R Us Challenge Blog. There's a new challenge theme offered on the 1st and 15th of each month and one lucky randomly drawn winner will receive a gift voucher prize to the Dies R Us Store.  


 For your convenience, all the important Dies R Us links are provided below.


click below for:

STORE

CHALLENGE BLOG

FACEBOOK

INSPIRATION BLOG

FRIENDS OF DIES R US PINTEREST PAGE


Aug 6, 2021

Sweet Birthday Wishes

 Hi everyoneSteph Ackerman here today sending you some birthday wishes.


This lovely Memory Box die has lots of possibilities.  Since it die cut into the panel, you can create any sized card.  


After die cutting the floral panel, I die cut the back panel from green cardstock using Lawn Fawn Rectangle dies to use as the base.  I also die cut 2 yellow flowers.  One was added to the card over the white flower and one was added on top to provide some dimension.


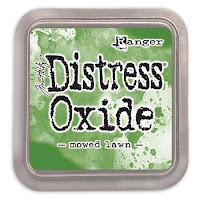
Using VersaFine Clair Green Oasis, Fairy Hugs Flower Vines were stamped along the top of the card using first and second generation stamping.  Next I sponged Mowed Lawn Distress Ink around the panel.  Finally I added a Fairy Hugs birthday sentiment along the bottom of the card.


Dies R Us Supplies:


Jul 7, 2021

Pet Talk

 Hi Friends of Dies R Us! Yes, another multiple card post - just a 2fer this time! I used some older Lawn Fawn stamps and dies, but the NEW RELEASE is now available at Dies R Us, just go to the website and choose NEW ARRIVALS {you'll find more than just Lawn Fawn - I have my eye on some of the great Visible Image sets}!!   Enjoy!


What I Used to Make my Cards:
White Card Base
Pink Card
Lawn Fawn Speech Bubble Backdrop, #LF1989
Lawn Fawn Critter Chatter Stamps, #LF1964
Lawn Fawn Critters at the Dog Park, Stamps #LF515, Dies #LF520
Lawn Fawn Meow You Doin'? Stamps #LF1315, Dies #LF1316 
Watercolor Paper {I use this}
Zig Clean Color Brush Markers
Gina K Amalgam Ink Pad in Obsidian Ink
Dimensional Dots
Pink Ink


I started these cards by cutting the backdrop out of white card and pink card, twice each.  Then I began to stamp the different dog and cat sounds on various white speech bubbles from the backdrop cut out which I then attached to my white card bases. I placed the stamped speech bubbles onto different spaces left by the die cut and filled in a few of the more empty spaces with the pink speech bubbles, leaving some of the spots empty.  The cat and the dog I used on the cards were previously colored and cut so I just added the dimensional dots to them and attached them onto the cards.  Lastly, I stamped the sentiments on white card, trimmed them and dotted them onto the card fronts.  I also stamped the small heart in pink ink and the paw print in black ink onto 2 of the smaller panels.  I like the look of the different levels created by the dots and the speech bubbles.  They are a different type of "I love you" card but every bit as important as the cards someone might get from humans; and a such nice way to say that your pets care about their pet parent {or aunt, grandparent, etc.} as much as you do!  

Thank you for stopping by to look at my work. I hope you and yours are doing well and are staying safe! I hope you had a fantastic weekend and see you here, at Dies R Us very soon!!  Fondly, Christi

 Don't forget to come join in the fun at the Dies R Us Challenge Blog. There's a new challenge theme offered on the 1st and 15th of each month and one lucky randomly drawn winner will receive a gift voucher prize to the Dies R Us Store.  


 For your convenience, all the important Dies R Us links are provided below.


click below for:

STORE

CHALLENGE BLOG

FACEBOOK

INSPIRATION BLOG

FRIENDS OF DIES R US PINTEREST PAGE

Jun 24, 2021

Birdhouse Magic Iris Card

Hi Guys! I'm Debbie from Debbie J’s Crafting Corner, here today sharing how I used several stamp and die sets from Lawn Fawn to create this Magic Iris Card.

I love showing the process when I’m creating.  I hope my tutorial and video help you see that, if I can make it, You Can Too!

I used the following stamps and dies from Dies R Us:

Lawn Fawn - Magic Iris Dies

Lawn Fawn - Magic Iris Add-On Dies

Lawn Fawn - Magic Iris Birdhouse Add-On Dies

Lawn Fawn - Grassy Hillside Borders Dies


Check out the video showing how I created this fantastic card!


Video Chapters

Introducing dies: 00:33
Cutting out the parts to make a Magic Iris: 00:46
Starting Assembly of the Magic Iris Mechanism: 01:00
Test: 04:36
Adding the Magic Iris Mechanism to the Cover Plate: 06:44
Adhering the Magic Iris to the front panel : 07:43
Putting it all together: 08:38

The Magic Iris Birdhouse Add-on

 I’ve occasionally made Magic Iris cards.  But I just couldn’t resist getting the cute birdhouse add-on!  I mean really… I tried, but in the end gave in.

So the first thing I did was cut everything out and make a birdhouse… all off video (sorry).

It would work great on it’s own, But I figured I would turn this first one into a Magic Iris card.

Step by step instructions

Cut out the following shapes with your die cutting machine:

  • 3 rings

  • 3 stabilizers

  • 3 blades

Take the slot cutter (flux capacitor) and line it up on one of the rings. Hold it in place with some washi tape and run it through your die cutting machine.  It will create 3 slots and 3 stitched marked areas that are halfway between each of the slots.

Insert the tabbed ends of the 3 blades into the slots, and align the rest of the blade along the outer edge of the ring.

On the rounded end of each of the blades is a small x cut into the cardstock. Place a mini glue dot ( 3/16 in ) on each of the x’s.


Keeping the blades lined up (they should form a perfect circle matching the ring with the slot), place another ring (without slots) on top, adhering it with the glue dots you added.

Turn the rings over.

Add some tape runner adhesive to the ring (with slots), starting at each of the stitched markers and going in a straight line to the outer edge of the ring.


Add the stabilizers. Place the curved end of each of the stabilizers along the inner curve of the ring on the adhesive added.

Turn the rings back over.

I also cut out a couple of the rounded tab pieces in the set and glued them together for greater strength when pulling the tab to operate the Magic Iris.


Align the curved end of the rounded tab along the inner edge of the ring and just to the right of one of the stabilizers. Where the 2 cross, they should form an inverted V.  This is where you will adhere the rounded tab using a tape runner.

Next, place the third ring on top and add tape runner adhesive to the stabilizers.  You then gently hug each stabilizer around the top of this ring.  Don’t adhere it too tight.  If the end reaches the center of the ring, it’s too tight, and your Magic Iris may not work properly.

Now it’s time to test the mechanism and decorate our Magic Iris card.

Here are some photos of the finished card.


Thank you so much for dropping by.  I hope you enjoyed this project and would love to hear what you think of this card.

Please leave me a comment down below!


Be sure to check out my YouTube Channel, Blog, Pinterest, and Instagram for more inspirational projects.  I also have a fun Facebook Group where you can share your projects with other fantastic creators.  We would love to see what you create, so come join us!


Head back to the Dies R Us Blog tomorrow for more fabulous inspiration from the DRU Inspiration design team.


Be sure to check head over to Dies R Us Challenge Blog.  We love to see what you create, and this is a perfect place for you to share your creativity.  


PLUS, there is a new challenge theme offered on the 1st and 15th of each month, and one lucky randomly drawn winner will receive a $10 gift certificate to the Dies R Us Store.  


Thanks so much for stopping by. And remember, if I can make it, YOU CAN TOO!