Feb 26, 2021

Lawn Fawn Ocean Themed Shadow Box Card

Hey Friends! Amanda here and today, I have an Ocean themed Shadow Box card using Lawn Fawn products. I just love fun fold cards, don't you? And what I love even more is when I don't have to do a ton of measuring, folding and thinking when I make them! Lawn Fawn products make fun fold and interactive cards so easy!


As usual, I do have a video tutorial for you today. Below the video, I will have a couple more finished product pictures and below that I will have a supply list for you.


Supply List

Don't forget to come join in the fun at the Dies R Us Challenge Blog. There's a new challenge theme offered on the 1st and 15th of each month and one lucky randomly drawn winner will receive a gift voucher prize to the Dies R Us Store. For your convenience, all the important Dies R Us links are provided below.

https://blogger.googleusercontent.com/img/b/R29vZ2xl/AVvXsEjCjT8pw_L9T-z6-KjvbFtjxltch0jDrbOVSRoR7-pMeQw8lEYfIDENxvu0UYve6R3ZP9GqtyyTDEJbdtSMk3bGQBx_Y3u5-ayMxatDG7IHMgflmEHGKjuk1fXzqacoc_aa78anm5BPmKz1/s320/*logo%2Bcollage.pages.jpg

click below for:

STORE

CHALLENGE BLOG

FACEBOOK

INSPIRATION BLOG

FRIENDS OF DIES R US PINTEREST PAGE

Thanks for stopping by!

If you enjoyed my video/blog post today, I would greatly appreciate it if you followed me on social media.

YouTube: http://www.youtube.com/c/RiseandProcraftinate

Facebook: fb.me/RiseAndProcraftinate

Instagram: https://instagram.com/riseandprocraftinate

Pinterest: www.pinterest.com/RiseandProcraftinate


Feb 25, 2021

Sweet Tulip Fairy

Hi everyone, Steph Ackerman here to share a sweet fairy card today.


I started by placing the fairy stamp - Moments Like These - on a stamping platform because I wanted to add different colors to her.


Using the coordinating Fairy Cuts - Tulip Fairy - die cut her. There is just a perfect bit of white cardstock all around the die cut image.


Using Misty Morning background paper, ink Lavinia Fairy Words in VersaFine Clair Morning Mist Ink, stamp on scrap paper first , then stamp along the right side for a subtle effect. 


 Mat the panel with white cardstock, then add it to a blue card.   Place the Tulip Fairy in the left corner.  Using a glue pen, add dots of glue around the panel then pour on Fairy Hugs Silver Lightning Glitter.


Dies R Us Supplies:


click below for:

Feb 24, 2021

Floral Fan Congratulations

 Hello Friends,

Diane here to share with you some Dies R Us inspiration.  I have a lovely little floral fan card today.  This beautiful fan die can be used for any occasion including Birthdays, Mother's day, Sympathy, Thinking of you or maybe even a Wedding Invitation.  I used the beautiful "Floral Fan" die from Tutti Designs available now at Dies R Us.


The paper collection I used for this card is Ephemera Queen by Graphic 45 and the pretty little red flowers are from Little Birdie Crafts.  This card measures 4 1/4 X 5 1/2.  This is an A2 sized card. The sentiment "Congratulations" is from a "Lawn Fawn" stamp set available from Dies R Us.  A must have in your crafty stash.

Here is a close up of my card:


This is a quick and simple card to make.  All I did was select some back ground paper, cutting it a little smaller than my card front, glued it to the front of my card. Then I cut the fan die twice and adhered them together. I layered some solid blue cardstock behind the fan die and fussy cut it.  Then I added a border from the designer paper and adhered it to the bottom of the card.  I stamped my sentiment in black ink, cut it out, and added it to the card.  Then I just added some flowers, pearls and a bow.  This was a fun quick card to make.


Floral Fan Die by Tutti designs:  

https://www.diesrus.com/products/tutti-designs-dies-floral-fan?_pos=1&_sid=5b023d659&_ss=r


Scripty Sayings by Lawn Fawn:  

https://www.diesrus.com/products/lawn-fawn-scripty-sayings?_pos=5&_sid=a3f884ad8&_ss=r


Don't forget to come join in the fun at the Dies R Us Challenge Blog.  There's a new challenge theme offered on the 1st and 15th of each month and one lucky randomly drawn winner will receive a $10 gift certificate to the Dies R Us Store.  For your convenience, all the important Dies R Us links are provided below.


click below for:


Thank you for stopping by.

Be Blessed and Have a Great Day!


Feb 23, 2021

It's Cold Outside

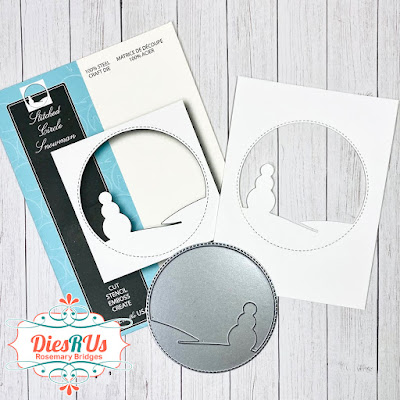
 Happy Tuesday everyone! How is everyone surviving the polar vortex that hit our country? I live in Oklahoma and it was soooooooo cold here! We are not equipped to handle days of snowy weather and below zero temperatures. I'm so thankful we didn't lose our electricity! When I saw this Memory Box die called Stitched Circle Snowman, I was inspired to create a winter shaker card. 


Let's get started!

 Step 1: I cut my white cardstock to 3.75 x 5. Then I laid the die on top of my paper and cut it out. I love this die because it adds a stitched circle border and just cuts out the center area leaving the entire card intact.

 
Step 2: I cut a clear sheet of acetate just a tad bit smaller than my card panel (3.5 x 4.75) and glued it on the backside of the card panel.
 
 
Step 3: Now, you will want to pick out your sentiment and stamp it before adding your foam tape to the back. I forgot to add the sentiment so my pictures are out of order. If you add your foam tape before you stamp your sentiment, then just be sure to reinforce the area you are going to stamp on with extra foam tape so it provides a firm surface to stamp on. I used the sentiment from Lawn Fawn's Winter Alpaca because it is definitely cold outside!
 

Step 4: Next, add your foam tape. You will want to add the foam tape close to the stitched circle border so your shaker elements stay within the circle area. Otherwise, they will fall below the snowdrift and you won't be able to see them.
 
 
Step 5: Next, cut a piece of decorative paper just a little smaller than your card panel so you can enclose your shaker pieces after you add them. 
 
 
Step 6: I framed the card with more decorative paper cut to 4 x 5.25. Then I adhered the entire thing to my card base which measure 4.25 x 5.5.
 
 
These are the products I used:

Don't forget to come join in the fun at the 
Dies R Us Challenge Blog.  There's a new challenge theme offered on the 1st and 15th of each month, and one lucky randomly drawn winner will receive a gift voucher prize to the Dies R Us Store.  For your convenience, all the important Dies R Us links are provided below.

Thank you for stopping by! Have a great week!

Feb 22, 2021

Amberly Floral


Hi everyone it’s  Monica Monday again and today I am sharing a card I made using one of the February 2021 new die arrivals.  Paper Rose "Amberly Floral Square." I took some metallic bronze paper and die cut for the card background. 


I then laid it over the card base using white cardstock.

I stamped the sentiment using AALL & Create "Blooming Poppies" stamp set.  I used black obsidian ink because I wanted a nice dark print. 
To add decor I added some flowers to give the card an overall elegant look and I hope everyone enjoyed my post for today!

Don't forget to come join in the fun at the Dies R Us Challenge Blog. There's a new challenge theme offered on the 1st and 15th of each month and one lucky randomly drawn winner will receive a gift voucher prize to the Dies R Us Store. For your convenience, all the important Dies R Us links are provided below.

https://blogger.googleusercontent.com/img/b/R29vZ2xl/AVvXsEjCjT8pw_L9T-z6-KjvbFtjxltch0jDrbOVSRoR7-pMeQw8lEYfIDENxvu0UYve6R3ZP9GqtyyTDEJbdtSMk3bGQBx_Y3u5-ayMxatDG7IHMgflmEHGKjuk1fXzqacoc_aa78anm5BPmKz1/s320/*logo%2Bcollage.pages.jpg

click below for:

STORE

CHALLENGE BLOG

FACEBOOK

INSPIRATION BLOG

FRIENDS OF DIES R US PINTEREST PAGE


Feb 19, 2021

Elegant Sympathy Card Using Scrapman & Spellbinders Dies

Hello! Amanda here and today, I am sharing a sympathy card. The card we all hate to have to send, but unfortunately, we all have to send them at some point in our cardmaking. I never keep any on hand, because, well, I really hate making them. So, I only make them when I need them. This way, I can usually make them to suite the person I am giving them to. This particular card, I don't know the recipient real well. She has dated my cousin for many years and married into the family 2yrs ago, but they have lived on the other side of the country most of that time. Her grandpa, unfortunately, died of Covid recently. So, I just went with simple and elegant.


As usual, I do have a video tutorial prepared for you. I will have more pictures and a supply list below that.

Here are some more finished product pictures.


Supply List

  • Scrapman - Frame Love


  • Scrapman - Rosebud


  • Spellbinders - Graceful Brackets
     - Unfortunately, Dies R Us doesn't have this die set in stock, but check out the other great Spellbinders dies they do have HERE You can also check out the other great edger dies they have HERE
  • VersaMark
  • VersaFine Clair - Nocturne
  • Simon Says Stamp - Detail White Embossing Powder
  • Gina K Designs - Vertical Greetings & Things
  • Unity Stamps - Mourning Dove
  • Craft Perfect - Specialty Card - Navy Toile
  • Paper Accents - Pearlized Garnet

If you enjoyed my video/blog post today, I would greatly appreciate it if you followed me on social media.

YouTube: http://www.youtube.com/c/RiseandProcraftinate

Facebook: fb.me/RiseAndProcraftinate

Instagram: https://instagram.com/riseandprocraftinate

Pinterest: www.pinterest.com/RiseandProcraftinate


Don't forget to come join in the fun at the Dies R Us Challenge Blog. There's a new challenge theme offered on the 1st and 15th of each month and one lucky randomly drawn winner will receive a gift voucher prize to the Dies R Us Store. For your convenience, all the important Dies R Us links are provided below.

https://blogger.googleusercontent.com/img/b/R29vZ2xl/AVvXsEjCjT8pw_L9T-z6-KjvbFtjxltch0jDrbOVSRoR7-pMeQw8lEYfIDENxvu0UYve6R3ZP9GqtyyTDEJbdtSMk3bGQBx_Y3u5-ayMxatDG7IHMgflmEHGKjuk1fXzqacoc_aa78anm5BPmKz1/s320/*logo%2Bcollage.pages.jpg

click below for:

STORE

CHALLENGE BLOG

FACEBOOK

INSPIRATION BLOG

FRIENDS OF DIES R US PINTEREST PAGE