May 29, 2020

Butterflies

Hello crafty friends,

Mary here today showcasing Lawn Fawn's Layered Butterflies and Spellbinders Sentiments Five die sets.


The Spellbinders "hello" is not currently available, but there are several other "hello" options.

Here's a quick video on how I created this card:


Don't forget to come join in the fun at the Dies R Us Challenge Blog.  There's a new challenge theme offered on the 1st and 15th of each month and one lucky randomly drawn winner will receive a gift voucher prize to the Dies R Us Store.  For your convenience, all the important Dies R Us links are provided below.


click below for:
FRIENDS OF DIES R US PINTEREST PAGE

Thanks for stopping by!

May 28, 2020

Happy Birthday

Hello Everyone.

It is Alycia from Let's Get Crafty.  I have been super busy creating cards.  We are still on lockdown. Next month will be Christmas cards.

So many people have been making rainbow cards. I found this way to create a rainbow without a rainbow die.  I used the Lawn Fawn Large dotted circle stackable.  I used Neenah white Cardstock 80lb.  Using Tim Holtz Distress ink, Barn red, Carved pumpkin and squeezed lemonade.  The nice thing about this is that you can have two or even four rainbows. Using the biggest stackable circle cut one out of white card stock so you can glue your circle onto to it.

After you ink and glue your circles back on the I used stickles on the rainbow and let it dry.


I decided we need clouds I used Cloudy Hillside Pop-up Add-on die from Lawn Fawn. This makes excellent clouds.  


I hope you enjoy this card I had so much fun with the rainbows.  I hope you try this technique.  It was so fun.  Everyone Stay Safe and take care.

I hope I've provided some inspiration for you to
play and create with your dies and we'd love for you 
to come and join in the fun at the Dies R Us Challenge Blog. 


There's a new challenge theme offered on the 1st and 15th of each month and one lucky randomly drawn winner will receive a gift voucher prize to the Dies R Us Store. 
For your convenience, all the important Dies R Us links are provided below.


click below for:

May 27, 2020

Happy Birthday Card!

Happy Wednesday, friends!

It's Nancy, from The Nickel Nook, back with a new project share!

Aren't dies wonderful?
They make it so fun to create a new project,
Each die has such a great variety of creative possibilities!

The featured die set on my card, the Petite Peony Cluster,
is one that I will be playing with often. 

Here's my card:


I began with a white A2 card base.
To that I added added the green designer paper.
I cut the brown print down to 4" x 5 1/4".
I then used the Tutti Designs - Nesting Stitched Ovals die to cut an oval from the center.
I cut a second oval from the script paper.
I adhered the brown print to the green background. 
Then I adhered the oval in place using foam tape. 
It is raised enough that you can get just a hint of the green around the edges.


I then cut two of the frame pieces from the Petite Peony Cluster die,
from some matching green cardstock. 
I adhered them in place on either side of the oval,
with half of the cut extending out from the oval. 

I then cut six of the single flowers, from the blue print designer paper. 
I shaped them, to add dimension, before adhering them in place. 
I then added a green rhinestone to the center of each flower. 


Finally, I die-cut the Happy Birthday from the Impression Obsession - Greetings Set.
These greetings are such a lovely font, and so intricate.
It's one of my "Must Have" sets!


 There you have it...my Happy Birthday card!
Thanks so much for stopping in today!
I'll be back next week with another fun project!

* * * * *

Dies R Us Product Used:


* * * * *
Don't forget to come join in the fun at the Dies R s Challenge Blog
 There's a new challenge theme offered on the 1st and 15th of each month 
and one lucky randomly drawn winner will receive a gift voucher prize to the Dies R Us Store.  
For your convenience, all the important Dies R Us links are provided below.


click below for:
FRIENDS OF DIES R US PINTEREST PAGE

Thanks for stopping by!

May 26, 2020

Hi Everyone! Luci here from My Crazy Craft Life, with some Sunshine and a Shaker! I used Jillibean Soup Hello Sunshine Set! Be sure to check out the video HERE for all the details!


The Hello Sunshine die from Jillibean Soup made it so easy to make a shaker card! For the inside sentiment I used My Favorite Things "You are my Sunshine" stamp!


Don't forget to come join in the fun at the Dies R Us Challenge Blog.  There's a new challenge theme offered on the 1st and 15th of each month and one lucky randomly drawn winner will receive a gift voucher prize to the Dies R Us Store.  For your convenience, all the important Dies R Us links are provided below.


click below for:

Thanks for stopping by!

May 25, 2020

Honoring the Red, White and Blue

Vicki here from He"artful" Validation...Today, we're celebrating Memorial Day here in the U.S.  It's a federal holiday honoring those in the military who sacrificed their lives while serving in the United States Armed Forces.  After the poem, "Flander's Fields" was written by a Canadian physician during WWI, poppies became a symbol of this holiday. So, I'm creating in red, white and blue today with a side of poppies!
I've used the following die cuts...
These three are available in the Dies R Us Store.


These die cuts are no longer in stock, but other items from the manufacturer are available.
Spellbinders Lacey Pennant Shapeabilities
Spellbinders Tags and Flags Shapeabilities
I have several paper collections in my stash that were perfect for the red, white and blue theme!
I just started cutting shapes with no design plans in mind....
The card base size for all of the cards is 4 1/2 x 4 1/2. 
After re-arranging for what seemed like hours, I came up with 4 different card designs in the red, white and blue color theme. 
Happy Retirement

Hello
Hugs
Truly Grateful

Using two different die cut sizes together allows for changing out colors and designs to create fabulous focal images.  I did this with both the postage stamp and star die cuts.
  
I hope my project has inspired you to use your die cuts or add some to your stash.
Stop by the blog tomorrow for more creative inspiration.

Don't forget to come join in the fun at the Dies R Us Challenge Blog.  There's a new challenge theme offered on the 1st and 15th of each month and one lucky randomly drawn winner will receive a gift voucher prize to the Dies R Us Store.  For your convenience, all the important Dies R Us links are provided below.


Thanks for stopping by!

Vicki 
He"artful" Validation of Vicki

May 22, 2020

Stamping With Dies

   Hello, Mandi here from MJ's Kraze blog. Today, I will be sharing with you how to create stamps with your dies. 
   All you need is some thin craft foam to create these foam stamps. I used these fun party icons by Frantic Stamper.
   With the foam die cuts, I attached them to a stamping block with a repositionable adhesive. When stamping a word make sure the word is backwards on the stamping block. Treat these like normal stamps. 
   This "Make a Wish" die is amazing since creates is an edger die so that means all those letters stay attached to the bottom part of the cardstock. 

Here is the end result. A custom stamp pattern paper card using dies. 
Dies R Us Product Used:


Don't forget to come to join in the fun at the Dies R Us Challenge Blog.  There's a new challenge theme offered on the 1st and 15th of each month and one lucky randomly drawn winner will receive a gift voucher prize to the Dies R Us Store.  For your convenience, all the important Dies R Us links are provided below.


Click below for:
FRIENDS OF DIES R US PINTEREST PAGE

Thanks for stopping by!

May 21, 2020

Geometric Art and Partial Die Cutting

Howdy Y'all!

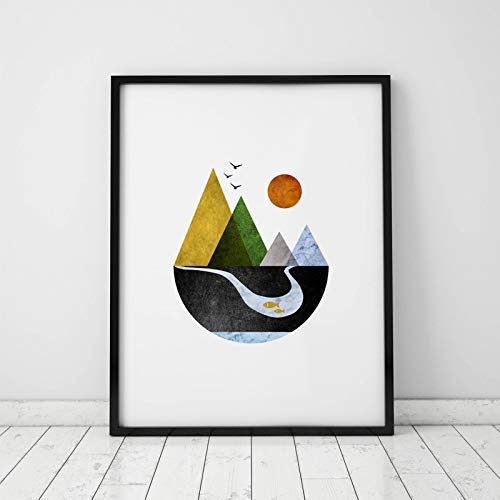
Mary Ellen here from Creative Time With ME! In the Online Card Class Spring Card Camp 2 that I am taking we were encouraged to create a card using die cuts or stamps in an unconventional way. But I needed a bit of inspiration to do that. Which is how I found this art piece on Amazon.


This is my interpretation of the piece.

Paper: CTMH White DaisyBlackPewter, Juniper, GlacierGoldrushCanary
Accessories: Bic Mark-it Ultra Fine Point Tuxedo Black, Spellbinders Nested Pennants, QuicKutz Nesting Circles

I have created a video to share with you on how I created this card!


Supplies used (not listed under the card picture)
Tim Holtz Scissors & Snips - Kushgrip Non-Stick Serrated Scissors Mini Snips 5"
Fiskars 12 Inch Portable Rotary Paper Trimmer
Ad Tech Crafter's Tape

Some of the products used are no longer available. But here are similar items you can find in the Dies R Us site.


Don't forget to come join in the fun at the Dies R Us Challenge Blog.  There's a new challenge theme offered on the 1st and 15th of each month and one lucky randomly drawn winner will receive a gift voucher prize to the Dies R Us Store.  For your convenience, all the important Dies R Us links are provided below.


click below for:
FRIENDS OF DIES R US PINTEREST PAGE

Thank you for stopping by!

Stay Healthy! 

Stay Safe!

Stay Crafty!


May 20, 2020

Pivot Pop Card


Hi everyone!  Monica from HeartcraftPaper here and I'm so glad you could make it back to visit the blog.  Today I have a wonderful spring inspired card.  The image that gave me the idea for this card is Lena, Floral Wreath, which can be found at the sister store Didi Crafts.  I loved all the flowers in her hair and felt that roses would be my theme. 


It was such a lovely image, but delicate and small so I wanted it to really pop!  Literally!    I wanted a rose, something to make it interactive and a statement piece.  So I found three dies that would set my image apart.


Supplies:

Lena, Floral Wreath 
Lawn Fawn: Scalloped Rectangle Stackables
A2 Card Base
Distress Ink: Vintage Photo
Black Cardstock
Fuchsia Cardstock
Green Cardstock
Liquid Glue
Scissors
Double Sided Tape
Pencil


 Let's Get Crafty!

Color Theme:  Reds, Fuchsia, Green & Black

Start with your coloring.  
Skin: E0000, E00, E02, E11, E93
Lips: R32
Flowers: YR18, R14, R29, YG63
Dress: C2, C4, C6, C8, C10
Trim/Boots: R14, R37


Start building up your card. 

You  will need to die cut your flowers first.  Use the Cheapo Die: Rose, as well as black and fuchsia cardstock for this.  First die cut the rose outline out in black (7x's).  Then place the  die cutting side down on the fuchsia cardstock and trace all around.


Now that you have your guide for the rose all penciled in adhere the black outline inside of the tracing.  You will then cut all along the outside of the black outline.  I would have used a quilting technique, but this particular dies has lines that do not fully close the image. 


With the roses done, cut out your leaves.  I did two for each flower, so a total of 14. 


Let's begin working on the sentiment.  For this cut out a 1/2" strip of white cardstock.  I stamped out my sentiment using individual wood block letter stamps I had found for $1.   I stamped out, "A Note To Say..."  and made a fishtail banner at the and.   I then crumpled up the banner some and used Vintage Photo Distress Ink to give the paper more of an aged and distressed look.


Now you will begin to assemble the background to the cover.  I chose a wonderful rose pattern that really fit my concept.  Using Lawn Fawn's Scalloped Rectangle Stackable Dies I die cut black cardstock (4 x 5 1/4") and the floral print (3 9/16 x  4 3/4").  Next adhere the floral print to the black background using double sided foam tape and set aside for later.


For the sentiment I decided on a speech bubble because the stamped image gave me that feel of a young lady raising her hand and waving and saying, "Hi!"  I began by die cutting out the speech bubble in white cardstock and the "hi" in black.  Then embossed the speech bubble with a polkadot pattern.  Using a glue pen adhere the sentiment to the bubble.


Now your ready to die cut the pivot pop-up mechanism.  I used craft card for the base (1) and a beautiful foil polkadot paper (2) that i feel works well with florals. 


You will fold away from you in a mountain fold. Next you will fold the diagonals away from you (valley fold).  This will create a frog like image. 


The cut has a hole at the center that allows you to align the fold of the cut along the fold of the card.  I maintained in placed and folded down one side to add glue onto the triangular section and repeated it by folding upwards on the other side. 


Using double sided tape add to both pieces along the little tab.  alight the tabs so that one is at the top and the other at the bottom and attache.  Once attached you will fold in the middle away from you and the two sides towards you.


Align the pop-up base in the center by using the hole in the mechanism as a guide.  Then fold in the sides to reveal the two  tabs you will apply glue away from the fold.  Allow to dry.


While the glue is drying on the inside you can work to apply your card background on the front using liquid glue or if you prefer, double sided tape.


Using one of the flowers created earlier you will adhere a set of leaves to it along the right side. 


This is how it should appear once complete.


Adhere the rose by using foam tape on the back.  Make sure to use enough to add support across the whole back of the rose. 


Now we need to add the sentiment.  I used foam tape on the back of the sentiment and glue on a portion that was placed over the rose, to attach.  I adorned using a larger pearl dot. 


Almost done!  All that needs to be done now is the arrange and glue down the decorations inside.  I fussy cut my image first. 


I arranged my items before gluing down.  This way I have an idea as to where I want everything to go. 


Now it's time to start gluing down my items.  I avoided setting any items over the folded sections and I opened and closed the card to make sure I arranged the flowers in a way that it would not peek out over the edge of the card when closed.  I also added some flowers to the background so that the inside looks like one big bouquet.   


  In the end this is what it will look like, both open and closed.


Thank you all for visiting the blog and we hope to see you back again!

XOXO - Monica


Don't forget to come join in the fun at the Dies R Us Challenge Blog. There's a new challenge theme offered on the 1st and 15th of each month and one lucky randomly drawn winner will receive a gift voucher prize to the Dies R Us Store.  


 For your convenience, all the important Dies R Us links are provided below.

click below for: