Showing posts with label Tutti Designs. Show all posts

Sep 7, 2021

Happy Fall Ya'all!

Happy Tuesday everyone!  Lisa here, sharing a fall themed card with lots of shimmer!  I combined products from Frantic Stamper, Lawn Fawn and Tutti Designs to make this card!


I started my project by choosing a fall-themed background die by Frantic Stamper called Swirling Leaves Stitched Background.  It's 3.5" by 5" so I ran it through my die cut machine twice on my 6.75" x 4.75" mat.  You can't even see the line between the two, the die lines up beautifully.


I decided I wanted to use a stamp since September is National Stamping Month, so I pulled out my Lawn Fawn Before 'N Afters stamp set.  


I chose to pair the stamp set with one of my favorite die sets, Tutti Designs Cross Stitch Banners.  Unfortunately, I somehow deleted the photos I took of the stamping, coloring and inking processes.  My apologies!  I do have a photo of the card before I adhered it together and embellished it.


I felt it needed something so I added the stones.

I hope this card inspires to make a fun fall card with any of the fun and amazing dies that Dies R Us carries.  --Lisa

Products Used:


Don't forget to come join in the fun at the Dies R Us Challenge Blog. There's a new challenge theme offered on the 1st and 15th of each month and one lucky randomly drawn winner will receive a gift voucher prize to the Dies R Us Store.  


 For your convenience, all the important Dies R Us links are provided below.


click below for:

STORE

CHALLENGE BLOG

FACEBOOK

INSPIRATION BLOG

FRIENDS OF DIES R US PINTEREST PAGE


Aug 27, 2021

merry Christmas in non-traditional pink!

Hello, crafty Dies R Us fans! Leslie here from Love To Scrap 2 and I’m stoked to be back on the blog today with another awesome DT inspiration project! I created a Christmas card in the non-traditional color of pink featuring the gorgeous Tutti Designs Ornament Circle! I love a pink Christmas card, and when you have the perfect die paired with the perfect pink sparkling paper, you have the perfect Christmas card! ;)


This was an easy one so let's go for it!

1. Cut the Tutti Designs Ornament Circle from pink sparkling paper and set aside.


2. Cut a square top-folding card base and an inside layering panel from white cardstock. Cut front and inside layering panels and an inside embellishing strip from pink cardstock. Cut an inside embellishing strip from the pink sparkling paper. 


3. Stamp the front sentiment in white ink in the lower right corner of the pink front layering panel. Stamp the inside sentiment in pink ink on the inside white layering panel.


4. Score diagonal lines every half-inch in both directions on the pink front layering panel and adhere it to the front of the card base. Adhere the pink sparking paper and pink cardstock strips to the inside white panel and layer it on the pink layering panel. 


Here's a close-up of the front panel with the scoring. Makes for a great handmade background!


5. Adhere the die cut to the front of the card with spray adhesive. I find that spray adhesive is much easier than trying to dab or apply lines of glue on this kind of die cut. 


6. Apply tiny gemstones inside the circle and larger ones in the upper right and lower left corners. Adhere the inside panel to the inside of the card base, and your beautiful non-traditional color Christmas card is complete! ;)


Dies R Us products used:
Tutti Designs Ornament Circle

Don't forget to come join in the fun at the Dies R Us Challenge Blog. There's a new challenge theme offered on the 1st and 15th of each month and one lucky randomly drawn winner will receive a gift voucher prize to the Dies R Us Store. For your convenience, all the important Dies R Us links are provided below.

https://blogger.googleusercontent.com/img/b/R29vZ2xl/AVvXsEjCjT8pw_L9T-z6-KjvbFtjxltch0jDrbOVSRoR7-pMeQw8lEYfIDENxvu0UYve6R3ZP9GqtyyTDEJbdtSMk3bGQBx_Y3u5-ayMxatDG7IHMgflmEHGKjuk1fXzqacoc_aa78anm5BPmKz1/s320/*logo%2Bcollage.pages.jpg

click below for:

STORE

CHALLENGE BLOG

FACEBOOK

INSPIRATION BLOG

FRIENDS OF DIES R US PINTEREST PAGE


Thanks so much for stopping by today - we'll see you next time!

Scrappy hugs,
Leslie


Aug 10, 2021

A Fairy Hello

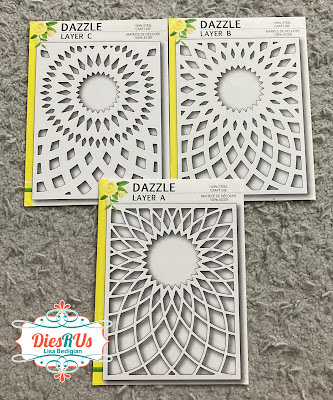
Happy Tuesday everyone!  Lisa here, with a fun fairy hello card.  The fairy isn't even the star of the show, the layered background dies from Birch Press are!!!  Check out how Dazzle-ing they are.


Aren't they amazing?  These are the Birch Press Dazzle layering dies.  You get a set of three and omg they're all fabulous because yes, you can use them individually, but layered is pure papery greatness!!


So let me tell you how this card even came to be.  I was going to do something completely different but I got some new cardstock and when I saw these three colors together, the card just kind of blew up from there.


I found that the layers were missing something, so I cut the top out of black glitter paper instead of the textured cardstock and added it on top for dimension.  I don't find the centers of these dies really need a lot of adhesive, so instead of putting adhesive on the paper before cutting the dies, I just put Scor Tape all around the frame and a few pieces in the center.  Easy Peasy!


I wanted to add a fairy, so I pulled out my Tutti Designs Mini Fairies set.  I had a hard time deciding which one to use and where to put him or her.


My card needed a sentiment so I pulled out an oldie but goodie, Lawn Fawn Scripty Hello.  I decided here to cut off the flowers in the hands of the fairy on the left.  I wanted it to look like the fairy was holding the greeting.


The final finishing touch it needed was some bling!  I used three sizes of clear AB gems to accent the sentiment on the card.  I love how it came together.

I hope this card inspires to check out all the amazing Birch Press layering dies that Dies R Us carries.  They're so fun and versatile.  --Lisa


Products Used:


Don't forget to come join in the fun at the Dies R Us Challenge Blog. There's a new challenge theme offered on the 1st and 15th of each month and one lucky randomly drawn winner will receive a gift voucher prize to the Dies R Us Store.  


 For your convenience, all the important Dies R Us links are provided below.


click below for:

STORE

CHALLENGE BLOG

FACEBOOK

INSPIRATION BLOG

FRIENDS OF DIES R US PINTEREST PAGE


Jun 25, 2021

All occasion card for that special cat lover!

Hello, crafty Dies R Us fans! Leslie here from Love To Scrap 2 and I’m thrilled to be back on the blog today with another awesome DT inspiration project! I created a super sweet CAS kitty card featuring the most adorable Tutti Designs Cat In Basket die paired with some pink enamel hearts and iridescent bling! Perfect for a cat lover! Wouldn't it be fun to die cut a bunch of these cats in different colors to create a set to give as a gift?! 


This is an easy one so let's get started!

1. Using the Tutti Designs Cat In Basket die, cut the cat in basket from pink cardstock.


2. Cut a standard A2 size side-folding card base from ivory cardstock along with a narrow embellishing strip for the front from pink cardstock. Also cut ivory and pink layering panels and embellishing strips for the inside. Round the bottom right corner of the card base and layers.


3. Adhere the cat die cut and embellishing strip to the front of the card base. Adhere the inside ivory and pink layering panels together and add the embellishing strips. 


4. Stamp the front and inside sentiment in pink ink.


5. Add two pink enamel hearts to finish the front. Adhere the layered panel to the inside of the card base. 


Dies R Us products used:
Tutti Designs Cat In Basket die
Versamark
Crystal Katana Pick Up Tool

Don't forget to come join in the fun at the Dies R Us Challenge Blog. There's a new challenge theme offered on the 1st and 15th of each month and one lucky randomly drawn winner will receive a gift voucher prize to the Dies R Us Store. For your convenience, all the important Dies R Us links are provided below.

https://blogger.googleusercontent.com/img/b/R29vZ2xl/AVvXsEjCjT8pw_L9T-z6-KjvbFtjxltch0jDrbOVSRoR7-pMeQw8lEYfIDENxvu0UYve6R3ZP9GqtyyTDEJbdtSMk3bGQBx_Y3u5-ayMxatDG7IHMgflmEHGKjuk1fXzqacoc_aa78anm5BPmKz1/s320/*logo%2Bcollage.pages.jpg

click below for:

STORE

CHALLENGE BLOG

FACEBOOK

INSPIRATION BLOG

FRIENDS OF DIES R US PINTEREST PAGE


Thanks so much for stopping by today - we'll see you next time!

Scrappy hugs,
Leslie


Jun 22, 2021

Coffee = A Good Day

Good Tuesday morning!!  Lisa here with a caffeine fueled all-occasion card.  It's funny because I LOVE coffee candy and ice cream and cakes but I don't actually drink it.  I make a lot of coffee-themed projects, but I think the cool thing about this Tutti Designs die in particular is it can be a coffee cup or a tea cup.  I'll admit to drinking copious amounts of tea daily, both iced and hot.  Caffeine makes every day better, right? 


I started my card by cutting the Tutti Designs Have a Good Day out of adhesive foil.  I like the adhesive foils and vinyls cause it saves me a step with fancy die cuts.

I knew I wanted the cup die cut on a circle, so I took a scrap of purple cardstock and laid my circle die on it before adhering the coffee cup.  That way, I don't have to worry about centering my die cut image onto the circle, I can tape my die in place around the cup once it's adhered. It's sort of like cheating, but it keeps me from ripping my paper when I put the cup down crooked and have to pull it up and start over.


When I first cut the bottles out, I decided I wanted to fill in all the die cut holes, so I glued them to foil cardstock with Bearly Art glue and fussy cut around them.


I still had one little area where my vinyl wouldn't lay straight, so I positioned one of my stones over it to hide my mistake 😎


I thought the card was missing something so I cut a couple of the Tutti Designs Cross Stitch Banners out of foil scraps.  Little banner accents always tie everything together.

I know I'm not the only one who needs caffeine to fuel her mornings!  Hopefully this inspires you to make some caffeine themed creations too. --Lisa

Products Used:


Don't forget to come join in the fun at the Dies R Us Challenge Blog. There's a new challenge theme offered on the 1st and 15th of each month and one lucky randomly drawn winner will receive a gift voucher prize to the Dies R Us Store.  


 For your convenience, all the important Dies R Us links are provided below.


click below for:

STORE

CHALLENGE BLOG

FACEBOOK

INSPIRATION BLOG

FRIENDS OF DIES R US PINTEREST PAGE


Jun 21, 2021

Rose Frame

 Hi everyone today I am here sharing a card I made using the Rose Frame die from Tutti Designs.  A gorgeous piece that is perfect for a card front.

CARD BASE
  • I diecut the frame using silver foil paper which really made the frame pop off the page. Such a gorgeous die with some intricate cuts. 
  • Next I used a piece of white cardstock to mat the foil paper over and stamped and sentiment in the center 

ADDED ELEMENTS

  • To complete my card I added some handmade foamiran flowers just to give the card some added flair

Don't forget to come join in the fun at the Dies R Us Challenge Blog. There's a new challenge theme offered on the 1st and 15th of each month and one lucky randomly drawn winner will receive a gift voucher prize to the Dies R Us Store.  


 For your convenience, all the important Dies R Us links are provided below.

 click below for:

STORE

CHALLENGE BLOG

FACEBOOK

INSPIRATION BLOG

FRIENDS OF DIES R US PINTEREST PAGE


Jun 4, 2021

Let's make a Christmas trifold window card!

Hello, crafty Dies R Us fans! Leslie here from Love To Scrap 2 and I’m stoked to be back on the blog today with another awesome DT inspiration project! I created a fun trifold window card featuring the amazing Birch Press Design Wreath Layer Set as the focal, along with a sentiment and bow from the Sizzix Christmas Ribbon Thinlits, some pretty coordinating Christmas papers, and lots of bling. Seems I'm in Christmas mode all year long so it's definitely not too early to get started on those cards!


Okay, let's do it up!

1. Using the Birch Press Design Wreath Layer Set, die cut the wreath from dark green cardstock for Layer A, light green cardstock for Layer B, white cardstock for Layer C and red cardstock for Layer D, and assemble it. Using the Sizzix Christmas Ribbon Thinlits, die cut the sentiment and bow from red cardstock with red foil cardstock bow loops and tails. 


2. Cut a standard A2 size top-folding card base and layering panel from white cardstock, a folded panel for the inside cut from dark green cardstock, a layering panel and embellishing strip for the front along with a narrow embellishing strip for the inside cut from red cardstock, diagonally-cut glitter and patterned paper pieces for the front along with embellishing strips for the inside. 


3. Adhere the dark green cardstock folded panel to the inside of the card base with the fold at the bottom. Open it up, adhere the white cardstock layer, and embellish it with the embellishing strips. Add the die cut sentiment. 


4. Adhere the patterned papers to the red cardstock panel, add the diagonal embellishing strip, and then die cut a large circular aperture in the layers with a Tutti Designs Dotted Nesting Circle die. Trace the circular aperture on the front flap and then cut a slightly larger circular aperture on the front flap and adhere the layered panel to it. Add the bow to the bottom of the aperture. 


5. This is what the trifold card should look like so far.


6. Fold the bottom panel upwards into the card base, fold down the top flap, and adhere the wreath focal into the opening. Add a stamped sentiment, and then add tiny clear gemstones to the wreath and some larger ones to the diagonal strip, along with a large red gemstone in the center.


Dies R Us products used:
Birch Press Design Wreath Layer Set 
Sizzix Christmas Ribbon Thinlits
Tutti Designs Dotted Nesting Circles

Don't forget to come join in the fun at the Dies R Us Challenge Blog. There's a new challenge theme offered on the 1st and 15th of each month and one lucky randomly drawn winner will receive a gift voucher prize to the Dies R Us Store. For your convenience, all the important Dies R Us links are provided below.

https://blogger.googleusercontent.com/img/b/R29vZ2xl/AVvXsEjCjT8pw_L9T-z6-KjvbFtjxltch0jDrbOVSRoR7-pMeQw8lEYfIDENxvu0UYve6R3ZP9GqtyyTDEJbdtSMk3bGQBx_Y3u5-ayMxatDG7IHMgflmEHGKjuk1fXzqacoc_aa78anm5BPmKz1/s320/*logo%2Bcollage.pages.jpg

click below for:

STORE

CHALLENGE BLOG

FACEBOOK

INSPIRATION BLOG

FRIENDS OF DIES R US PINTEREST PAGE


Thanks so much for stopping by today - we'll see you next time!

Scrappy hugs,
Leslie