Showing posts with label Elizabeth Craft Designs. Show all posts

Aug 11, 2021

Seychelles Card

 Hello Friends,

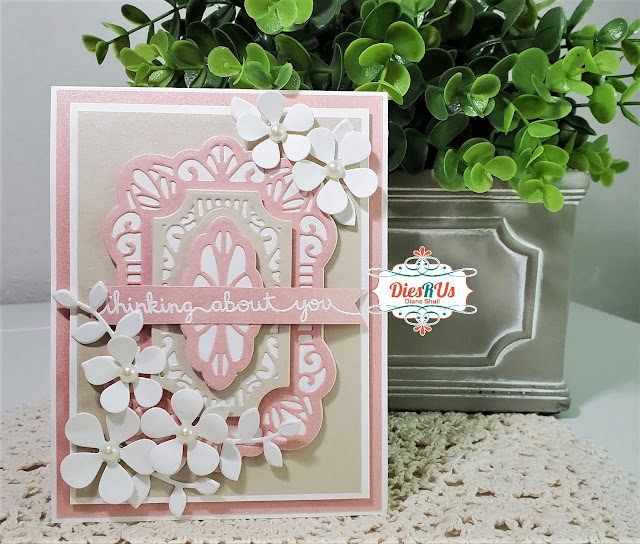
Today I have an elegant pink and white "thinking of you" card to share.  This card was created using papers from Michaels and dies from Dies R Us.  The focal die is from Creative Expressions by Sue Wilson and it's called Seychelles (kind of like Sea Shells).  It's from the Indian Ocean Collection. 

 Come take a look!


Card Tutorial:

I began with a card base.  White 110 lb cardstock measuring 4 1/4 X 11, score it in half at 5 1/2.

Next decide on the colors to use.  I chose metallic pink, metallic vanilla and white cardstock from Michaels's Art & Crafts Store.

Next cut out the dies using Creative Expressions; Indian Ocean Collection - Seychelles.  I used the largest two and the smallest two dies, cut them out in pink metallic papers.  Then the middle two dies, cut them in vanilla metallic paper.


Using the outline dies, I cut the shadow layers from 65 lb white cardstock.


In this photo you can see each layer, the white shadow to the pink large die cut, the white to the inner vanilla die cut, and the white shadow layer to the smallest decorative die cut.


Adhere each metallic layer onto the white shadow layer.  As seen above.

Next stack each layer using foam squares or dimensional dots, placing the smallest die onto the next larger die until you have a Seychelles medallion for the focal of your card.


Next cut your background papers from the two colors you chose from. 
Cut them a slight bit smaller than your base card.


Then add foam to the smallest layer.  This will add additional dimension to the card.


Next cut out the flowers using the Elizabeth Craft designs, #1029-Bunch of Flowers 3 die using 65 lb white cardstock.  Then cut the leaves out of white cardstock using Karen Burnistion #1059-Autumn Elements.


In the photo above, you can see the Seychelles die all put together, the base layers and the white die cut flowers.

Adhere the base layers together to your liking, then add the completed Seychelles die cut to the front of the card.

At this point you may shape the flowers and leaves with an embossing tool or leave them as is.
Set them aside. We will add them to the card soon.

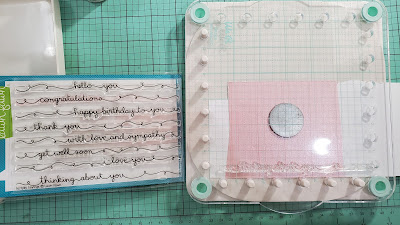
Lets work on the sentiment:  You may add any sentiment you like.  The stamp set I used has many options to choose from.  I used the Scripty Sayings by Lawn Fawn.


Choose your saying and stamp your sentiment with VersaMark ink.  This is a clear ink that allows you to use embossing powder to stamp and enhance the look of your sentiment.  I used a stamping platform in case I wanted to stamp my image multiple times for a more bold appearance.


Here I am adding the white embossing powder by Zing.


Below, I am using a heat tool to warm up the embossing powder.  This leaves a raise image and adds additional texture to the card.


Next, cut the sentiment into a strip.  I added fish tails to the right hand side of mine.


Putting it all together:  


The next step is adhering all the elements together onto the front of the card.   Add the sentiment strip using pop dots and glue.  Add leaves and the flowers using additional pop dots for more dimension.  Add rhinestones or pearls into the centers of the flowers for more bling.

Here is another look at the finished card.  I hope you are inspired today.  Thank you.


Products used:


This was such a Fun project.  I hope that you will give it a try. Be sure to visit Dies R Us for this and many more fantastic dies and stamps for all your crafty crestions.


Don't forget to come join in the fun at the Dies R Us Challenge Blog. There's a new challenge theme offered on the 1st and 15th of each month and one lucky randomly drawn winner will receive a gift voucher prize to the Dies R Us Store.  


For your convenience, all the important Dies R Us links are provided below.


click below for:

STORE

CHALLENGE BLOG

FACEBOOK

INSPIRATION BLOG

FRIENDS OF DIES R US PINTEREST PAGE


Jul 30, 2021

This whimsical guy gives some good birthday advice!

Hello, crafty Dies R Us fans! Leslie here from Love To Scrap 2 and I’m thrilled to be back on the blog today with another awesome DT inspiration project! I created a fun birthday card featuring the Elizabeth Crafts Jungle Leaves Die Set which paired perfectly with the whimsical Chikoo stamp set in my stash! I originally was thinking child birthday (specifically one of our youngest grands) but I know some adults that would love it!


This is a clean and simple design, so let's get started!

1. Cut a standard A2 size top-folding card base and front layering panel from white cardstock along with dark green front and inside layering panels, and round the bottom right corner of each. Cut embellishing strips for the inside from medium and dark green cardstock. Finally, using the Elizabeth Crafts Jungle Leaves Die Set, cut some jungle leaves from medium and dark green cardstock. 


2. Stamp the image in brown ink on the white front layering panel and color it with alcohol markers.  Stamp his right hand a second time on a piece of scrap white cardstock, color it and fussy cut it, and set it aside. Layer the jungle leaves die cuts together and adhere them to the panel. Using the Crystal Katana Pick-Up & Glue Tool, paper-piece the tiny little hand set aside earlier so it looks like he's holding onto the vine. This tool is amazing for maneuvering small paper-pieced items into place! Mask his left hand, stamp the bananas in brown ink, and color them with alcohol markers. Layer the panel onto the dark green cardstock layer. 


3. Stamp the front and inside sentiments in brown ink. Adhere the embellishing strips on the left side of the inside panel, and stamp some bananas in the lower right corner in brown ink and color them to match those on the front. Adhere the panels to the front and inside of the card base, and you're done! Super cute!


Dies R Us products used:
Elizabeth Crafts Jungle Leaves Die Set
Crystal Katana Pick-Up & Glue Tool 

Don't forget to come join in the fun at the Dies R Us Challenge Blog. There's a new challenge theme offered on the 1st and 15th of each month and one lucky randomly drawn winner will receive a gift voucher prize to the Dies R Us Store. For your convenience, all the important Dies R Us links are provided below.

https://blogger.googleusercontent.com/img/b/R29vZ2xl/AVvXsEjCjT8pw_L9T-z6-KjvbFtjxltch0jDrbOVSRoR7-pMeQw8lEYfIDENxvu0UYve6R3ZP9GqtyyTDEJbdtSMk3bGQBx_Y3u5-ayMxatDG7IHMgflmEHGKjuk1fXzqacoc_aa78anm5BPmKz1/s320/*logo%2Bcollage.pages.jpg

click below for:

STORE

CHALLENGE BLOG

FACEBOOK

INSPIRATION BLOG

FRIENDS OF DIES R US PINTEREST PAGE


Thanks so much for stopping by today - we'll see you next time!

Scrappy hugs,
Leslie


Jul 8, 2021

Thinking of You Birdie Card


SQUAWK! Today I am excited to share this cute birdie "Thinking of You" card I created using Elizabeth Craft Design Parrot Die  


This little guy was so fun! and being a birdie momma of a green quaker parrot I knew I had to have this die! 

To recreate this card you will need:

Die R Us Supplies

Elizabeth Craft Design Parrot Die  

Frantic Stamper Elementals #14 Scalloped Square Basics

Altenew Heartfelt Sentimental Stamps.

Other Supplies

Card stock - green plaid, green dot, green squares, yellow embossed, white; black Nuvo drops; ink; 5 1/2 inch card base

Creating your card

Start by die cutting your Elizabeth Craft Design Parrot Die   from your card stock. 

If your plan and layout out your dies you can cut multple dies and colors at the same time! 

Assemble your parrot's head.   


Assemble the parrot's  body. 

Add black Nuvo drops (or die cut eyes) to finish your parrot. 

Cut a 5 1/4 inch square of green plaid paper and adhere to your card base. Die cut scalloped square from Frantic Stamper Elementals #14 Scalloped Square Basics using white card stock. The Scalloped square die cuts a frame and a stitched square all in one cut! 


Adhere die cut frame to your card. 


Stamp "thinking of You" sentiment from the Altenew Heartfelt Sentimental Stamps. This set has so many great sentiments! 


Adhere your stamped square to your card. 


Finish your card by adding your assembled die cut parrot! 


Don't forget to come join in the fun at the Dies R Us Challenge Blog. There's a new challenge theme offered on the 1st and 15th of each month and one lucky randomly drawn winner will receive a gift voucher prize to the Dies R Us Store.  


 For your convenience, all the important Dies R Us links are provided below.


click below for:

STORE

CHALLENGE BLOG

FACEBOOK

INSPIRATION BLOG

FRIENDS OF DIES R US PINTEREST PAGE


Thanks for stopping by


Nov 11, 2020

Christmas Joy

 Hello Friends,

Diane here to share with you my next Die R Us design team card.  Christmas is coming up fast and it's time to get started on those cards, boxes and tags.  Today I created a pretty Christmas "Joy" card in traditional Christmas colors.


Christmas Joy


Card Instructions:


This card measures 5x7. Using the Creative Expressions dies by Sue Wilson, from the Gemini dies collection "Lyra", I place the die on the front right-hand side panel and ran it through my die cutting machine.  Then I took a piece of 65lb red card stock and cut out a panel using the matching border die.  I wanted the red to show through the cuts on the front panel of my card.  I was careful to cut the red to look nice on the inside of my card.

Next, I cut a piece of 65lb white cardstock measuring 3 1/2 x 6. I took the opposite border die, and cut out the right side. Then I cut a piece of red cardstock to shadow my border.  Next I carefully cut the panel to fit the front of my card.

Then I took my Tutti "Joy" dies and cut one set in red and another in green.  I wanted the Joy to be two colors, so I carefully cut away the letters in the green. I just wanted the holly vine left.  Then I glued the vine onto my red letters.  Next, I centered the letters onto the front card panel and glued them down. I then popped up the joy panel onto the front of my card using foam dots.

Then using the Elizabeth Craft, Bunch of Flowers 3 dies I made some small poinsettias.  This dies set has three style of flowers. The first one pictured on the packaging in the darkest purple is best suited for a poinsettia flower.  Selecting the die, I cut out the flower 3 times. I only used the two smallest flower cuts. I place the 3 large flowers in a bag to use on another project.  Next, I shaped my flowers, assembled them and glued in a yellow stamens in the center of each bloom. Trimmed the stem of the stamens and hot glued my poinsettias onto the front of my card.

I wanted the back of my card to balance with the weight of the front of my card, so I cut two white cardstock panels measuring 4 3/4 x 6 3/4. I took one of them and glued it to the inside of my card, then I glued the other one to the back of the card.  This way my card is balance and will stand upright.  I hope that you will give this one a try.


Supplies:

Now Let's take a look at the supplies I use for this lovely Christmas card.


Dies that I used:

Tutti Designs, Joy-463:

Creative Expressions, Sue Wilson, Gemini Dies - Lyra:

Elizabeth Craft Designs, 1029-Bunch of Flowers 3:


I hope I was able to inspire you today. Now it's your turn. Go get those supplies and get your craft on.

Have a fabulous day!

Blessings and Hugs,


Don't forget to come join in the fun at the Dies R Us Challenge Blog.  There's a new challenge theme offered on the 1st and 15th of each month and one lucky randomly drawn winner will receive a $10 gift certificate to the Dies R Us Store.  For your convenience, all the important Dies R Us links are provided below.