Showing posts with label #cardmaking. Show all posts

Mar 5, 2021

It Almost Feels Like Spring

 Hello crafty friends,

Mary back with my first March post.  After a very snowy and cold February, I'm so glad for the feel of Spring we have been enjoying the last several days.  I think my card below gives off a flesh Spring feel with the help of the following Poppy dies:  Adriana Square Frame and Whittle Birds.

This card looks so intricate, but it so easy to make.  I created a slim card measuring 8" x 3.80" and covered the card front using two die cut Adriana Square Frames, which I first covered with double sided tape before die cutting them.  The Adriana Square Frame measures 4" x 4" so only a tiny bit of overhang required trimming off on the sides.  Next, I die cut the Whittle Birds from pattern paper.  Some of the Whittle Birds I placed down with foam tape for dimension and some flat.  I kept the windows blank of sentiments until I decide what to use the card for, but I kind of envision the word "just" die cut in the top window and "because" in the bottom window.   

Thanks for stopping by.  To visit my personal blog just clink on my name Mary Moisan

Until next time... Take care. 


Don't forget to come join in the fun at the Dies R Us Challenge Blog.  There's a new challenge theme offered on the 1st and 15th of each month and one lucky randomly drawn winner will receive a gift voucher prize to the Dies R Us Store.  For your convenience, all the important Dies R Us links are provided below.


click below for:

Jan 15, 2021

More HAPPY New Year Cards

 Hello crafty friends,

Since we're still in January and I feel it's totally acceptable to wish people "HAPPY NEW YEAR" throughout the month of January, I'm back with two more "HAPPY NEW YEAR" cards today. 


For the above card I used Grand Hour Glass die by Poppystamps and the Roman Clock by Frantic Stamper.  The Roman Clock is not currently available, but the IO Clock Face die is.  

I started by die cutting the clock and using it as a stencil over my card front.  Next, I die cut the body of the hour glass to create my shaker window.  I backed the window with acetate and added tiny gun metal and black star sequins.  I also added a hand written "HAPPY NEW YEAR" message inside the hour glass shaker.  Once my shaker card front was attached to my card, I glue sections of the inked clock to the card, overlapping the hour glass in some places.


I stayed with hour glass theme, this time using the Small Hour Glass by Poppystamps and the Happy Happy Happy by Frantic Stamper. 

I created five small hour glass shakers and top the card with the Happy Happy Happy sentiment.  


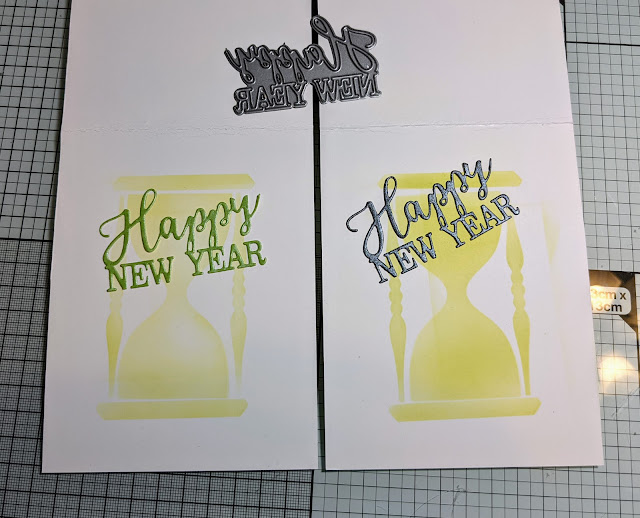
On the inside of both cards I used the Happy New Year die from Merry Christmas set by Impression Obsession.  I also created a stencil from the Grand Hour Glass to ink both cards.


Here's a side by side of the Grand Hour Glass and the Small Hour Glass dies.
 
Thanks for stopping by.  To visit my personal blog just clink on my name Mary Moisan
Until next time... Take care. 


Don't forget to come join in the fun at the Dies R Us Challenge Blog.  There's a new challenge theme offered on the 1st and 15th of each month and one lucky randomly drawn winner will receive a gift voucher prize to the Dies R Us Store.  For your convenience, all the important Dies R Us links are provided below.


click below for:

Jan 8, 2021

Happy 2021

  Hello crafty friends,

I hope everyone had a nice end to 2020.  


For my first Design Team card for 2021 I wanted to make a Happy New Year card, but my go to Happy New Year die by Impression Obsession wasn't going to give my the look I wanted, which was a block style stand alone "happy" that I could cover the front of the card with.  

I ended up using the "happy" from the Happy Mother's Day die by Impression Obsession, it wasn't exactly want I wanted, but close enough.  I colored several pieces of scrap mixed media paper and die cut it my happies. I die cut a circle opening to show my stamped inside card image (Newton Celebrates)  

Until next time... Take care. 


Don't forget to come join in the fun at the Dies R Us Challenge Blog.  There's a new challenge theme offered on the 1st and 15th of each month and one lucky randomly drawn winner will receive a gift voucher prize to the Dies R Us Store.  For your convenience, all the important Dies R Us links are provided below.


click below for:


Dec 18, 2020

Christmas Sweater

Hello crafty friends,

I've been on a hunt for Christmas sweaters/sweatshirts for the family the last few days, so I decide to make a card with a few paper sweaters.  Thinking these would make really cute package tags also.


I used this fun die set from Elizabeth Craft Designs called Winter Sweater and some small print pattern paper to die cut three sweaters for my slim card.  I die cut the hanger, sweater trims and reindeer all from white card stock and colored them with Distress ink.  I also inked the card background with Distress ink and spayed it with glimmer mist.

Update:  The Winter Sweater by ECD is not currently available, but Frantic Stamper has this Cozy Sweater and they have another die set with Sweater Icons.


On the inside of the card, I used "Season's Greetings" word dies from the Christmas Stitched Words by Impression Obsession.     

Thanks for stopping by.  If you like to visit my personal blog just clink on my name Mary MoisanHappy Holidays crafty friends! 


Don't forget to come join in the fun at the Dies R Us Challenge Blog.  There's a new challenge theme offered on the 1st and 15th of each month and one lucky randomly drawn winner will receive a gift voucher prize to the Dies R Us Store.  For your convenience, all the important Dies R Us links are provided below.


click below for:

Dec 11, 2020

Crystal Fir

 Hello crafty friends,

Mary back with this fast and fun card...


The Ice Crystal Fir tree by Tutti Designs is delicate, but is substantial enough to be the focal point on a standard A2 card.   On my card, I die cut it from white card stock and glued it over green plaid pattern paper.  I placed the tree to the right, so that I could fit the MERRY word die from the Christmas Stitched Words by Impression Obsession.   


Don't forget to come join in the fun at the Dies R Us Challenge Blog.  There's a new challenge theme offered on the 1st and 15th of each month and one lucky randomly drawn winner will receive a gift voucher prize to the Dies R Us Store.  For your convenience, all the important Dies R Us links are provided below.


click below for:

Nov 16, 2020

Hey Y'all

 Hey y'all! Alicia with you today.  You probably don't know this but I am originally from Georgia, so when I saw this word die set from Frantic Stamper I just had to have it.  This sentiment paired with Karen Burniston's barn die and animals are the perfect combination.  The barn pop up is one of the easiest assemblies from Karen Burniston without sacrificing the wow factor, pop ups bring.

Here is the front of the card.  I used the Karen Burniston Farm Edges on the front of the card adding one layer using Frantic Stamper Grassy Hill Edgers.  I dressed up the goat as the farmer.  I used the Karen Burniston Cat & Dog smaller kerchief instead of the one that comes with the Karen Burniston Tiny Accessories 3.  The pitchfork is part of that set.  I also enhanced the tractor with the hints Karen Burniston gives in her instructional video.

I created a few more animals for the inside.  I used small portions of the Frantic Stamper Grassy Hill Edgers on each side of the barn.  I used the fence from Karen Burniston Farm Edges folded in half and glued inside the barn.  I then glued the cows on the fence, one on each side to create depth.


I just love how the barn doors open.  I couldn't find an animal that I liked tucked inside.  I thought the straw paper looks pretty cool showing through.  I did find the owl was too cute peeking through the top window.


I have highlighted some of the assembly steps in the collage below. The upper right photo illustrates the sliding door assembly.  It couldn't be easier. The trickiest part is putting the glue on just the right pieces.  The upper left photo shows my cow and goat assembly.  They each have embossed areas to ink up details of the animals.

You can see in the bottom right corner how I attached the owl inside before gluing the barn together.  You can also see how to glue the tabs to each side of the barn.  The final step is a drop of glue at the top of the barn and hold between the fingers for a minute until the glue dries.  The final photo is a side view of the barn, fence and cows.  It really is so flat.  I don't think extra postage will be needed even with all the animals and details.

I used the following dies in my project.

Frantic Stamper Hey Y'all


Don't forget to come join in the fun at the Dies R Us Challenge Blog.  There's a new challenge theme offered on the 1st and 15th of each month and one lucky randomly drawn winner will receive a gift voucher prize to the Dies R Us Store.  For your convenience, all the important Dies R Us links are provided below.


Oct 23, 2020

Spooky Banner

 Hello crafty friends,

Mary back today with my last Halloween card of the season for this blog.


I started my card by die cutting a square window in the middle, so that the inside stamped pattern (IO Cover-a-Card Gradation CC015) could be seen.  I used the Die-Versions Stitched Squares, but would have preferred to used the Lawn Fawn Outside In Stitched Squares, because the stitched lines are left on both the negative and positive pieces.  

Next I inked the around the sides of my card front with distress ink. While the ink dried, I die cut the Spooky Banner die by Tutti Designs from black glitter cardstock and glue it to the card.  A sentiment from the Tiny Halloween stamp set by Lawn Fawn and some sequin finished the card.

Hope you enjoy the last few days of the Fall/Halloween season... Until next time... Take care. 

Don't forget to come join in the fun at the Dies R Us Challenge Blog.  There's a new challenge theme offered on the 1st and 15th of each month and one lucky randomly drawn winner will receive a gift voucher prize to the Dies R Us Store.  For your convenience, all the important Dies R Us links are provided below.


click below for:

Oct 16, 2020

Jack-o-Lanterns

Hello craft friends,

Mary back on the blog today with two more Halloween cards featuring the Jack-O-Lantern Faces die set from Frantic Stamper.  I love this set of scary faces... they are the perfect size for grouping onto a card front.  I used them on two slim cards.


On this first card, I die cut the Jack-O-Lantern Faces into the black card front and used distressed oxide inks to "light" them up underneath. I carried the ink colors a crossed the card base, so that a little bit of it would show once the black card front was glue down.  This was a quick card, the most time consuming part of making it was the ink blending. 


On this second card, I die cut the Jack-O-Lantern Faces into orange glitter card stock die cut circles (Stitched Circle Stackables) and glue them onto my card making for another quick an easy card.
   

Hope your having a fun Fall/Halloween season... Until next time... Take care. 

Don't forget to come join in the fun at the Dies R Us Challenge Blog.  There's a new challenge theme offered on the 1st and 15th of each month and one lucky randomly drawn winner will receive a gift voucher prize to the Dies R Us Store.  For your convenience, all the important Dies R Us links are provided below.


click below for:


Sep 25, 2020

Rainbow Bats and More

Hi, Mary here... 

My desk is full of Halloween crafty goodies, so I'm back on the blog today with two more Halloween cards.  I used this cute bat die from Impression Obsession on both of the cards I'm showings today.  

I started my first card by die cutting several bats from white mixed media 184lb (400 series) cardstock. Please note this die includes tiny dies for the inner ears, nose and belly, which I didn't use on my card. 


Initially, I inked the bats solid with their Distress Oxide colors, but ended up adding black at the bottoms of all the bats for added interest.  


When I placed the bats on my card background I felt the bats didn't pop enough, so I went back and die cut more of them, so that each inked bat had a white shadowed bat underneath.  I glue the inked and shadowed bat so just a little bit of the white showed. 
 

Here's a picture of all the bats with their white shadows.


 I love how the finished card turned out.  The black card base, I splashed with white ink.

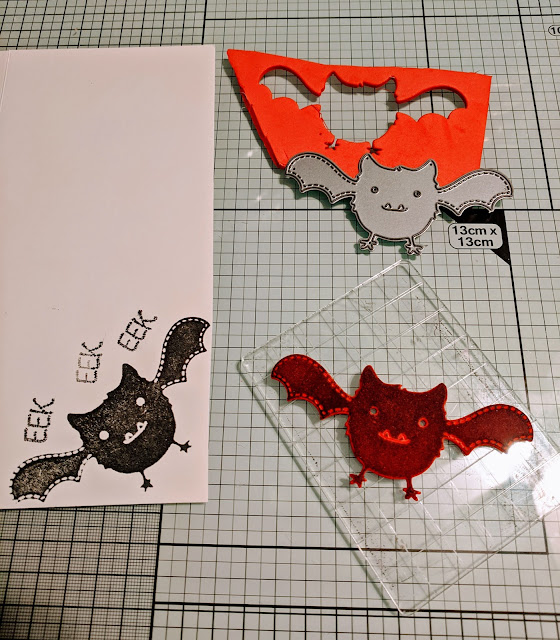
For the inside, I die cute the bat from foam to create a stamp... notice, that it doesn't matter what color foam you have.  


On my second card, I started by die cutting a Double Stitched Oval from my card front.  

I glued the die cut and inked bat on the front over the oval opening and backed it with another die cut bat on the back side.  On the card's inside, I glued the die cut cat.  


I used Cheery Lynn Designs' Whimsical Halloween Cat die set, which is currently not available in the store, but the Large Mod Cat, the Creepy Cat are good alternatives die set if you want to create a similar card.   


Don't forget to come join in the fun at the Dies R Us Challenge Blog.  There's a new challenge theme offered on the 1st and 15th of each month and one lucky randomly drawn winner will receive a gift voucher prize to the Dies R Us Store.  For your convenience, all the important Dies R Us links are provided below.


click below for: