Hello fellow crafters. Lena here to share a very bright and sparkly Christmas card with you.
I'm not too sure what this fold is called, but I call it a centre easel card because, well it has an easel card panel in the centre :-)
Here is a quick pictorial of how I made this card.
First, I prepared the card base. You can resize it any way you want to make it fit your specific design.
It's very easy - I cut an 1.25" inch strip on either side and adhered them down to the back of the card. Then you score the centre panel that is left in half and voila, your card fold is done!
Now to work on my sparkly card panel - I took a piece of Elizabeth Craft's double sided adhesive tape and adhered it to a piece of white cardstock. I did this twice to end up with two pieces. You will need the one to make the die cut and the other to help keep all the little pieces in their place.
I used Sue Wilson's Stained Glass Poinsettia die to make the cut. You need to ensure that when you run it through your die cutting machine, that the die is placed on top of the adhesive tape.
This is what it looks like once it's cut and has the second piece of cardstock adhered to the back.
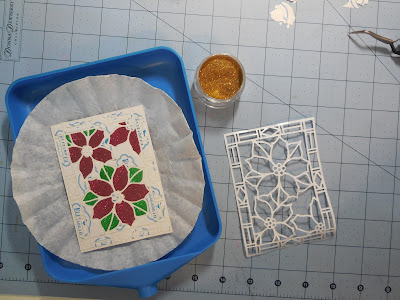
Time for the fun part. Using Elizabeth Craft's Silk Microfine glitter, I peeled off the pieces I wanted to add the glitter too. This is my little glitter "station". I use a coffee filter to contain my glitter, my fine pointy tweezers to remove the adhesive from the different parts I'm adding glitter to, and a
Swiffer cloth to wipe away any runaway glitter.
Swiffer cloth to wipe away any runaway glitter.
I worked in groups of colour making sure to rub in the glitter well and then clean it all away before starting on the next colour. There is a wonderful tutorial by Els on how to use her glitter. You may click HERE to go take a look.
Once my main panel was done, I worked on the embellishments for the sides. I cut out the pieces using a few of the dies that come in the Spellbinders Holy Frame die set. I also cut them out of cardstock that had the adhesive on the back. I removed the tape and dipped the entire cut into the glitter. I shaped the petals to add a little bit of dimension.
When I was done with my card, I wanted a message panel on the inside that tied in with the front of the card. I didn't have any gold cardstock that matched the gold of the glitter, so using score tape, I adhered a strip all the way around the panel and dipped it into the gold glitter, rubbed it all into the tape and wiped it clean with the Swiffer cloth. It worked perfectly!
Here is a close up of the message panel. I stamped a sentiment and a poinsettia to tie it all together. I also added pearls to the centres of the flowers and went over the stamped poinsettia with a clear Wink of Stella pen.
Here is a look of what the card looks like when flattened and ready for mailing.
A quick card, this wasn't, but I love how it came out. It was very difficult to capture all the sparkle from the glitter on the pics, but I'm sure you can imagine how it shines beautifully.
I hope I was able to inspire you to use your dies, create a project, and come play along at the Dies R Us Challenge Blog for your chance to win a gift voucher to the Dies R Us Store. A new challenge begins on the first and fifteenth of every month. Be sure to Follow Us on Facebook too.
Till next time,


love, love, love the stainglass effect!
ReplyDeleteAlicia
A beautiful card, love the die.x
ReplyDeleteAbsolutely gorgeous and I love the fancy fold too! Well done!
ReplyDeleteLena, this card is fabulous! So many beautiful details with the glitter design.
ReplyDeleteGorgeous ! And fabulous tuto !
ReplyDelete