Hello Happy Camper! Tis the season for outdoor fun and today I am using several Karen Burniston die sets to create this fun summer card. On the front I used nesting dies to frame the sentiment and lantern cuts. I used ink to color the "light" in the lantern.
I love a good pop up and the tent does not disappoint. I used the Karen Burniston Pop Up Tent assembly video to get started. I found the perfect paper, however, it was not double sided as Karen suggested. I used blue ink to color the tent flaps. I added brads to hold them back. The die cut provides the holes. The cut also has the holes for the twine to go through the tent. I used more brads to secure the "ropes".
The fire is also a pop up included in the tent pop up set. The stump and the attaching mechanism are also included in the set. I used vellum for the pop up mechanism to lessen the visibility. To have a pop up on the other side, simply reverse the folds.
Don't forget to come join in the fun at the Dies R Us Challenge Blog. There's a new challenge theme offered on the 1st and 15th of each month and one lucky randomly drawn winner will receive a gift voucher prize to the Dies R Us Store. For your convenience, all the important Dies R Us links are provided below.
Hello, crafty Dies R Us fans! Leslie here from Love To Scrap 2 and I’m thrilled to be back on the blog today with another awesome DT inspiration project! I created a super sweet CAS kitty card featuring the most adorable Tutti Designs Cat In Basket die paired with some pink enamel hearts and iridescent bling! Perfect for a cat lover! Wouldn't it be fun to die cut a bunch of these cats in different colors to create a set to give as a gift?!
2. Cut a standard A2 size side-folding card base from ivory cardstock along with a narrow embellishing strip for the front from pink cardstock. Also cut ivory and pink layering panels and embellishing strips for the inside. Round the bottom right corner of the card base and layers.
3. Adhere the cat die cut and embellishing strip to the front of the card base. Adhere the inside ivory and pink layering panels together and add the embellishing strips.
4. Stamp the front and inside sentiment in pink ink.
5. Add two pink enamel hearts to finish the front. Adhere the layered panel to the inside of the card base.
Don't forget to come join in the fun at the Dies R Us Challenge Blog. There's a new challenge theme offered on the 1st and 15th of each month and one lucky randomly drawn winner will receive a gift voucher prize to the Dies R Us Store. For your convenience, all the important Dies R Us links are provided below.
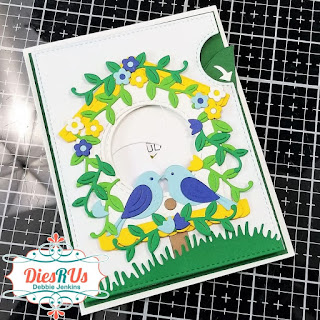
Hi Guys! I'mDebbie fromDebbie J’s Crafting Corner, here today sharing how I used several stamp and die sets from Lawn Fawn to create this Magic Iris Card.
I love showing the process when I’m creating. I hope my tutorial and video help you see that, if I can make it, You Can Too!
I used the following stamps and dies from Dies R Us:
I’ve occasionally made Magic Iris cards. But I just couldn’t resist getting the cute birdhouse add-on! I mean really… I tried, but in the end gave in.
So the first thing I did was cut everything out and make a birdhouse… all off video (sorry).
It would work great on it’s own, But I figured I would turn this first one into a Magic Iris card.
Step by step instructions
Cut out the following shapes with your die cutting machine:
3 rings
3 stabilizers
3 blades
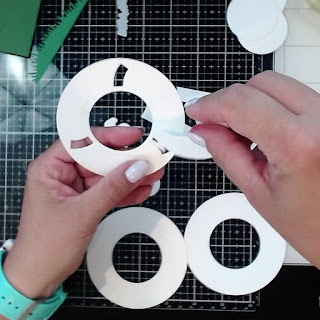
Take the slot cutter (flux capacitor) and line it up on one of the rings. Hold it in place with some washi tape and run it through your die cutting machine. It will create 3 slots and 3 stitched marked areas that are halfway between each of the slots.
Insert the tabbed ends of the 3 blades into the slots, and align the rest of the blade along the outer edge of the ring.
On the rounded end of each of the blades is a small x cut into the cardstock. Place a mini glue dot ( 3/16 in ) on each of the x’s.
Keeping the blades lined up (they should form a perfect circle matching the ring with the slot), place another ring (without slots) on top, adhering it with the glue dots you added.
Turn the rings over.
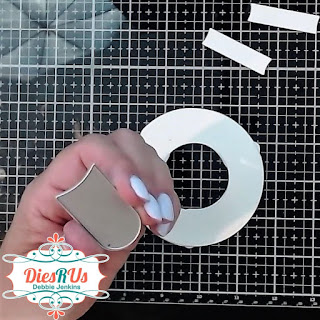
Add some tape runner adhesive to the ring (with slots), starting at each of the stitched markers and going in a straight line to the outer edge of the ring.
Add the stabilizers. Place the curved end of each of the stabilizers along the inner curve of the ring on the adhesive added.
Turn the rings back over.
I also cut out a couple of the rounded tab pieces in the set and glued them together for greater strength when pulling the tab to operate the Magic Iris.
Align the curved end of the rounded tab along the inner edge of the ring and just to the right of one of the stabilizers. Where the 2 cross, they should form an inverted V. This is where you will adhere the rounded tab using a tape runner.
Next, place the third ring on top and add tape runner adhesive to the stabilizers. You then gently hug each stabilizer around the top of this ring. Don’t adhere it too tight. If the end reaches the center of the ring, it’s too tight, and your Magic Iris may not work properly.
Now it’s time to test the mechanism and decorate our Magic Iris card.
Here are some photos of the finished card.
Thank you so much for dropping by. I hope you enjoyed this project and would love to hear what you think of this card.
Please leave me a comment down below!
Be sure to check out myYouTube Channel,Blog,Pinterest, andInstagram for more inspirational projects. I also have a fun Facebook Group where you can share your projects with other fantastic creators. We would love to see what you create, so come join us!
Head back to theDies R Us Blog tomorrow for more fabulous inspiration from theDRUInspiration design team.
Be sure to check head over toDies R Us Challenge Blog. We love to see what you create, and this is a perfect place for you to share your creativity.
PLUS, there is a new challenge theme offered on the 1st and 15th of each month, and one lucky randomly drawn winner will receive a $10 gift certificate to theDies R Us Store.
Diane here to share with you some Die R Us inspiration. I have created a simple and easy Summer Time Gift Box that can be used for a Summer Birthday, Beach Party favor gift, or any Summer Time celebration. I used the super fun Lawn Fawn Scalloped Treat Box and the Scalloped Treat Box Beach House Add-on. So Super Adorable. Come see!!!
With only two Lawn Fawn Dies you can create this super cute gift box too.
Below is how I created this cutie,
First I cut two of the Scalloped Treat Box using some wood papers.
Next, I folded the little box on the score lines. The next step is to cut out all the decorative elements. I used the Lawn Fawn Beach House Add On from Dies R Us and using different solid color cardstock I cut out the elements. I cut the roof out of sea blue, the shutters out of pink, the windows and door out of white and so on.
The sea blue roof
Beach House Elements
Here I am placing the window frame on top of black cardstock.
Here I am adding the pink shutters to the window frame. So Cute!
Here I am adding the yellow wing to the sea gull for added color.
Here I am adding the sea grass together.
Here is where I added the glittery sand to the sea grass.
Here is the link for the Lawn Fawn Products I used for this little gift box.
This was a Super Fun Little project. I hope that you enjoyed this inspiration post.
Be sure to visit Die R Us for this and many more wonderful Dies and Stamps for your crafty creations.
Don't forget to come join in the fun at the Dies R Us Challenge Blog. There's a new challenge theme offered on the 1st and 15th of each month and one lucky randomly drawn winner will receive a gift voucher prize to the Dies R Us Store.