May 27, 2018

Happy Birthday to You!

Happy Sunday!
Monica's here today! Before I get started I just wanted to say hope everyone is having a fabulous holiday weekend!
Now onto some crafts! :)
I needed to create another Birthday card, so this time I decided to go with an all cream card.
I absolutely love how it turned out.
So without further delay here is my card for today.
As always for full details check out my YT video below.
Hope you enjoy:)


Products Used


Thank you so much for stopping by! Happy Crafting!

Don't forget to come join in the fun at the Dies R Us Challenge Blog. There's a new challenge theme offered on the 1st and 15th of each month and one lucky randomly drawn winner will receive a gift voucher prize to the Dies R Us Store. For your convenience, all the important Dies R Us links are provided below.

May 26, 2018

Easy Arrow Fold Card using Dies R Us Products


Hi .. How are you today. This DT project for Dies R Us showcases a Thank You card made using some die cuts and super fun layers for depth and dimension along with Scraperfect Best Glue Ever and Vintage Photo inking on the edges.. I am also sharing an Easy Arrow Card Shape.

Supply List:
Glue: ScraPerfect Best Ever Glue
Ink: Tim Holtz Vintage Photo
Machine/ tools: Big Shot Express,
Other: Cardstock, Flower, glitter


 This is a super fun and easy card but the different shape added so much to the design.
HERE is the LINK for the pattern details in a VIDEO 

So following the pattern then cut pattern papers to fit the spaces but leaving the white border all around.
 I die cut the accents and went from there.


This is the postioning of the pieces.... I cut the butterfly die apart and matted some of the butterflies so they popped on the busy print.


In the close ups you can better view the details. When it was together I added sparkles to the flower and glued to the card front.


In the close up you get a better view of the die cuts - some matted some not.

Tutti Designs - Dies - Swirly Butterfly Circles


Don't forget to come join in the fun at the Dies R Us Challenge Blog.  There's a new challenge theme offered on the 1st and 15th of each month and one lucky randomly drawn winner will receive a gift voucher prize to the Dies R Us Store.  For your convenience, all the important Dies R Us links are provided below.
click below for:

Thanks for visiting... hope to see you again soon, Have a great day.

May 25, 2018

Coffee...My Friend


 I admit it.  Coffee is my friend...my best friend!  A hot brew in the morning (ok, maybe more than one) and in the spring/summer, iced coffee later in the day -- yum!  Karen Burniston has THE most adorable pop up die that is just perfect for me:  Coffee Cup Pop-Up!


To start, I used a white cardstock base and added two pieces of an aqua cardstock.

Next, I die cut all the pieces for the inside and outside of the card.


 I began by placing the 'napkin' pieces; one piece to each side of the inside of the card to see where I wanted the cup to go.


Then I assembled the coffee cup and attached it to the napkin pieces - there are tabs on the end of the cup and slits in the napkin pieces.  Next I attached the napkin pieces to the base of the card. News flash:  There is a slit in the back of the coffee cup to place a gift card if you'd like!!

I cut out a few more coffee beans for the bottom edge and added the sentiment from Karen Burniston's Word Set 1 - Greetings die set.


For the front of the card, I layered a pretty paper design from Lawn Fawn's Perfectly Plaid Spring pad.  Then, I added the napkin die cut, circles and coffee beans. I kept this card pretty simple, but there are endless possibilities!


Come join in all of the fun at the Dies R Us Challenge Blog.  There's a new challenge theme offered on the 1st and 15th of each month and one lucky randomly drawn winner will receive a gift voucher prize to the Dies R Us Store.  For your convenience, all the important Dies R Us links are provided below.


click below for:

May 24, 2018

Have a MANATEE-RIFIC Day!

Happy Thursday everyone! It's Rosemary here sharing this scene card I created with several of the NEW Lawn Fawn Dies! I LOVE how easily a scene card comes together using the coordinating Lawn Fawn stamps and dies. It's so much fun, and DIES R US gives me so many options!
++++++++++++++++++++++++
The links to all of the products used from the Dies R Us Store are shown below. Here is a step-by-step of how I created this card. First, I cut out two pieces of the Lawn Fawn Stitched Woodgrain Backdrop from brown cardstock.

Next, I used my paper trimmer to cut 3/4" strips, along with a 5" x 6" rectangle to glue the strips to. I was trying to create a shiplap boat wall. In retrospect, I should have used a lighter brown cardstock and inked the edges with walnut stain distress ink so you could see the strips.

I glued the strips down to the rectangle, offsetting the strips to look like a shiplap wall, and then trimmed the brown cardstock down to 4.5" x 6". Then I added a piece of 4.75" x 6.25"gold cardstock underneath.

I used a circle die and cut out the center. I used a die I had in my stash, but if you don't have any circle dies you can use the Elizabeth Craft Designs Frame It Stitched Circles.

I cut out the largest Lawn Fawn Porthole Frame Die, and a plain circle about the same size from a transparency sheet. I glued the gold porthole frame on top of the transparency.

I cut two more plain circles....one from watercolor paper and one from Yupo paper. I created a sky background with markers and paintbrush on the watercolor paper. I created water with alcohol inks on the Yupo paper. Next, I used one of the Lawn Fawn Stitched Wave Border Dies to cut out the bottom "water" portion of the circle and glued it on top of the sky background.

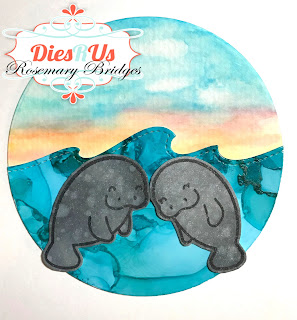
I had an extra watercolor paper circle, and covered the top with Hickory Smoke and Black Soot Distress Oxide Inks. Then I splattered water on top and used a paper towel to pick up the excess water. This creates the lighter spots on the paper...perfect for the manatees from the Lawn Fawn Manatee-rific Stamps. This stamp set also has Coordinating Dies.

Here's the circle scene with the manatees. Aren't they adorable?!!

I wanted to create some depth so I added foam squares to the back of the shiplap/porthole cardstock BEFORE adding the circle manatee scene to the back. This puts some space between the porthole and the scene

 You can see here that there is space between the scene and the porthole.

The side view shows some of the dimension. I also added foam squares behind the sentiment banner.
 ************************************
Here are the Dies R Us products used:


Thermoweb 3D Foam Squares
**********************************************************************
For more inspiration, come join the fun at the Dies R Us Challenge Blog. There's a new challenge theme offered on the 1st and 15th of each month, and one lucky randomly drawn winner will receive a gift voucher prize to the Dies R Us StoreFor your convenience, all the important Dies R Us links are provided below.
Come check these out! Click below for:
FRIENDS OF DIES R US PINTEREST PAGE

Have an AWESOME Thursday!