Showing posts with label Lawn Fawn Watercolor Wishes. Show all posts

Oct 21, 2018

Hummingbird Sympathy

Hi, fellow paper crafters!  It's Julie with you today from Muddy Paws & Inky Fingers.  It's always a pleasure to be sharing some of the wonderful Dies R Us products with you!

I'm a church organist.  One of my duties, besides Sunday services, is playing for funerals.  I seem to always need a sympathy card.  Today, I used some gorgeous Dies R Us products and created a sympathy card:


I'll go over all the supplies a bit later in this post, but here's a photo of them, before I started:

The nesting dies are from Yvonne Creations Dies.  It is the Nesting Frame Die.  I love this die, but there's a bit of a learning curve with it.  Make sure you keep track of your layers, or it can get confusing.  I've ruined some paper, cutting the pattern in the wrong direction.  I always reassure myself -- it's only paper!!

Here's a shot of how I did the card base:


Notice how I leave the largest die outside of the fold of the card base.   If you look closely at the finished card, you can see where that fold is.  The outside layer is exactly the same size on the left side of the card (where the fold is).


Now, as promised -- a list of supplies used:


Don't forget to come join in the fun at the Dies R Us Challenge Blog. There's a new challenge theme offered on the 1st and 15th of each month and one lucky randomly drawn winner will receive a gift voucher prize to the Dies R Us Store. For your convenience, all the important Dies R Us links are provided below.
We hope to see you again tomorrow!

Oct 16, 2018

Thanksgiving Card

Tracy here today with my first post for Dies R Us. I am so excited to be on this amazing team. So let's get to my first project.

Fall is my favorite time of year so I had to start with a fall card using some Lawn Fawn Dies and Paper along with several Distress Oxide inks.


I started by taking a white piece of cardstock and 6 different colors of my Distress Oxide Inks and applied the inks in a random pattern overlapping them to get some beautiful fall colors. I then used that piece of cardstock to cut out the leaves for the wreath.


For the base of the wreath I used a spring sprig die from Lawn Fawn and cut that out of brown cardstock even though it doesn't show in the final result.


I then assembled the wreath with all the leaves and added a twine bow at the bottom and some orange stickles around the wreath to give it some bling. I used an old Sizzix Thinlets Mixed Media die to cut out a piece of orange cardstock and added a piece of Lawn Fawn Watercolor paper behind it. I then assembled the card on a kraft card base and since I had a few leaves left over I tucked them into the bottom left corner. I added the stamped and embossed sentiment and it was done.


Supplies Used:

Lawn Fawn - Stitched Leaves Dies

Lawn Fawn - Spring Sprig Dies

Lawn Fawn - Paper Pad - 6

Distress Oxide Ink Pad - Spiced Marmalade
Distress Oxide Ink Pad - Fossilized Amber

Distress Oxide Ink Pad - Peeled Paint
Distress Oxide Ink Pad - Fired Brick
Distress Oxide Ink Pad - Lucky Clover
Distress Oxide Ink Pad - Vintage Photo
Don't forget to come join in the fun at the Dies R Us Challenge Blog. There's a new challenge theme offered on the 1st and 15th of each month and one lucky randomly drawn winner will receive a gift voucher prize to the Dies R Us Store. For your convenience, all the important Dies R Us links are provided below.


Check out these links! Click below for:


Thanks for stopping by!

Oct 14, 2018

So Grateful! (to be here!)

Hello, fellow paper crafters!  It's Julie with you today with my first post for Dies R Us.  I'm super excited to be sharing with you!

I love shaped cards!  If you visit my blog, Muddy Paws & Inky Fingers, you'll see many shaped cards. You can use many different dies to make shaped cards.  Follow this post, and I'll show you how.

First, the finished card, then how I did it --


Here's  the supplies I used (more details later):


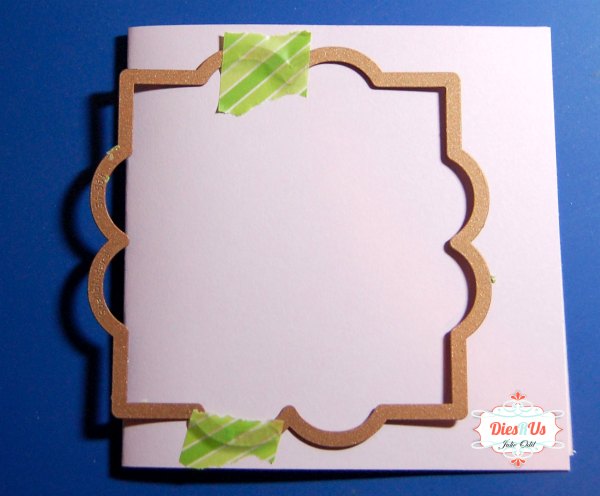
I created the card base using the largest Spellbinders die.  Pictured below is how I did it.
Notice that I left one edge of the die hanging off the paper, which is already folded in 2, like the card base.  I like to use washi tape to hold my dies in place.  You can easily remove it after you run it through your die cutting machine.

Here's the card base after it's cut out.  I cut out another piece of paper using this same die and tape it over the top, hiding the flat edge on the left.

Here's the card again!  A fun shape, easily constructed.

Supplies found in the Dies R Us Store:

Don't forget to come join in the fun at the Dies R Us Challenge Blog. There's a new challenge theme offered on the 1st and 15th of each month and one lucky randomly drawn winner will receive a gift voucher prize to the Dies R Us Store. For your convenience, all the important Dies R Us links are provided below.
We hope to see you again tomorrow!