Hello Crafty Friends -Annie here with a fun interactive birthday card.
Today's card is mostly Lawn Fawn Products. I wanted to create a fun child's birthday card. I used the Ahoy, Matey stamp set along with a few dies.
Lift the Flap - by the X that marks the spot - to see the rest of the
sentiment and of course the treasure!
Let's get started.
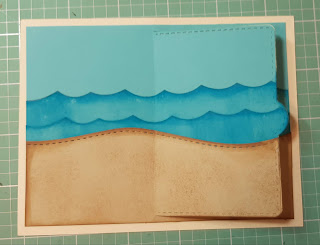
I stamped, colored, and fussy cut the images. I also die cut some waves into light blue cardstock and a stitched hill into tan cardstock. I die cut some clouds and sun as well.
Next, I added a bit of Distress Oxide ink in Mermaid Lagoon to the waves. The top of the light blue cardstock will become the sky. I add more ink to the wave caps the fade out toward the bottom.
Then, I add some Distress Oxide Ink in Vintage Photo to the sand hill. I used the sponge applicator for the top and sides. I then used a stencil brush and stippled the ink on to create the effect of sand.
Now, for the assembly of the card. I puzzle piece the section back together using the card front panel as my base (the cream cardstock) for proper placement. I use some washi tape to hold everything together so that I can die cut the flap.
I place the Lift the Flap die in place, secure with some washi and run it through my die cutting machine.
I die cut a second flap from light yellow cardstock for the inside. This will hide all the layers. I trim away the extra cardstock.
Next, I turn over the front panel and run adhesive down the back.
I also adhered the yellow cardstock to the backside of the flap.
I put a bit more really close to the opening area.
I then center the front panel onto the cream cardstock.
Then, I add some Distress Oxide in Vintage Photo with the stencil brush to the inside of the flap area.
Next, I start adding the images.
First, I run most of the images through the Xyron 150 Sticker Maker.
I start with the inside of the flap area. I add the treasure chest, extra gold pieces, and jewels.
Then, I close the flap and start placing the other images to the front of the card. I tuck the little ship into the waves. layer the clouds and sun (so the sun is peeking out of the clouds) and the little mountains and palm trees. I added the parrot to one of the trees. As well as the small oasis. I then used some low profile foam tape to adhere the little boy and girl into place. Finally, I added the sentiment on the flap and inside the flap area over the treasure.
Materials Used:


Tsukineko Memento Ink: Tuxedo Black
Sakura Gelly Roll Pens: White, Black & Metallic Gold
Xyron Mega Runner Adhesive
Xyron 150 Sticker Maker
Tim Holtz Stamping Platform
Recollections Brand Cardstock: Cream, Light Blue, Light Yellow & Tan
Thank you for stopping by today. I hope you found some inspiration!
Don't forget to come and join in the fun at the Dies R Us Challenge Blog. There's a new challenge theme offered on the 1st and 15th of each month and one lucky randomly drawn winner will receive a gift voucher prize to the Dies R Us Store. For your convenience, all the important Dies R Us links are provided below.


What a fun card! Love it!!
ReplyDeleteThis is totally adorable, Annie. Love the pirate scene you created. And how fun! I had not seen those Flap dies. Going on my wish list :-)
ReplyDeleteThis is so fun! Who doesn't love a pirate card?
ReplyDelete