Showing posts with label Pinkfresh Studio. Show all posts

Aug 16, 2021

Pinkfresh Layers

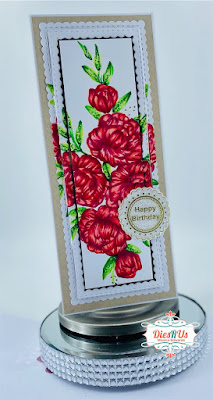
 Hi everyone today's card features the Pinkfresh Studios "Slimline Stitched Scallop Rectangles" die available at Dies R Us.  I used it to stamp and color a floral image and gave each of the die layers some height using different sizes of foam tape.

1.  I first stamped the image onto some copic blending paper using amalgam ink which can be used for watercolor/alcohol ink and colored the image itself using my copic pens.  Leaves: YG05, YG07, YG09, G28 : Flowers: R39, R29, R24, R22

2.  Once I was done I think laid the largest die over the entire image and ran it through my diecut machine.  The outer layers was glued as is the 2nd inner layer I used foam tape and the 3rd inner layer I used a thicker foam tape so to add height to the finished piece.

3.  The sentiment is a simply foil sticker I had that says "Happy Birthday" and I hope everyone enjoyed my post for the day and thanks for stopping by... and

Don't forget to come join in the fun at the Dies R Us Challenge Blog. There's a new challenge theme offered on the 1st and 15th of each month and one lucky randomly drawn winner will receive a gift voucher prize to the Dies R Us Store.  

 For your convenience, all the important Dies R Us links are provided below.

click below for:

STORE

CHALLENGE BLOG

FACEBOOK

INSPIRATION BLOG

FRIENDS OF DIES R US PINTEREST PAGE

Jan 28, 2021

Sunflower Birthday Wishes

 Hi everyone, Steph Ackerman back today sending you some Sunflower Birthday Wishes.


At this time of year, a bright cheery card is needed so I created a card from tan cardstock.
Die cut the top orange layer using the diagonal die. Mat this panel with green cardstock for contrast, then assemble the card.


Stamp Lawn Fawn Sunflowers, leaves and pots with black ink, then color with Copic Markers, or another marker of choice.  Colored pencils would also work well.


Use the coordinating dies to die cut all the pieces..


Stamp a birthday sentiment on white cardstock and die cut with an oval die.  Mat with a larger die using green cardstock and add to the card using foam adhesives for dimension.  


Arrange the sunflowers in a pleasing manner on the card, layering the sizes for dimension.  At this point, I decided I did not want to use the flower pots so I put them aside for another project.


Add stickles to the center of the flowers.


Thanks for stopping by.

Dies R Us Supplies Used:


Dec 16, 2019

XoXo

Hello all, Samantha here!

I hope you take a second and stop by the Dies R Us store because there are SO MANY GOODIES! 

Today, I am sharing a card I made with some Hearts! It become an unintentional Valentine's themed card!


 I used the Love Sentiments by Elizabeth Crafts for the XOXO at the bottom of the card. Her dies are amazing! They cut beautifully and are all joined together.

Impression Obsessions Heart Flourish die was my go to for this background. It's elongated design worked perfectly with the design I had in mind! 

The stickers are from Pink Fresh Studios!


Elizabeth Craft Designs - Dies - Love Sentiments


Thanks so much for checking out my cards today! I hope you have a great day!
hope that I was able to inspire you to use your dies, create a project, and come play along with us at the Dies R Us Challenge Blog for your chance to win a gift voucher to the Dies R Us Store.  A new challenge begins on the 1st and 15th of every month.  Be sure to follow us on Facebook and Pinterest too.

Jun 20, 2019

A Sparkly Hug w/ Pinkfresh & Concord and 9th


Hi Everyone, Kristina here - Thanks for stopping by, I hope you're having a great day.
Grab your sunglasses for this one! So-Much-Glitter! My original plan for this card was glitter peeking through the fun geometric background from Pinkfresh Studios - The rest fell into place from there. 

The Process

  • Start by glittering a 4.25 x 5.5 piece of white card stock. I did this by running the cardstock through my Xyron sticker maker to cover one side with adhesive and added two tones of glitter for an ombre effect. You could also use glitter card stock. 
  • Die cut your background die 2 times and adhere them down to your glitter background, one of top of the other. 
  • Die cut and add your sentiment. The background is so busy you'll need a chunky word like this. I love that this die comes with the word, the shadow, AND a frame. The shadow piece was cut once from white card stock, followed by the word in glitter card stock, and lastly the frame was cut 3x from black card card stock and glue on one one top of the other. 
  • Use the negative space pieces from the black card stock to fill in the font's holes. I only used a single layer here. 
  • Cut out the hearts from the 'Hugs' die set. Adhere down to the card panel and coat with a dimensional adhesive such as Nuvo Crystal Glaze. 
  • Lastly, add a sentiment strip and adhere the whole thing down to an a2 sized card base.

Notes

The glitter I used was Elizabeth Craft Silk Microfine glitter. I had tried another glitter on my first go and didn't like the way it looked. You definitely want a full coverage opaque glitter, or just use a glitter card stock. 

If all you have is translucent glitter, you could also ink blend an ombre background then cover it with your glitterable (yes its a word) adhesive and cover the panel with your translucent glitter. 

Supplies


Concord and 9th Hugs Dies
Shop at:
Dies R Us
Pinkfresh Studio Geo Floral
Shop at:
Dies R Us

Don't forget to come join in the fun at the Dies R Us Challenge Blog. There's a new challenge theme offered on the 1st and 15th of each month and one lucky randomly drawn winner will receive a gift voucher prize to the Dies R Us Store. For your convenience, all the important Dies R Us links are provided below.


click below for:


May 15, 2019

Hey Gorgeous!

Happy Wednesday my crafting friends!  Kristina Hein here to bring you today's project.


I just love how you can take an all white die and create something so colorful!  The floral die is Botanical Spray from Frantic Stamper Inc.  Here it is before coloring:


And here it is all colored up!


Here are the lovely Copic markers I used.


Once I finished coloring the floral die, I got to work on creating the sentiment.  This time I used the Hey Gorgeous die from Pinkfresh Studio.


I cut the shadow layer out of a bright green glitter cardstock.  The fine black word layer I cut out of black paper that I sprayed some shimmer spray onto.  I applied Stick It to the back of the black cardstock before cutting out the letters since they are so fine.  Then I peeled off the backing and adhered to the glitter shadow layer.  Now for the card base.

The card base itself is made out of Neenah Solar white 110lb cardstock.  Next I cut a layer of black cardstock using a stitched rectangle die from Elizabeth Craft Design.  I played around with the placement of the floral die cut until I found the perfect spot.  Some of it hung over the edge of the panel so I strategically cut here and there.  I then just tucked the cut off pieces back in different spots.  No sense wasting any of that loveliness!  I used liquid glue to adhere all of the it to the black layer.  I used the same liquid glue to adhere the "gorgeous" word into place.  For the "hey" portion of the word I used foam tape so it would pop out above the floral die cut.  

After I took a step back and gave it the once over.  I decided that it just felt too plain for my taste.  I splattered white paint all over the black panel.  Once it was dry, I went in with White Blizzard Nuvo drops.  I placed a few random drops and then added some to the flower centers.  Once the drops were dry (I waited several hours to be sure!) I glued the black panel to the card base.  And I called it done!

Check out all that sparkle!


And one last photo...


Supplies Used:

Stick It Adhesive sheets
Shop at:
Dies R Us
Neenah Solar White
Neenah Solar White
Shop at:
SBC | EH
Tombow Mono Multi Liquid glue
Shop at:
SBC | EH
Therm O Web Foam Tape
Shop at:
SBC | EH
White Bizzard Nuvo drops
Shop at:
Dies R Us
Botanical Spray Frantic Stamper
Shop at:
Dies R Us
Hey Gorgeous Pink Fresh Studio
Shop at:
Dies R Us
Stitched Rectangles Elizabeth Craft Design
Shop at:
Dies R Us

Come on over and check out all of our great links!


See you soon!
~Kristina H.


Feb 27, 2019

Floral Hello

Happy Wednesday everyone!  Kristina H. here with today's project share.  I've got an any occasion card for you.  Check out this beauty!


I find that when you have a gorgeous die to work with it is really easy to make a gorgeous card.  Not to mention it takes minimal effort.  Now that's my kind of die!

I started by grabbing a piece of dark gray cardstock.  I then taped the Pinkfresh Studios Hello With a Bouquet die down and ran it through my die cut machine.  Next I carefully poked out all of the pieces I didn't need.   This is another die where I recommend you use your metal/detail shim in your die cut machine.

Once I had all of the pieces poked out, I taped the die cut piece onto an A2 sized piece of watercolor cardstock.  I taped it in several places so that it wouldn't wiggle around.  I got out two different colors of Zig Clean Color Real Brush markers and my waterbrush.  I went through flower by flower and leaf by leaf.  I added a little of the dark gray marker to the bottom of the flower sections and spread out the color with the waterbrush.  I keep a paper towel close by to scribble off my waterbrush if I feel like it still has too much color.  I repeated this for all of the flowers.  Then I used the light gray marker on all of the leaves using the same technique with the markers.


Here is what it looked like after I got all of the sections colored and removed the die cut piece.


Doesn't that look cool?

Next I cut about a 1/16th of an inch off a top and bottom of the watercolor panel.  I added some Stick-it adhesive to another piece of dark gray cardstock and ran it through my die cut machine.  If I had done that with my first piece I could have used it but I didn't think of it at the time.  This die cut is pretty fine and would be difficult to add liquid glue to the back of.  Not impossible but not exactly fun, at least for me.  I peeled off the backing paper and carefully lined it up with the watercolored cardstock.


I thought it looked pretty striking just like this but I wasn't done yet.  I decided I wanted to use silver glitter paper for all of the letters.  I cut a piece of glitter paper just large enough to cover the letter section of the die and ran it through the die cut machine.  When I laid the glitter paper close to the colored piece I realized the silver was just too bright in comparison.  Thankfully this is a pretty easy fix.  I got out a T3 and T5 Copic marker.  I went over all of the letters with the chisel end of the T3 marker.  This toned down the brightness of the silver.  I think I went over it two times.  Then I added a bit of T5 to the very bottom and blended it up just a bit with the T3 until I was happy with the blend.


I popped the letters out and glued them into place on the watercolor panel.  Now we are pretty close to finishing up this card!

I used a corner rounder punch on all four corners of the watercolor panel.  Then I glued it down to an A2 sized card base of the same dark gray cardstock I used for the die cut.  It leaves a tiny little space on the top and bottom of the card.  This helps to tie the base together with the die cut piece.  For the final touches I glued a few confetti sequins down around the card.  That's it!


I know I say this all the time but I'm so pleased with how it turned out!  

Supplies used are listed below.  Please note, the image is not for the Pinkfresh Studios die that it I used, Hello with a Bouquet.  It is currently out of stock and the link has been temporarily removed from the site.  When you click on the link it will take you to all of the Pinkfresh Studios dies.  Dies R Us has tons of other gorgeous dies you could use in its place to be sure!

Stick It Adhesive sheets
Shop at:
Dies R Us
Pinkfresh Studios
Pinkfresh Studios
Shop at:
Dies R Us

Check out all of our fabulous links below!


See you soon!
~Kristina