Showing posts with label Kristina Hein. Show all posts

Sep 11, 2019

Meow

Happy Wednesday!  Kristina Hein here today with my very last design team post for Dies R Us!  I have had such a blast being on this team.  I'm going to miss it!  *Sniff*  I'll try not to be sad so let's get to my card!


I bought this adorable Peek a Boo Kitty die and I just knew I needed to make a fall card with it!  I do want to mention that there are several different Peek a Boo dies available in the Dies R Us store.  I definitely need to add more to my collection!

I started by die cutting the patterned paper with the Elizabeth Craft Designs Stitched Rectangles dies.  


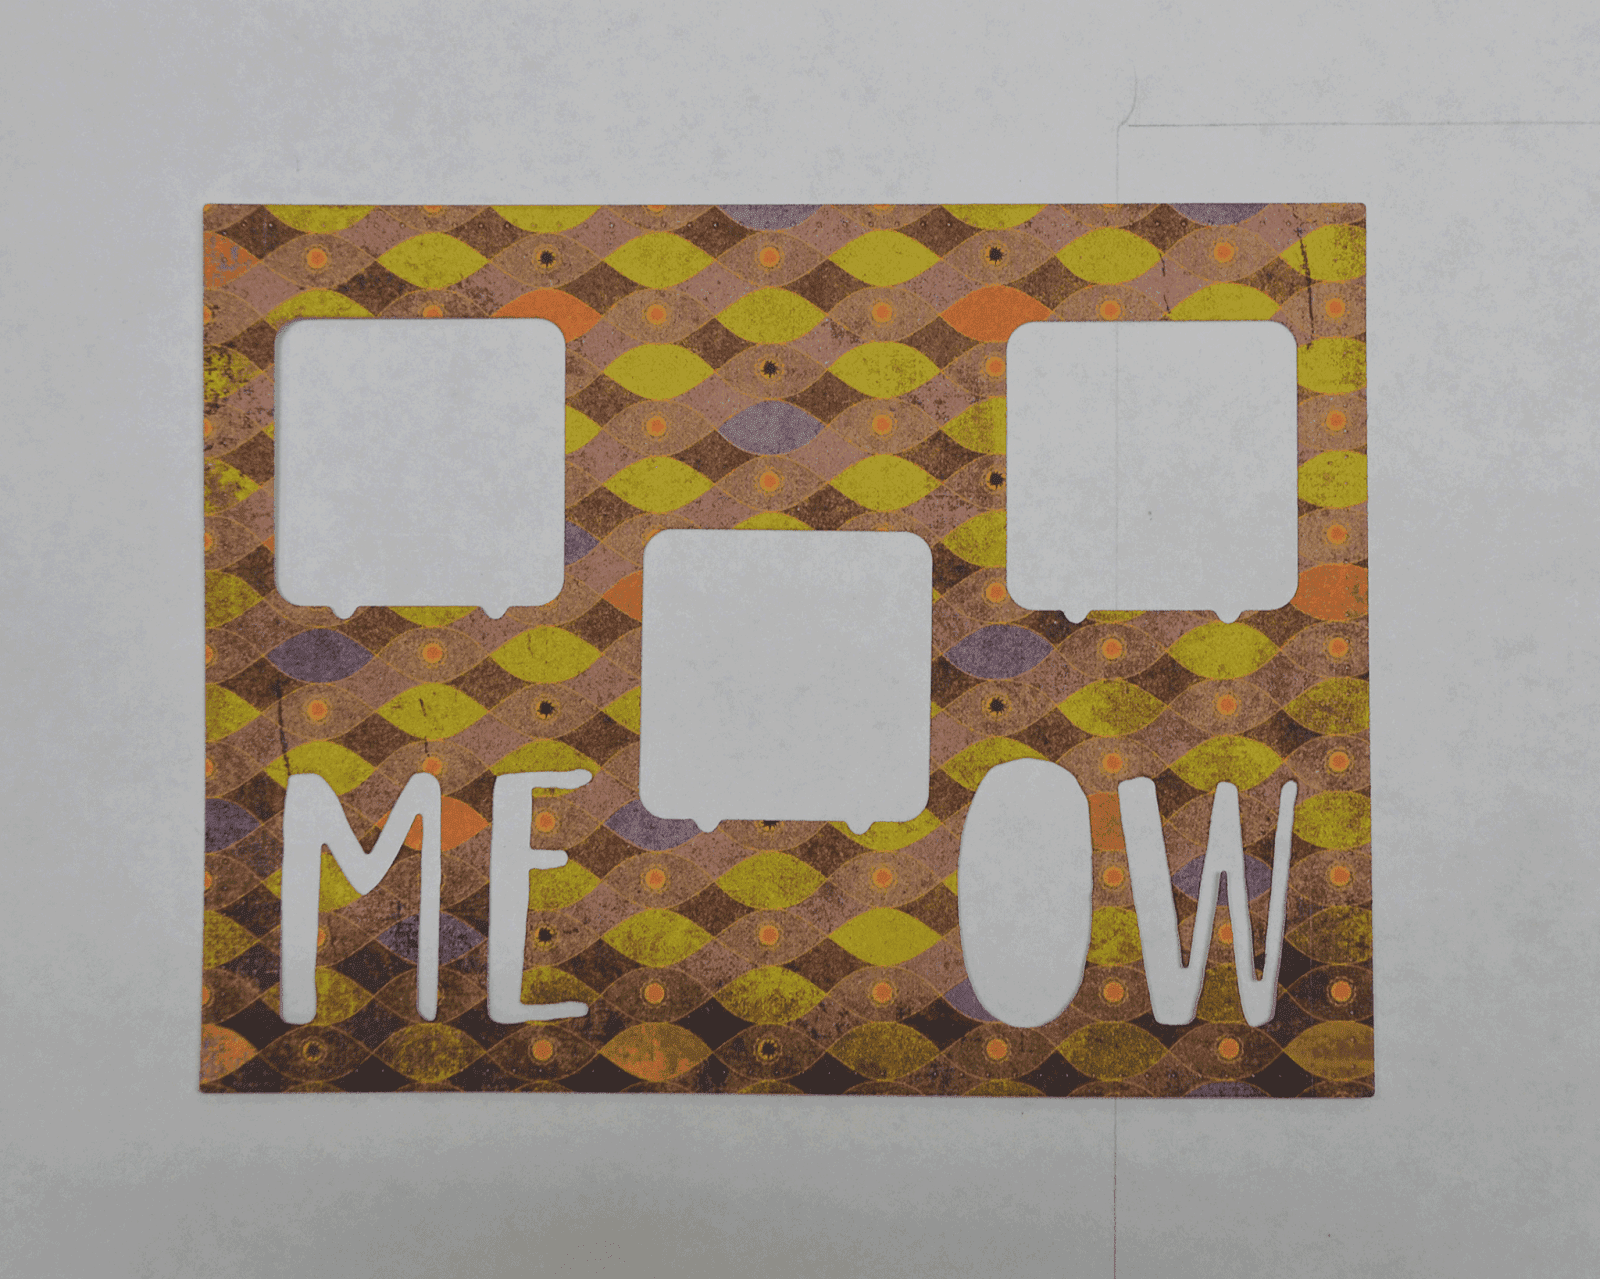
You might be able to see some of the pencil lines that I made to use as reference points for my die placement.  I cut the cat die out three times as well as the word Meow.


Next I cut the letters out again from a black patterned paper and the cats out of colored cardstock.  I then glued die cut patterned background pieces into the colored cardstock cat frames.


Now I started building up the card.  I glued the patterned paper rectangle onto a black card base.  I glued in the black letters.  I added foam tape to the back of the kitty pieces and fit them into the die cut spots.

For the finishing touches I added some coordinating sequins.  It was a pretty quick card to put together!

When it was done I realized I had enough leftover pieces to make a second card.  So here it is!


This one went together even quicker because I didn't do any inlaid diecutting.  Everything is just glued in place!  For this card I used Stickles as my finishing accents.  They are much more vibrant in real life.

You should come on over and check out all of our great links!


I want to thank everyone at Dies R Us for letting me be a member of the team!
~Kristina

Supplies Used:
Tombow Mono Multi Liquid glue
Shop at:
SBC | EH
Stitched Rectangles Elizabeth Craft Design
Shop at:
Dies R Us
Peek a Boo Kitty - Poppy Stamps
Shop at:
Dies R Us

Sep 4, 2019

Flippin' Fall

Hello again my friends!  Kristina Hein with you today to share some fall love.  I know it isn't actually fall yet but it sure has felt like it outside lately!  I'm sure the summer heat will return with a vengance.  Let's get to my card!


I recently bought the Karen Burniston Triple Flip die.  I always love the dies that they create and this one is a heck of a lot of fun to use.  I won't get into the details on how to construct the card basics because you can watch the fabulous videos that Karen releases with all of her dies.

I started by cutting an A2, side fold landscape card base out of dark brown cardstock.  Then I cut a sheet of fall patterned paper to 3 1/2" x 5 1/2".  I then took the main die that creates the slots and ran it through with the patterned paper.  I held it in place on the card base so I could fit the half circle die in just the right spot.  I ran the card base through my die cut machine.  I cut some orange cardstock for the rest of the flip mechanism and put it together with the patterned paper.


Next I sponged the edges of the fall paper with brown ink.  I then cut 3 rectangles out of green patterned paper and 3 rectangles out of orange patterned paper.  This die is included in the Triple Flip set.  I sponged around those edges as well.


The next step was to glue all of the rectangles onto the flip mechanism.


Now that I had the flip portion created, I needed goodies to decorate it all up.  I chose to use the squirrel die from the Karen Burniston Woodland animals set.  I cut the squirrel out of dark gray cardstock, his belly out of light gray and added the face and ear details.  The acorn I cut out of light brown and just colored the top with a dark brown marker.  I tucked the acorn into his paws.


Isn't he just the cutest?  I cut out several more elements using the dies included in the set as well as some extra things.  I cut out stitched leaves dies from Lawn Fawn, colored a pumpkin from the Pick of the Patch stamp set, used the fall word die from the Karen Burniston Autumn word set, and the word happy from the same Pick of the Patch stamp set.


I did a lot of ink sponging to add more color and texture.  I also used foam tape on some of the elements, added Avocado Liquid Pearls and some fall colored Stickles.

I showed you the completed front at the beginning of the post so now I'll show you the back of the flaps.


Plus a close up look.


And one final photo.  I just wanted to show how this all fits on the card front.  That leaves you the entire inside of the card to add a message!


You should come on over and check out all of our great links!


~Kristina Hein

Supplies Used:


Avocado - Liquid Pearls
Shop at:
Dies R Us
Woodland Animals - Karen Burniston
Shop at:
Dies R Us
Autumn word set - Karen Burniston
Shop at:
Dies R Us
Triple Flip die - Karen Burniston
Shop at:
Dies R Us
Pick of the Patch stamps - Lawn Fawn
Shop at:
Dies R Us
Stitched Leaves - Lawn Fawn
Shop at:
Dies R Us
Small Stitched Leaves - Lawn Fawn
Shop at:
Dies R Us

Aug 14, 2019

Faux Floating Frame

Hey there you fabulous crafty peeps!  Kristina Hein with you today to share a technique I'm calling faux floating frame.  I'll get in to the reasons why in just a bit.  The technique creates two cards so here they are!


So why did I call it faux floating frame?  Well, you see, I had every intention of making this a floating frame card...but I didn't think it all the way through.  I am using the Jumbo Beautiful Rose die from Frantic Stamper.  You see, this die is a very delicate and fine line die.  Pretty much impossible to put foam tape behind the pieces to give it the floating look.  I improvised!

First step-since the die was so delicate, I wanted to actually color the paper first.  I traced the outline of the die onto some Bristol cardstock several times.


Second step-I added distress inks with a blending brush.  I used Dusty Concord and Bundled Sage.


Third step-I fitted the die back into the pencil outlines and cut them all out.


Fourth step-I laid all of the die pieces out onto a piece of A2 sized white cardstock.  I used Press n Seal to hold everything in place.  Then I cut off everything that was left hanging over the edge of the cardstock.  This picture was taken with the Press n Seal still holding everything together.


This was about the time I realized I wasn't going to be able to do the regular floating frame technique.  I peeled the Press n Seal and the die pieces away from the cardstock.  I then went around the backs of all the dies with a liquid glue.  I lined it back up and pressed back onto the cardstock.  After I made sure it was dry, I took a stitched oval die from the Elizabeth Craft Designs Stitched Ovals set and cut it out of the center.  This left me with two pieces.


Sixth(ish) step-I cut a piece of purple cardstock using the Elizabeth Craft Designs Stitched rectangles.  I then splattered on some shimmer spray.


Seventh step-I added foam to the back of the oval piece and played around with some of the extra bits I had left from trimming the original piece down.  Once I liked the layout, I glued the extra flower bits in place.  I cut the Best Wishes die from Tutti Designs out of white cardstock.  I then glued it in place.


Final steps-I glued the purple layer onto a white cardstock base.  I then added the oval piece and some Silver Lining Nuvo drops and called it done!


The steps are pretty similar for the green card except that I used the frame piece instead of the oval piece.  I also made it a side fold, landscape style card.  I added gold splatters and Honey Gold Nuvo drops.  The celebrate die is from Karen Burniston.  I cut a white layer and a purple layer.  I offset the white layer just a bit to give it a shadow.


I love how they turned out and I hope you like them as well!

Have you heard?  We are looking for new design team members!  Check out the details HERE.

And take a peek at all of our awesome links.


click below for:

And last but not least, supplies used:

Zig 2-Way Glue Pen - Squeeze and Roll
Shop at:
Dies R Us
Honey Gold - Nuvo drops
Shop at:
Dies R Us
Jumbo Beautiful Rose die - Frantic Stamper
Shop at:
Dies R Us
Celebrate - Karen Burniston
Shop at:
Dies R Us
Best Wishes - Tutti Designs
Shop at:
Dies R Us
Silver Lining - Nuvo drops
Shop at:
Dies R Us
Stitched Rectangles Elizabeth Craft Design
Shop at:
Dies R Us
Stitched Ovals - Elizabeth Craft Designs
Shop at:
Dies R Us

Aug 7, 2019

Choose to Shine

Happy Wednesday!  Kristina Hein with you today to share some rainbow fun!  Let me show you the first card!


I was able to take advantage of one of the special orders Dies R Us did for Paper Smooches for one of the recent releases.  I highly recommend you sign up for the email list.  This is the fastest way to learn about special orders and sales!  

Anywho,  I am using the Paper Smooches Sunnyville stamps and Cuppa Sunshine dies for my projects today.  I really had intended to make one card but I had so much fun I ended up with three.  

Did you know that Dies R Us has started carrying Brusho powders in the store??  I was SO excited to hear that and grabbed up a few colors.  Don't know what they are?  YouTube has tons of videos.  They are so darn cool.  Sorry, I'm fangirling over Brusho. 

Let me walk you through the process and then I'll share the other two cards.  Gotta leave some carrots for the end ya know!

I started by cutting out the Cuppa Sunshine die three times out of watercolor paper.  I then spritzed them lightly with water.  Then I added the Brusho powders and spritzed more water until the powder blended how I wanted.  I suggest you start with a little powder and add more as needed.  It doesn't really take that much.  I also worked on a piece of wax paper.  This helps a lot with quick clean up.

The colors used are Yellow, Yellow Ochre, Cobalt Blue and Purple.  The Brusho does not come in the bottles you see in the picture.  I changed them up to a dispenser bottle that was more convenient for me.  I let them air dry.


Here's a closer look so you can see the awesome texture and color these create.


Then I removed all of the pieces from the cup frame.  I made sure to keep all of the pieces.


Next I cut the Cuppa Sunshine die three more times out of watercolor paper.  I wanted the outlines to be white so I could fit all of the colored pieces inside.  I also cut the solid cup die out three times from regular cardstock.  I added Stick-It adhesive to the TOP of the cardstock before cutting out the cup.  This way there is already glue in place to hold the little pieces as I go.

Here are all of the cups put back together along with several other pieces I am using on the cards.  The rainbow paper strips are from two different Lawn Fawn paper pads.  The colored cardstock is from my stash and I used a striped embossing folder to give them added texture.


So,  here is the completed yellow version.


And the purple version.


And all three together for comparison.


Do you have a favorite?  Oh, I almost forgot.  The sentiment is from the Sunnyville stamp set.  I inked it up with Versamark and added black embossing powder.  Then I just cut it at an angle and layered it up.

One more picture before I let you go.  Another shot of that lovely Brusho texture.


Supplies used:

Yellow Brusho
Yellow Brusho
Shop at:
Dies R Us
Yellow Ochre Brusho
Yellow Ochre Brusho
Shop at:
Dies R Us
Cobalt Blue Brusho
Cobalt Blue Brusho
Shop at:
Dies R Us
Purple Brusho
Purple Brusho
Shop at:
Dies R Us
Tombow Mono Multi Liquid glue
Shop at:
SBC | EH
VersaMark Watermark ink pad
Shop at:
SBC | EH
Stick It Adhesive sheets
Shop at:
SBC | EH
Canson Watercolor paper
Shop at:
EH

I also wanted to direct your to the Dies R Us design team call.  Head HERE for all the details.

Don't forget to come on over and check out all of our great links!


See you soon!
~Kristina H.