Showing posts with label Tim Holtz. Show all posts

Oct 29, 2020

Harvest Blessings Card

  Hi everyone, Steph Ackerman back today sharing a scarecrow card for Fall.


I love Fall and fell in love with this scarecrow.


I used both dies in the Lawn Fawn Slimline dies set to create this card.  On the top layer I stamped a scarecrow in brown ink.  Because I wanted him to take center stage on the card, I stamped the scarecrow a second time, colored him with Copic Markers, then fussy cut him.

Using Tuti Designs Oval dies, I cut 6 of the smallest die and arranged them to create 2 different sized pumpkins, inking the edges with brown ink before gluing each pumpkin together.  Then I added some greenery and cut off the bottoms of each.


The colored scarecrow and pumpkins were added to the card with foam adhesives for added dimension.


 What do you think?
Thanks for stopping by.


Aug 7, 2020

Pocket Card

Mandi here with a how-to create an A2 size card with a pocket inside. 
   I created a little diagram to help visual learners.  Once you got the card base cut and scored place the die on the card front and die cut it. 
  As you can see I used the love word die from Paper Smooches. Keep the die-cut handy since we will be using it in a minute. I wanted to keep this card simple so I just fussy cut a watercolor stamped image and used foam tape to pop it up on to the card. 
   Cover the angle piece with your desired paper. Now fold the card so the angle cut is on the inside of the card. Glue along the inner and bottom edges. With the card close glue the love die-cut on the inside of the card by placing it in the negative area of the card front. Accent the sentiment with a Funky Floral #3 die-cut. 
   For the finishing inside touch, I added the same Funky Floral #3. With this inside pocket, it is great to hold a gift card. 
  Here is the completed card. Simple but holds a fun surprise. 

                                                     Dies R Us Product Used:
Sizzix Tim Holtz Funky Floral #3
Paper Smooches Love word 

Don't forget to come to join in the fun at the Dies R Us Challenge Blog.  There's a new challenge theme offered on the 1st and 15th of each month and one lucky randomly drawn winner will receive a gift voucher prize to the Dies R Us Store.  For your convenience, all the important Dies R Us links are provided below.


Click below for:

Jul 17, 2020

Christmas In July

   Hello everyone. Mandi here with a Christmas project since it is Christmas in July. Today I will be sharing how-to create simple place setting cards.
   Step 1. Fold cardstock in half. Tape the die the cardstock making sure the top of the die overhang the fold. Run it through the die cutter, this will create the card base. Tip it is best to use on nesting die set. 
    Step 2. Die-cut next smaller size in the nesting die set.  Also, at this time die cut the Sizzix Tim Holtz Funky Floral #3  flower. For the flower center, I used a sequin. Adhere everything to the place card. 
 Step 3. Type names on cardstock, trim strips, and tuck it under the flower. To make the cards stand up straight just trim off the bottom to create a flat edge. 
Dies R Us Product Used:

Don't forget to come to join in the fun at the Dies R Us Challenge Blog.  There's a new challenge theme offered on the 1st and 15th of each month and one lucky randomly drawn winner will receive a gift voucher prize to the Dies R Us Store.  For your convenience, all the important Dies R Us links are provided below.


Click below for:
FRIENDS OF DIES R US PINTEREST PAGE

Thanks for stopping by!

Apr 24, 2020

Creating a Pop-up Card

   Hello, Mandi from MJ's Kraze, here again. Last week, I shared with you are love card and today, I will be showing you how to use die cuts on the inside of your card with a simple pop-up feature. 

   First off cut liner card base a 1/4" smaller than your card base. Here I did a folded 5 1/4"x 4" so it fits an A2 card. I wanted two pop-up features so I did 4 horizontal cuts along the fold, 2 cuts are about 1" and the other 2 are about 3/4". Then connect the matching cuts with a vertical scoreline.
   Push the two pop-ups in so it looks like this. Adhere cardstock liner to your card base. 
    When it comes to adding the die cuts, you want to adhere to one side of the folded mechanism so the fold is free to move. I used the lovely butterfly dies from Jeanine's Art.  I had one die-cut on the right side of the top fold and the bottom fold it is on the left. To tie the front card design to the inside, I added some of the Tim Holtz Funky Floral die cuts from Sizzix to the writing area. Here is what the inside of the card looks like.
   Now let's look back to the outside. See how decorating the inside can make a handmade card look even more special. 


Don't forget to come to join in the fun at the Dies R Us Challenge Blog.  There's a new challenge theme offered on the 1st and 15th of each month and one lucky randomly drawn winner will receive a gift voucher prize to the Dies R Us Store.  For your convenience, all the important Dies R Us links are provided below.


Click below for:
FRIENDS OF DIES R US PINTEREST PAGE

Thanks for stopping by!


Apr 17, 2020

Creating Pattern Paper - Love Card

   Hello everyone, Mandi here, from MJ's Kraze,  today I want to share with you how to create a pattern paper using die cuts. This is what the finished project looks like. 

   To get started I used the Funky Floral Him Holtz die from Sizzix. I love the large flower so I die cut it in two colors of cardstocks and I die cut the fringe flower centers kraft, those will be used later.   I adhere it to a cardstock panel that will go on a card front. 


   I trimmed any of the overhangs die cuts and adhere it to a card base that had pattern paper on it. To make the flowers pop I took a .08 pen and outline the die cuts. I then added a little metallic washi tape along the top. 

   Now onto the finishing touches. I added the fringe flower and yellow sequins for the centers. I top it off with the "love" die cut from Paper Smooches


Don't forget to come to join in the fun at the Dies R Us Challenge Blog.  There's a new challenge theme offered on the 1st and 15th of each month and one lucky randomly drawn winner will receive a gift voucher prize to the Dies R Us Store.  For your convenience, all the important Dies R Us links are provided below.


Click below for:
FRIENDS OF DIES R US PINTEREST PAGE

Thanks for stopping by!

Apr 8, 2020

Be Happy!

Happy Wednesday, friends!

It's Nancy, from The Nickel Nook, back to share a fun new inspiration project,
using fun dies from Dies R Us!

Here's what I made:


I wanted to make something pretty, that might encourage you,
and maybe even make you happy! :o)

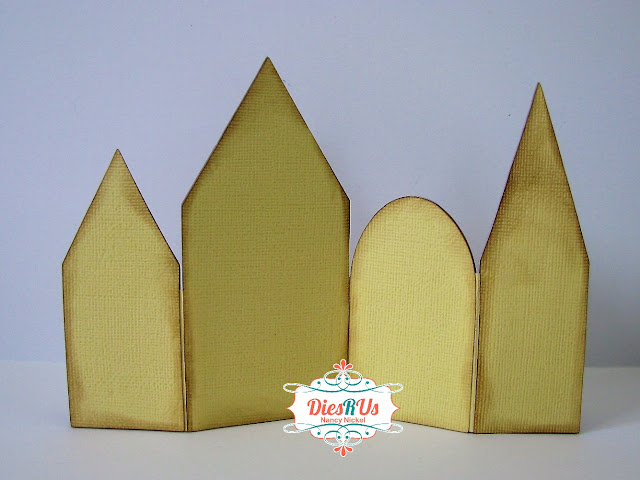
I cut all four pieces from: chipboard, decorative paper, and yellow cardstock.
I adhered the decorative paper to the front of each piece, 
and then inked all the edges.

Here's the back:


I added yellow cardstock hinges to the back of the pieces
before covering them with the yellow cardstock cuts. 
I then inked all around the back too. 

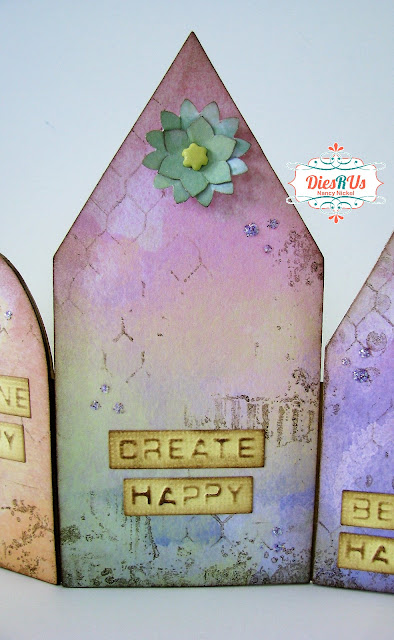
I then grabbed some fun texture stamps,
and did some stamping over the front of the dwellings.

I cut/embossed/inked all the words from yellow cardstock,
I chose a series of words that I thought would be fun.
It's like the active process to becoming happy! 


First we "HOPE FOR HAPPY".
I added a little punched/layered flower, and some pretty Stickles dots.


Next, we "IMAGINE HAPPY".
I added a few more Stickles dots for a little sparkle.


Then we "CREATE HAPPY".
Maybe by making a fun project like this one!
I added another punched flower, and more Stickles dots.


Finally, the process helps us "BE HAPPY"! 
One smaller flower, along with more sparkle!


There you have it! 
I hope you enjoy my fun project!
I'll be back soon with more!

* * * * *

Dies R Us Product Used:


* * * * *
Don't forget to come join in the fun at the Dies R s Challenge Blog
 There's a new challenge theme offered on the 1st and 15th of each month 
and one lucky randomly drawn winner will receive a gift voucher prize to the Dies R Us Store.  
For your convenience, all the important Dies R Us links are provided below.


click below for:
FRIENDS OF DIES R US PINTEREST PAGE

Thanks for stopping by!