Showing posts with label Pop Up card. Show all posts

Jan 5, 2020

Tropical Birthday!

Hello all, Samantha here!

I hope you take a second and stop by the Dies R Us store because there are SO MANY GOODIES! 

Today, I am sharing a card I made for a birthday! A tropical themed birthday, of course!

I struggle with masculine cards, because I want to throw glitter or flowers on just about everything I touch! However, Karen Burniston's amazing set came to the rescue! With her Ocean Animals, Tropical Scene, Sea Animals, and lastly the Palm Tree Pop Up set I felt like it all came together pretty easily. 
One of the many things I love about Karen's products is the easy to follow YouTube tutorials she has on putting these amazing pieces together!

 Being a lover of all things beach, nautical, and tropical I had an absolute blast putting this card together! I hope you'll go to the store and check out some of the other amazing products that Dies R Us carries!


Karen Burniston - Dies - Ocean Animals

Karen Burniston - Dies - Tropical Scene

Karen Burniston - Dies - Sea Animals

Karen Burniston - Dies - Palm Tree Pop-Up


Thanks so much for checking out my card today! I hope you have a great day!
hope that I was able to inspire you to use your dies, create a project, and come play along with us at the Dies R Us Challenge Blog for your chance to win a gift voucher to the Dies R Us Store.  A new challenge begins on the 1st and 15th of every month.  Be sure to follow us on Facebook and Pinterest too.

Dec 8, 2019

YOU Make the World a Better Place!

Hello all, Samantha here!

I hope you take a second and stop by the Dies R Us store because there are SO MANY GOODIES! 

Today, I am sharing a card I made with a galaxy theme!

Its just in my nature to make everything sparkly, and pink! So, generally I have a tough time making masculine cards. However these two sets from Karen Burniston made it so easy!


For this base, I started out with a slight shimmer navy card stock. I then used regular white cardstock to create my galaxy base. This was created with Adirondack inks. If you've never played around with these, you ought to because they are so much fun!

So, once the galaxy background was created. I got to work cutting out  my dies! Karen Burniston makes assembly so easy with her You Tube videos! So that's what I used, to assemble this card together. I, did however switch the rocket to pop up the side of the card, instead of the bottom. 

The ring around the space ships, were actually die cut with washi tape! 


Avery Elle - Sentimentals
Shooting Stars Crafting Dies

Thermoweb - 3D Foam Squares - White .25" 176/Pkg
Thanks so much for checking out my cards today! I hope you have a great day!
hope that I was able to inspire you to use your dies, create a project, and come play along with us at the Dies R Us Challenge Blog for your chance to win a gift voucher to the Dies R Us Store.  A new challenge begins on the 1st and 15th of every month.  Be sure to follow us on Facebook and Pinterest too.

Jul 10, 2019

Summer fun

Summer is in full swing here in the midwest!  Kristina Hein with you today to share a summer inspired card.  Let me show you the finished card and then we'll get to the nitty gritty details!

This is the front of the card.

And here is the inside.


Isn't this a fun summer card?

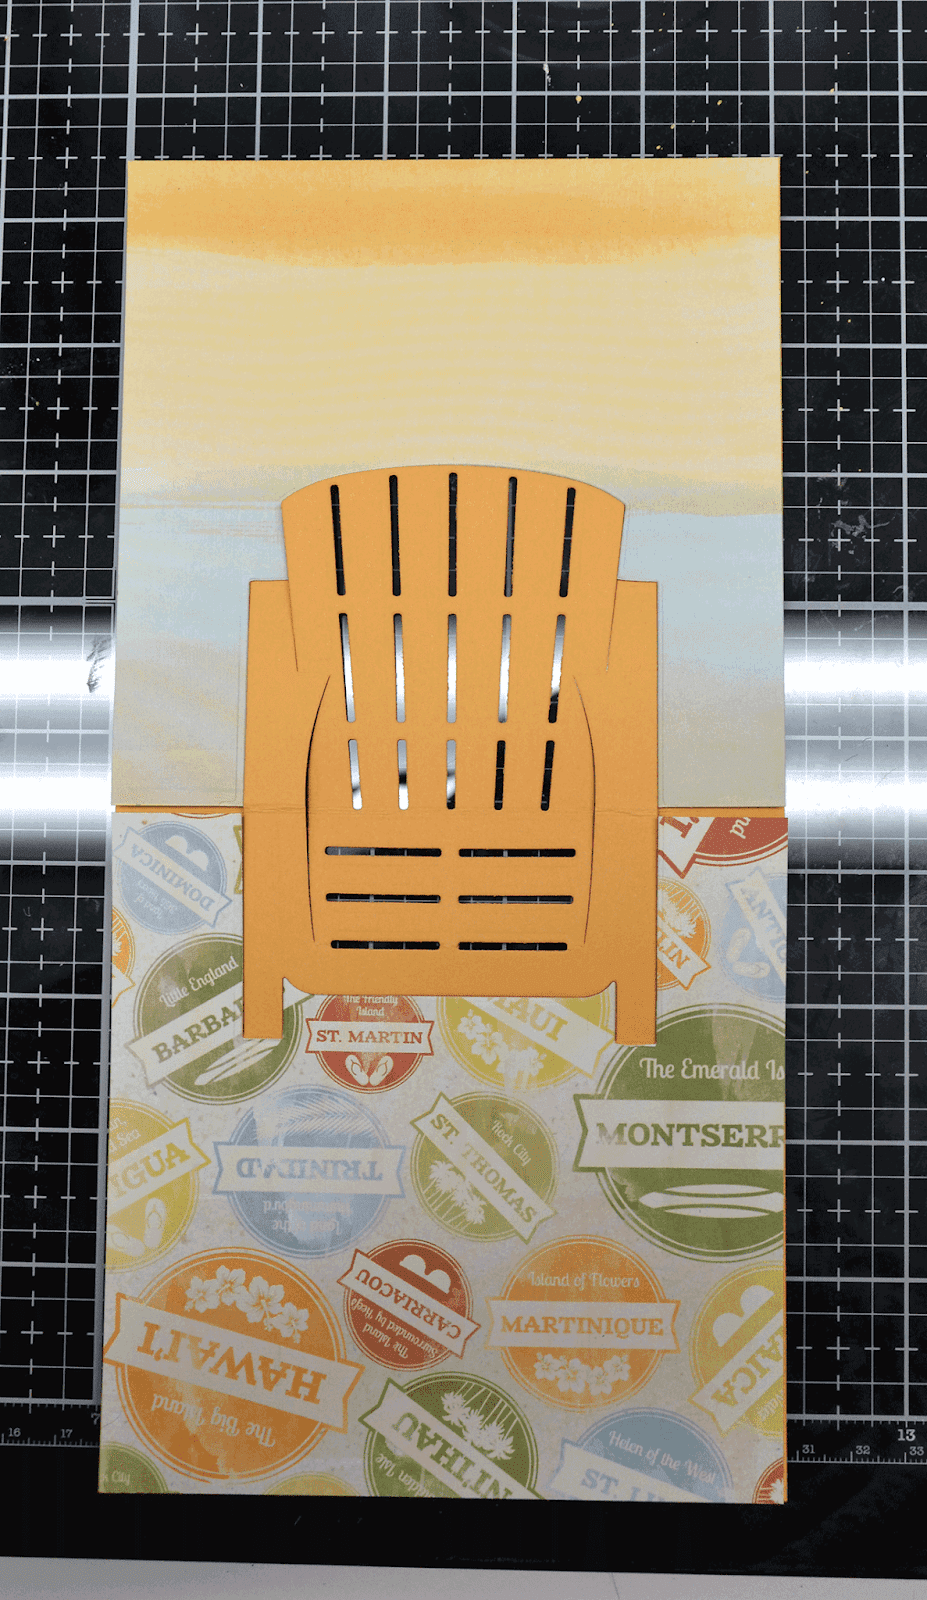
The first step was to create a 5"x 5" square card base.  I did this out of a warm yellow cardstock.  Next I cut two pieces of patterned paper from the Bo Bunny Beach Therapy paper pad.  I glued those to the top an bottom of the inside.  I then lined up the Karen Burniston Adirondack Chair die and ran it through my cutter.  I removed the excess chair pieces resulting from the pattern paper and cut them off.  That reveals the yellow chair.

The next step was to fold the chair along all the score lines.  After that, I cut out the chair arms from a pale green cardstock and glued them in place.


Next I cut all the pieces for the kitty die using the Karen Burniston Cat & Dog die.  I added foil paper in the center of the glasses so they look polarized.  The glasses come from the Karen Burniston Tiny Accessoris 2 set.  I added the details on the cat with markers.


I wanted the kitty to pop up as well when you open the card so I created a piece that fits through a slat in the chair and will attach to the kitty.


I cut it down and glued the cat in place. Here you can see the kitty sitting in the chair.  I also added the sun die (Karen Burniston Tropical Scene) and a few clouds.  I couldn't find my Lawn Fawn dies at the time but they are linked below.


Now I moved on to the inside sentiment.  I cut a piece of rust cardstock using the waves edge (Karen Burniston Tropical Scene) as a scallop edger die on the top and bottom.  I ran it through my cutter with an embossing folder to give it texture.  Then I went over it lightly with a white ink pad to make the pattern more noticeable.  I then cut out the letters using the Karen Burniston Blackboard Alphabet dies.  I created the leaf pieces using dies from the Sizzix Funky Florals #2 set.  I glued all of the elements in place.


That leaves me with the outside of the card to decorate.  I cut a pale blue piece of cardstock to cover the back of the card and the chair mechanism.  I used the Dotted Scallop Squares die set to cut out the tropical paper.  I glued it into place.  I used red foil paper and Coles ABCs from Lawn Fawn to cut out the word Summer.  I used liquid glue to add them to the front.  For the finishing touch I added some matching sequins.


You shoud come on over and check out all of our great links!


~Kristina Hein

Supplies Used:

Zig 2-Way Glue Pen - Squeeze and Roll
Shop at:
Dies R Us
Simple Puffy Cloud dies - Lawn Fawn
Shop at:
Dies R Us
Karen Burniston Cat and Dog
Shop at:
Dies R Us
Karen Burniston Blackboard Alphabet
Shop at:
Dies R Us
Elizabeth Crafts Designs Dotted Scallop Squares
Shop at:
Dies R Us
Tiny Accessories 2 - Karen Burniston
Shop at:
Dies R Us
Adirondack Chair - Karen Burniston
Shop at:
Dies R Us
Funky Floral #2 - Sizzix
Shop at:
Dies R Us
Tropical Scene dies - Karen Burniston
Shop at:
Dies R Us

May 22, 2019

For the Grad

Howdy and hello everyone!  Kristina Hein here with a little something for the graduate in your life!


It's been a long time since I made a pop-up box card but I thought this might be the perfect time.  Not only is my daughter graduating from high school but so is my stepson!  Yikes.  Things are bit chaotic around here.  I wanted to create a card that incorporated my daughter's school colors of orange and black.  I'm pleased with the results!

There are a ton of videos and tutorials out on the web that give you detailed instructions on how to create the basic card.  I'm not going to go into detail and just start with the basic box already created.


I started by cutting pieces of patterned paper to fit the tops of the flaps and the vertical sides of the box.  I sponged the edges with orange ink that matches the orange cardstock I planned to use.   I glued the paper onto the box.  Next I used the Grad Group Border die to cut out a piece of orange cardstock.  I did have to cut off one of the grads because it was too wide for the box.  I used liquid glue to adhere the grad die into place.


Next I cut out and assembled all of the die pieces I needed.  I used Blackboard Alphabet and Blackboard Numbers to cut out the letters and numbers that I needed.  I cut silver cardstock with the smallest die from the Tutti Designs Stitched Nesting Banners dies.   I used the Karen Burniston Congrats word die set to cut the sentiments out of orange cardstock.  Here are all of my pieces ready to go on the box.


And here is the box after all of the pieces were glued into place!


I used pieces of acetate to extend my pieces up.  The balloon pieces were a little to heavy for just acetate so I added thin pieces of black cardstock as a support.  It worked out perfect because they look like balloon strings!


The great thing about these pop-up boxes is that they still fold flat for mailing.


The flat card measures approximately 5" x 7 1/4".  I hope I have inspired you to whip up a pop-up box or two.  Now, wish me luck.  I need to make at least one more graduation card!

Supplies Used:

Zig 2-Way Glue Pen - Squeeze & Roll
Shop at:
Dies R Us
Tutti Designs Stitched Nesting Banners
Shop at:
Dies R Us
Karen Burniston Blackboard Alphabet
Shop at:
Dies R Us
Blackboard Numbers Karen Burniston
Shop at:
Dies R Us
Congrats Word Set Karen Burniston
Shop at:
Dies R Us
Grad Group Border Impression Obession
Shop at:
Dies R Us

Come on over and check out all of our great links!


See you soon!
~Kristina H.