Jul 26, 2021

Cheers to Happy Hour!

 Hi there, Alicia with you today.  I tried my hand with the Karen Burniston Triple Flip card using more Karen Burniston die sets to compliment the card.  I used some bold pattern paper to create a "happy" hour kinetic card.  I followed Karen Burniston's Triple Flip assembly video even though I have previously used this die set. I find a refresher of the details are helpful.  The front panel needs to be 5.5" so I used an A2 size card base.


I enjoyed creating the tiny drinks.  I used acetate for the glasses and white card stock inked as the contents.  The little olives are adorable and so easy to make.  Just cut and then use the stencil feature to color in the black with a pen.  


And now for the flip...I used cut the word into three equal parts freehand and spread them across the three panels.  I cut simple ovals from the Karen Burniston Memory Charms to really make the sentiment pop off the page.


A closer look of the sentiment.


Here are some of the dies and cuts I made prior to inking. 


From the store:


Other products:
Stampin Up Pretty Petals 6x6 papers and Old Olive card stock
White card stock
various inks


Don't forget to come join in the fun at the Dies R Us Challenge Blog. There's a new challenge theme offered on the 1st and 15th of each month and one lucky randomly drawn winner will receive a gift voucher prize to the Dies R Us Store.  


links below for:


Thanks so much for stopping by


Jul 23, 2021

Twirly Circle Friendship Card

Hello, crafty Dies R Us fans! Leslie here from Love To Scrap 2 and I’m delighted to be back on the blog today with another awesome DT inspiration project! I created a pretty friendship card featuring the absolutely gorgeous paper-pieced Memory Box Twirly Circle die! Paper piecing is very relaxing for me and it sure yields a nice result!


Okay, so let's get started!

1. Using the Memory Box Twirly Circle die, cut the focal element once from dark purple cardstock and discard all the small pieces, keeping just the center circle for embellishing the inside panel and the frame which will be the base of the focal element on the front. 


2. Die cut a second twirly circle from light purple patterned paper and a third one from medium purple cardstock, retaining the innermost circle of pieces on the patterned paper one and the outermost circle of pieces on the medium colored cardstock one. The use of washi tape on the back side holds the pieces where they belong.


3. Cut a square top-folding card base from white cardstock along with front and inside layering panels and one narrow embellishing strip for the inside from dark purple cardstock, a front layering panel and inside embellishing strip from yellow gingham patterned paper, and an inside layering panel from white cardstock.


4. Adhere the yellow gingham layering panel to the dark purple layer to create the front panel. Adhere the dark purple twirly circle frame to the front panel, and then place all the small pieces retained from the other two die cuts into the negative spaces on the frame using the Crystal Katana Pick-Up & Glue Tool. This tool is a lifesaver when working with a lot of small pieces and makes the process go much faster! Next, adhere the yellow gingham and narrow dark purple strips to the white cardstock panel and then adhere that panel to the other dark purple layer to create the inside panel. 


5. Add the sentiment strip to the front panel, and then add the retained circle from the dark purple die cut and a sentiment to the inside panel. 


6. Adhere the panels to the front and inside of the card base, and add a little bit of bling to the front panel for some interest. Now your pretty paper-pieced card is complete! ;)


Dies R Us products used:
Memory Box Twirly Circle
Crystal Katana Pick-Up & Glue Tool

Don't forget to come join in the fun at the Dies R Us Challenge Blog. There's a new challenge theme offered on the 1st and 15th of each month and one lucky randomly drawn winner will receive a gift voucher prize to the Dies R Us Store. For your convenience, all the important Dies R Us links are provided below.

https://blogger.googleusercontent.com/img/b/R29vZ2xl/AVvXsEjCjT8pw_L9T-z6-KjvbFtjxltch0jDrbOVSRoR7-pMeQw8lEYfIDENxvu0UYve6R3ZP9GqtyyTDEJbdtSMk3bGQBx_Y3u5-ayMxatDG7IHMgflmEHGKjuk1fXzqacoc_aa78anm5BPmKz1/s320/*logo%2Bcollage.pages.jpg

click below for:

STORE

CHALLENGE BLOG

FACEBOOK

INSPIRATION BLOG

FRIENDS OF DIES R US PINTEREST PAGE


Thanks so much for stopping by today - we'll see you next time!

Scrappy hugs,
Leslie


Jul 22, 2021

How to create a Christmas Cookie Jar Shaker Card

How to create a Christmas Cookie Jar Shaker Card

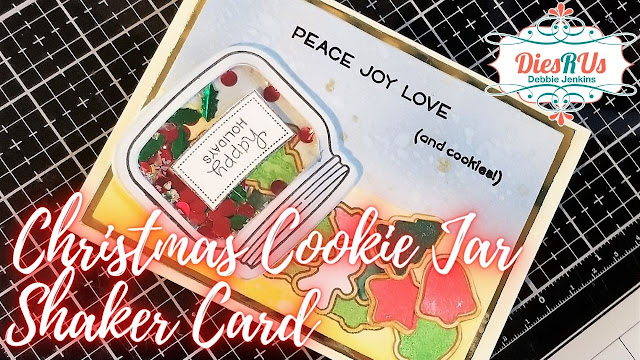
Hi Guys! I'm Debbie from Debbie J’s Crafting Corner, here today sharing how I created this Christmas Cookie Jar Shaker Card using Lawn Fawn stamps and dies.

I love showing the process when I’m creating.  I hope my tutorial and video help you see that, if I can make it, You Can Too!

I used the following stamps and dies from Dies R Us:

Lawn Fawn - How You Bean? Stamps

Lawn Fawn - How You Bean? Shaker Add-On Dies

Lawn Fawn - How You Bean? Christmas Cookie Add-On Stamps


Check out the video showing how I created this fantastic card!

https://youtu.be/BfI3ng00Tj0

Video Chapters

  • Introduction: 00:11
  • First we Stamp: 0:32
  • Then we color: 4:15
  • Create the Shaker: 5:30
  • Decorating the Front: 7:30
  • Add the Shaker Bits: 12:00

 First we Stamp

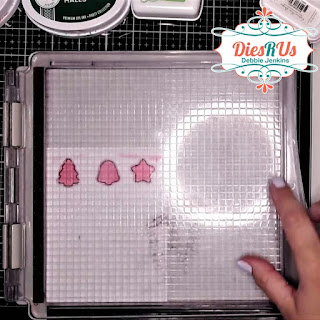
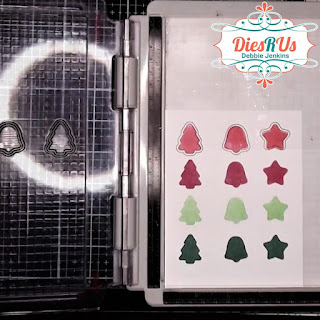
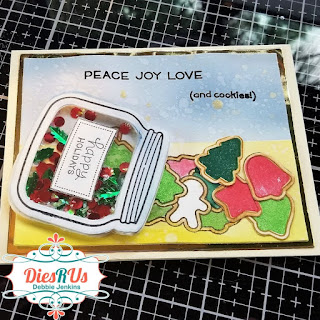
First we stamp.  I stamped out a bunch of the cookie images, using the solid pieces to color in all of the frosting.  

Then I stamped out the scene for the front of the card.  This includes the jar, the cookies on the “counter” and the cookies still in the jar.  

In order to stamp the frosting, I did some simple masking using Post-it tape for the masks.

How to create a Christmas Cookie Jar Shaker Card

How to create a Christmas Cookie Jar Shaker CardHow to create a Christmas Cookie Jar Shaker CardHow to create a Christmas Cookie Jar Shaker CardHow to create a Christmas Cookie Jar Shaker Card

Then we color

Then we color.  Well… there wasn’t much coloring needed. But the cookies needed to be baked, right?  So I tried water-coloring with the Caramel ink from Hero Arts and it worked great. 

How to create a Christmas Cookie Jar Shaker Card

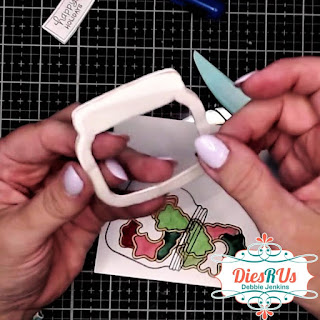
Then I added some double sided adhesive from Scrapbook.com to the back of the cookie images and label for the jar, and fussy cut them out.
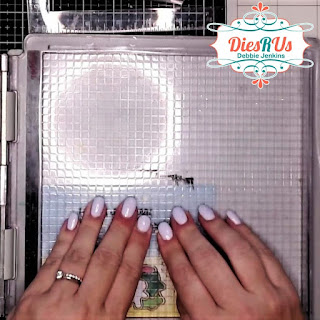
How to create a Christmas Cookie Jar Shaker CardHow to create a Christmas Cookie Jar Shaker Card

Create the Shaker

To create the shaker, I added double sided adhesive to some Darice foam and cut out the well using the shaker die in the shaker add on die set.

 Then removed the backing paper and adhered some clear acetate, cut from another die in the set, to the foam.

How to create a Christmas Cookie Jar Shaker Card

Decorating the Front

Time to decorate the front of the card.  We don’t want the cookies to be floating in the air. 

So I created a countertop by masking off a horizon line with Post-it tape.  I colored the wall in soft blue, and the counter in yellow.

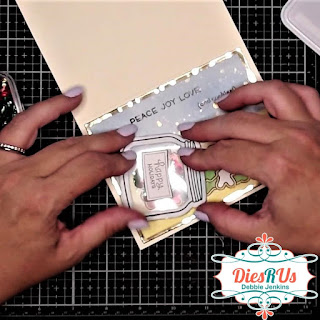
Then I added some splatter and a heat embossed sentiment, and adhered the card together.
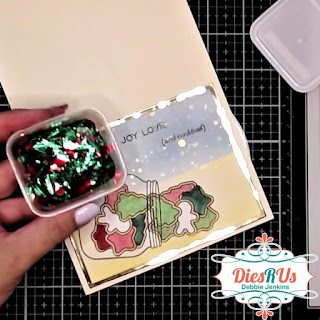
How to create a Christmas Cookie Jar Shaker CardHow to create a Christmas Cookie Jar Shaker CardHow to create a Christmas Cookie Jar Shaker CardHow to create a Christmas Cookie Jar Shaker CardHow to create a Christmas Cookie Jar Shaker Card

Add the Shaker Bits

Now for the fun bit… shaker bits.

I poured out a small pile of a Christmas confetti mix from Dollar Tree into the center of the jar on my card front.  Once they were arranged away from the edges, I adhered my shaker well to the front of the card, over the stamped jar on the card.

How to create a Christmas Cookie Jar Shaker CardHow to create a Christmas Cookie Jar Shaker Card


Here are some photos of the finished card.How to create a Christmas Cookie Jar Shaker CardHow to create a Christmas Cookie Jar Shaker CardHow to create a Christmas Cookie Jar Shaker CardHow to create a Christmas Cookie Jar Shaker CardHow to create a Christmas Cookie Jar Shaker Card  

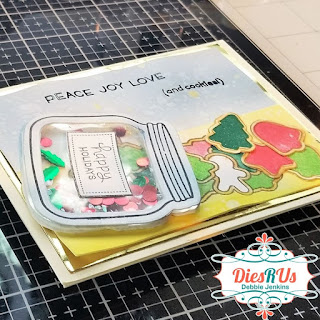
Thank you so much for dropping by.  I hope you enjoyed this project and would love to hear what you think of this card.

Please leave me a comment down below!


Be sure to check out my YouTube Channel, Blog, Pinterest, and Instagram for more inspirational projects.  I also have a fun Facebook Group where you can share your projects with other fantastic creators.  We would love to see what you create, so come join us!


Head back to the Dies R Us Blog tomorrow for more fabulous inspiration from the DRU Inspiration design team.


Be sure to check head over to Dies R Us Challenge Blog.  We love to see what you create, and this is a perfect place for you to share your creativity.  


PLUS, there is a new challenge theme offered on the 1st and 15th of each month, and one lucky randomly drawn winner will receive a $10 gift certificate to the Dies R Us Store.  


Thanks so much for stopping by. And remember, if I can make it, YOU CAN TOO!


Jul 21, 2021

Christmas in July Gift Box


 Hello Friends,


Diane here to share with you my Christmas in July Dies R Us inspiration.  This adorable little box is so fun and easy to create.  I used the super fun Lawn Fawn Scalloped Treat Box and the Scalloped Treat Box Winter House Add-on.  Come take a closer look...


This is a perfect little box for some Christmas candy treats for family, friends or co-workers.  Below is  a simple tutorial on how I created this cutie.


First I cut two of the scalloped treat box using some wood papers.


It helps to enhance the score lines with a score board and score tool.  Next, I folded the little box on the score lines and glued the flaps accordingly. Be sure to press them with a bone folder for a crisp edge.


Glue the bottoms together.


Glue the sides together.


Press inside to make sure everything adheres nicely.


Then cut out all the decorative elements.  I used different solid colored cardstock to cut the elements. I cut the roof out of snow white, the door and windows out of white. I used gold for the inside of the window and door. I used a bright green for the wreaths and trees and bright Christmas red for the bows.


All that's left is to put it all together and decorate your gift box.


I wanted some snow to place at the bottom of each side of the box. So I took my Lawn Fawn mini frames dies and cut out only one side of the rectangle frame die. 


 I trimmed off the excess, and adhered it to the bottom of each side of the gift box.


I continued to decorated my box until I was pleased with the outcome.


This was such a Fun little project.  I hope that you will give it a try. Be sure to visit Dies R Us for this and many more fantastic dies and stamps for all your crafty crestions.


Don't forget to come join in the fun at the Dies R Us Challenge Blog. There's a new challenge theme offered on the 1st and 15th of each month and one lucky randomly drawn winner will receive a gift voucher prize to the Dies R Us Store.  


links below for:


Thanks so much for stopping by.