Mar 25, 2017

A Happy Hello

Good Morning!  Happy Saturday!
Donna Phelan back again to share an all occasion card with you today!

This card measures 5 1/2 inches squared plenty of area to load up with lots of pretty dies.  I started with a little stitching on my pretty Designer Paper.  Easy to do and adds so much interest I think.  The focal panel was cut using a Die-Namics Cross Stitched Rectangles die cut.  On either side of that I added a Die-Namics Dizzy Border die, which I split right down the middle, placing half on top and bottom.  This panel is also backed with a piece of Fun Foam, which makes the whole panel quite sturdy.      


I created my circle frame by layering 2 different size Spellbinders Standard Circle dies.  Behind that frame I cut one of the Distressed Windham Collage dies by Memory Box.  I cut this several times making sure it was wide enough to cover the space of my circle frame.  I then topped it with the beautiful Row Of Poppies die by Memory Box.  These were layered Kraft on Black card stock.  The butterfly die cut was gifted to me.  One last die, the Curly Words - Hello by Die Versions.  This die is also layered, Green on Black card stock.  I also added the leftover Kraft poppies to the inside of my card.  Some Sheer Ribbon and a few Adhesive Rhinestones for accents.


Try using your dies in a manner in which they were not intended
and your dollars will go twice as far. 
Here's what I used:
Memory Box
Distressed Windham Collage
Memory Box
Row Of Poppies
Die Versions
Curly Words Hello
Thanks so much for stopping by!
Enjoy~~


Remember everyday the Design Team will be sharing beautiful inspiration with you all, so keep coming back!
Don't forget to play along at the Dies R Us Challenge Blog for your chance to win a gift voucher to the Dies R Us Store.  A new challenge begins on the first and fifteenth of every month.  Be sure to Follow Us on Facebook too. 


Mar 24, 2017

Thanks You Very Much

Morning Peeps, 
Berni here with another creation for the Dies R Us Inspiration blog!  The Dies R Us on-line store carries a huge assortment of amazing dies by several manufacturers. . 

Project Instructions:
I just wanted to have some tulips in purple. So I pulled out this Tutti Tulip Corner die. I double cut the die, once in black and then again in purple. I placed the purple on top of the black die for a shadow effect. Added some glitter on the tulips and butterfly. Placed the butterfly in right bottom corner for a little dimension. Added the sentiment in the middle for the focal point

Kindly take a jog and check out all of the fabulous dies available at the Dies R Us Store; and do not forget to come join in the fun at the Dies R Us Challenge Blog! A new challenge is offered on the 1st and 15th of each month with a Gift Certificate to one winner each challenge. That winner could by You!

Thank you for stopping by. See ya real soon, Berni

Also, if you are new to Pinterest, kindly know you do not need to sign up or have a Pinterest account in order to enjoy all the lovely Pin-inspiration you will find.
Follow Dies R Us

click below for:
STORE
CHALLENGE BLOG
FACEBOOK
INSPIRATION BLOG


Mar 23, 2017

Card "Bright Spring"

Hello, friends! 
Natalya here with a succous card  for Dies R Us Inspirational Blog


Here is a photo of the process of creating a card. 


 The background of the card is painted in sprays and add stamps


From these elements adding the composition
And details:


Here's the cute dies that I used: 
Dies R Us - Dies - Rectangle Frame: Prima - Dies - Emmanuelle Fleurs:
Hugs, Natalya!


I hope you will join in on the fun over at the Dies R Us Challenge blog. Be sure to pop over to theDies R Us store to do some shopping while you are here. And don't forget to like us on ourFacebook page. You don't want to miss out on anything that is happening at Dies R Us.

Follow Dies R Us!


click below for:


Mar 22, 2017

Hello Spring!

Hello, Janice here with you again to share my latest card 
made for the Dies R Us Inspirational Blog.

As we are now in the first week of Spring, I thought I would use the colours that always
 remind me of Spring for my card today.

I started by embossing a 7"x5" card base.
Then using the largest of the Lawn Fawn - Stitched Scalloped Border Dies, I cut three
borders in yellow and green, and glued them together and added them to the bottom of a white embossed panel.
Next using the second largest of the Lawn Fawn - Stitched Scalloped Border Dies, I cut a yellow border and glued it to the top of the embossed panel.


Using orange card, I cut the word 'Hello' from the Avery Elle - Sentimental Die Set
and glued it to the central panel. Finally I added a couple of green sequins
and yellow enamel dots to finish.

The dies I have used are:-


Thanks so much for stopping by.
Check back daily for more great inspiration from the girls on the design team.

Why not check out all the fabulous dies available at the Dies R Us store AND, 
don't forget we have a Dies R Us Challenge Blog too!

A new challenge is offered on the 1st and 15th of each month with a PRIZE VOUCHER 
offered to the lucky winner of each challenge.


click below for:
STORE
CHALLENGE BLOG

INSPIRATION BLOG
FACEBOOK
PINTEREST
See you again soon!
Janice

Mar 21, 2017

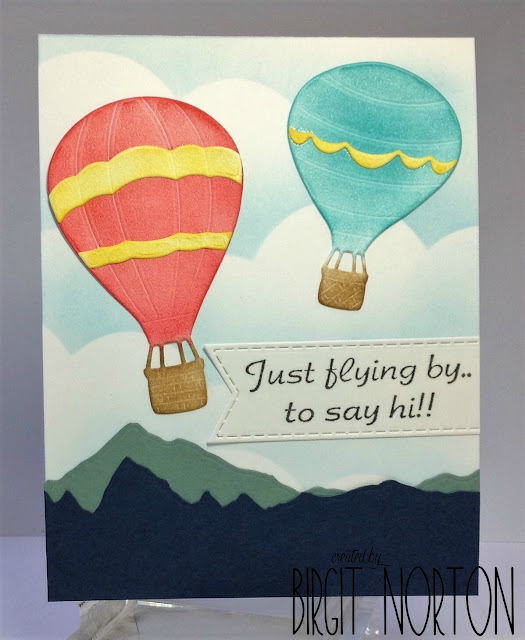
Up, Up And Away!

Good morning ~ Birgit here with you today. 
 Masculine cards can be challenging for me so when I saw the Hot Air Balloons from Elizabeth Craft Designs, I just knew this would be perfect for a masculine card.

I started by cutting a Lawn Fawn Puffy Cloud die out of a piece of scrap paper and using it as a stencil to create the sky scene using distress ink and a blending tool.

Next, I cut two mountain ranges using Impression Obsession Mountain Landscape Layers and layered them over the cloud background.

I cut the Elizabeth Craft Designs Hot Air Balloons out of Soft Finish Cardstock and added color using distress inks and a blending tool and assembled the balloons.  I used a computer generated sentiment and cut it using an Elizabeth Craft Designs Stitched Fishtail Banner and finished the card off.  


Here's a list of products I used that can be found at Dies R Us
Elizabeth Craft Designs - Hot Air Balloons  Lawn Fawn - Puffy Cloud Borders Die Impression Obsession - Dies - Mountain Landscape Layers  Elizabeth Craft Designs - Dies - Stitched Fishtail Banners

Don't forget to play along at the Dies R Us Challenge Blog for your chance to win a gift voucher to the Dies R Us Store.  A new challenge begins on the first and fifteenth of every month.  Be sure to Follow Us on Facebook too. 


Thanks so much for stopping by!  Blessings~ Birgit

Mar 20, 2017

Spring Begins

Good Monday Morning!  Spring begins today!  Yippee!
Donna Phelan back again to share a pretty Spring Garden card with you all. 
I can't stress this enough, if you have the best dies that our Dies R Us Store sells, then you can surely create a beautiful card....no doubt!
Here's today's feature:


Many, many dies used on this creation.  Let's start from the beginning.  I created my rolling hills using the Stitched die from Paper Smooches.  I then added the Burlap Border by Cheery Lynn.  I always try to look at dies from every angle.....sure it's a great die for adding texture, but turn it all around and see the different possibilities.....here it is now a pretty white trellis for my Spring flowers.  I then topped my 'trellis' with this fabulous Ivy Corner Flourish also by Cheery Lynn.  I die cut several and then snipped them apart, placing them where I wanted them to grow.    


Then I added a white picket fence, isn't that every one's dream?  This Picket Fence is perfect, it's by Amy Design.  Adding a wheelbarrow full of pretty posies just made sense to me.  The Wheelbarrow is by Impression Obsession and was cut in silver and black card stocks, which were just layered together.  After stamping my sentiment, I still felt this needed a bit more, so I added the Lace Corner Deco H die by Cheery Lynn


 And now for some planting!  


The pretty posies in the wheelbarrow are from the Large Madison Window set from Poppy Stamps.  I die cut the flowers and vines from different color card stock and filled my wheelbarrow.  All of the flowers, large and small, have seed bead centers.


The larger flowers on my trellis are Cherry Blossom Branch by Cheery Lynn.  I could have used the 'vine and branch' that came with this die but decided to use that pretty Ivy instead.   Adhesive Pearl accent, Flower Punch on inside.

Here's what I used:

Cheery Lynn
Burlap Border


Cheery Lynn
Ivy Corner


Amy Design
Picket Fence


Impression Obsession
Wheelbarrow


Cheery Lynn
Lace Corner Deco H


Cheery Lynn
Cherry Blossom Branch


Thanks so much for stopping by!


Enjoy~~

 Remember everyday the Design Team will be sharing beautiful inspiration with you all, so keep coming back!
Don't forget to play along at the Dies R Us Challenge Blog for your chance to win a gift voucher to the Dies R Us Store.  A new challenge begins on the first and fifteenth of every month.  Be sure to Follow Us on Facebook too. 

click below for: