Showing posts with label Yvonne Creations. Show all posts

Jun 15, 2021

Pretty Perfume Bottles

Good morning!!  It's Lisa again, sharing a girly perfume bottle card with you today.  These Yvonne Creations Perfume dies make me think of my grandmother.  She always had a collection of pretty bottles sitting out that she picked for the style of the bottles rather than the fragrance.


I layered the bottles onto the nesting frames from the Yvonne Creations Snowflake Rectangle die set.  I like to look at my Christmas die sets and find elements that are not Christmas-related and use them all year long.


When I first cut the bottles out, I decided I wanted to fill in all the die cut holes, so I glued them to foil cardstock with Bearly Art glue and fussy cut around them.


I'm not always sure of my layout until I start taping or gluing things together.  I was almost sure this was going to be a vertical card with a big sentiment, but I didn't like how that looked.


I wanted to share something I do when I pop up elements that not a lot of people do.  Especially when my cardstock is thin, like this silver shimmer is, I can't stand when the cardstock like dips because there's no foam tape there.  So I put foam under the entire die cut.  I just snip my pop dots to fit in the little spots.


I know it looks crazy but it makes the card look so much more polished.


I glued all these Diamond Dotz stones on one at a time.  This really shows the difference between the plain and embellished die cuts.  They make it pop.

I hope this inspires you to look at your Christmas dies and see what else can be made with them. Have a crafty day! --Lisa

Products Used:


Don't forget to come join in the fun at the Dies R Us Challenge Blog. There's a new challenge theme offered on the 1st and 15th of each month and one lucky randomly drawn winner will receive a gift voucher prize to the Dies R Us Store.  


 For your convenience, all the important Dies R Us links are provided below.


click below for:

STORE

CHALLENGE BLOG

FACEBOOK

INSPIRATION BLOG

FRIENDS OF DIES R US PINTEREST PAGE


May 25, 2021

Alice In Wonderland Frame Card

Good morning!!  It's Lisa again, this time with an Alice In Wonderland themed square card.  I don't make a ton of square cards because they require extra postage, but every now and then I have a die that just screams "square card" and this Yvonne Creations Playing Cards Frame die definitely fits that category.

The minute I saw this die from Yvonne Creations I knew I wanted to make an Alice in Wonderland card with it.  I paired it with this Cheshire Cat stamp from Creative Expressions.

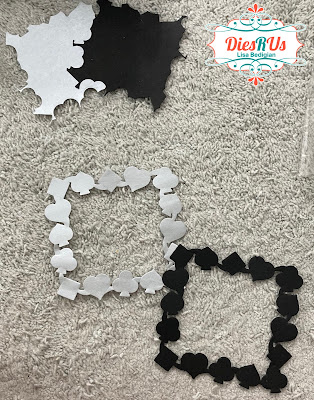
Since I had to wait for the ink to dry, I started by stamping the image on a 4" x 6" piece of Neenah Classic Crest Solar White 80lb cardstock.  While that set, I cut the frame once out of black cardstock and once out of silver shimmer text weight cardstock.  I put adhesive sheets on the back of the cardstock before cutting it so I could easily layer and attach them to the card.


See those negative space pieces in the top left corner? Since they have adhesive on them, I'll save them to cut sentiments and other small die cuts out of for future projects.

At this point, I decided that I wanted the frame to be more dimensional, so I wanted to cut three more layers of black cardstock to build up.  But since my inked background would need to dry, I went back to my stamped panel to ink it first.


This is where I made a mistake, but I didn't realize it until I went to cut it out.


When I taped the die down to cut out the center, I made the stripes of ink too wide, so the pink wasn't showing up.  So I had to stamp it and color it again.

I forgot to take a photo of the process, but I used scraps of red and black matte glitter cardstock to cut the hearts, diamonds, clubs and spades out, then I fussy cut all the frame away from the shapes and layered them onto the stacked frames.  I taped the negative die cut insert with my stamping into the frame first, then adhered it to my card base.  Clear AB rhinestones finished it off.


I hope this inspires you to play around with layering dies and using the negative part of the frame die as well.  Have a crafty day! --Lisa

Products Used:


Don't forget to come join in the fun at the Dies R Us Challenge Blog. There's a new challenge theme offered on the 1st and 15th of each month and one lucky randomly drawn winner will receive a gift voucher prize to the Dies R Us Store.  


 For your convenience, all the important Dies R Us links are provided below.


click below for:

STORE

CHALLENGE BLOG

FACEBOOK

INSPIRATION BLOG

FRIENDS OF DIES R US PINTEREST PAGE


Nov 10, 2020

Evergreen Reindeer Christmas Card

Happy Tuesday everyone! I'm on a buffalo plaid kick lately. Last week was red, buffalo plaid. Today I'm showing you how I created a green, buffalo plaid Christmas card.


The first thing I did was die cut the Memory Box Evergreen Reindeer from green, buffalo plaid paper.


 I was originally going to keep it as is, but I felt like the trees were a little lost so I cut it down to a square. Then I decided I wanted the deer to be a black silhouette so I colored in the deer with a black sharpie. The deer needed some more thickness so I die-cut the deer from black cardstock twice, cut the deer out, and glued the layers together. 

Next, I added foam tape to the back of the green buffalo plaid panel and decided to back it with some wood looking patterned paper.

Then I went on the search for background paper. I decided to stick with green and black.


I used the Yvonne Creations Merry Christmas die again. I don't see this die in the store right now, but Dies R Us has several that would work HERE. I cut it multiple times so I could layer them for more thickness.


The final step was putting it all together and adding a bow to the top. 
 

Here are the products I used:
(the one from Yvonne Creations is no longer in the DRU Store, but this link will take you to other options that will work)


Don't forget to come join in the fun at the Dies R Us Challenge Blog.  There's a new challenge theme offered on the 1st and 15th of each month, and one lucky randomly drawn winner will receive a gift voucher prize to the Dies R Us Store.  For your convenience, all the important Dies R Us links are provided below.

Thank you for stopping by! Have a great week!

Nov 3, 2020

Reindeer Scalloped Circle Frame Christmas Card

Happy Tuesday everyone! Today I'm showing you how I created this simple, gold embossed Christmas card. I love gold embossing powder and the way it brings elegance to a card. 


The first thing I did was die cut the Memory Box Reindeer Scalloped Circle Frame and Yvonne Creations Merry Christmas Die from black cardstock. I don't see this Merry Christmas Die in the store right now, but Dies R Us has several that would work HERE.


Next, I used a makeup blender brush and tapped the embossing ink over the deer and the Merry Christmas. Since these dies are intricate I did not rub the brush back and forth over the die-cuts because I didn't want to tear the paper. Tapping works perfectly.


Then I sprinkled Ranger Gold Embossing Powder on top of the die cuts over a sheet of printer paper so it's easier to put the excess powder back into the jar.


Another thing I like to do with intricate dies is to die cut several and layer them to make them more sturdy. I cut 3 extra of the deer and Merry Christmas from black cardstock and glued them all together.

To finish it off, I added some buffalo plaid paper and a small red blow.

Here are the products I used:

Reindeer Scalloped Circle Frame Die

(the one from Yvonne Creations is no longer in the DRU Store, but this link will take you to other options that will work)

Gold Embossing Powder


Don't forget to come join in the fun at the Dies R Us Challenge Blog.  There's a new challenge theme offered on the 1st and 15th of each month, and one lucky randomly drawn winner will receive a gift voucher prize to the Dies R Us Store.  For your convenience, all the important Dies R Us links are provided below.

Thank you for stopping by! Have a great week!

Sep 23, 2020

Girl in the Garden Card

 Happy Wednesday, friends!

It's Nancy, from The Nickel Nook, here with you today!
I am sharing my final Design Team post with you.

I have to tell you that I had the BEST time putting this one together!

Here's my card:


Isn't that the sweetest image?
I used the "Tremendous Friend" stamp set from AALL & Create Stamps.
Unfortunately, this particular set has sold out since I made my card.
You'll find more sets just as cute as this one HERE.


I stamped the little girl and the butterflies, colored them, and fussy cut them out.


Then I went about creating the fun scene.


This is the sentiment that came with the stamp set.
It's stamped on the inside of the card.


Here's one last look at the finished card:


Thanks so much for stopping in today!
I hope you found some inspiration in my fun card!
I've enjoyed sharing my projects with you over the past several months! :o)

Dies R Us Products Used:


* * * * *
Don't forget to come join in the fun at the Dies R Us Challenge Blog
 There's a new challenge theme offered on the 1st and 15th of each month 
and one lucky randomly drawn winner will receive a gift voucher prize to the Dies R Us Store.  
For your convenience, all the important Dies R Us links are provided below.


click below for:

Thanks for stopping by! 

Jul 29, 2020

Merry Christmas in July

Merry Christmas in July, friends!

It's Nancy, from The Nickel Nook, back with a new project share!

This week I'm sharing a fun Christmas card,
made with some really fun dies!


Shaped cards are so much fun to make!
This die set from Yvonne Creations includes several layers,
as well as many fun elements.


I layered my base cut with some pretty Christmas paper.
Then I added a lovely oval die-cut shape,
to which I added some pretty decorative elements,
along with a stamped sentiment.
Finally, I added some Nuvo drops for the berries.


Products Used:

Yvonne Creations - Holly Jolly - Card Set


Tutti Designs - Stitched Nesting Ovals Die


* * * * *
Don't forget to come join in the fun at the Dies R s Challenge Blog
 There's a new challenge theme offered on the 1st and 15th of each month 
and one lucky randomly drawn winner will receive a gift voucher prize to the Dies R Us Store.  
For your convenience, all the important Dies R Us links are provided below.


click below for:
FRIENDS OF DIES R US PINTEREST PAGE

Thanks for stopping by!

Jun 3, 2020

Charming Grunge or Rustic Charm?

Happy Wednesday, friends!

It's Nancy, from The Nickel Nook, back with a new project share!

As you can see by my title,
I didn't quite know what to call this card.  

I love the combination of a grungy or rustic background,
and the delicacy and prettiness of a doily, flowers, or ribbon!
So that's what I did for today's card!


First, I chose the paper I wanted for my background. 
I die-cut it using the medium frame die from the Yvonne Creations - Holly Jolly Card Set.
Then I chose a coordinating cardstock, folded it,
and used the largest frame die to cut the card base.


For the doily I chose the Cheery Lynn - Spring Flower Burst Doily.
I cut it from the same cardstock as the card base.
Once I had it in place in the center of the background,
I decided that it covered up too much of the brick design.
So I cut the doily in half, and adhered it in place along the top of the card.


I then added some pretty little flowers,
and a big sparkly bow!


I think it's such a wonderful combination of elements!
There are so many beautiful doily dies to choose from in the Dies R Us shop.
Try making a fun Charming Grunge or Rustic Charm card of your own! 


Thanks so much for stopping in today!
I'll be back soon with another fun project!

* * * * *

Dies R Us Product Used:


* * * * *
Don't forget to come join in the fun at the Dies R s Challenge Blog
 There's a new challenge theme offered on the 1st and 15th of each month 
and one lucky randomly drawn winner will receive a gift voucher prize to the Dies R Us Store.  
For your convenience, all the important Dies R Us links are provided below.


click below for:
FRIENDS OF DIES R US PINTEREST PAGE

Thanks for stopping by!