Showing posts with label Tim Holtz Distress Oxide Inks. Show all posts

Feb 25, 2020

A Little Birdie Told Me Thank You...

Hello, friends!  It's Julie with you today from Muddy Paws and Inky Fingers.  I never seem to have enough thank you cards on hand, so I made another one for today, using a die set from Spellbinders.


Here's all the supplies I used:


Here's a picture of everything die cut, and the bird inked with Picked Raspberry Distress Oxide Ink, and the sentiment inked with Peacock Feathers Distress Oxide Ink:


There are many birds in the Dies R Us Store that would workout this one by Memory Box would work particularly well.  This "Thank You" sentiment from Dee's Distinctive Designs is very similar to the one I used, but of course, a whole different sentiment would work just as well.  The stitched rectangle die is from Lawn Fawn.  The bird and letters were glued in place with The Best Glue Ever.

I want to invite you to join the Dies R Us Challenges.  They run every 2 weeks and have easy themes to follow. I also want you to check out  our new sister store, Didi's Crafts, specializing in European crafts, and shipping to Canada!

Here's one last view of my card:


I hope you check out this blog everyday for inspiration!


Jul 21, 2019

Flower Vase Friendship Card

Hello, fellow crafters!  It's Julie with you today.  I tend to like my cards simple, but bold, and today's card follows that theme.

Dies, distress oxide inks, some pearl accents, and it's a wrap.  Sounds like a great card, right?  You be the judge:


Bright and bold, right?  Here's how I did it, and the products I used (linked at the end of this post).

I used a vase and flower die for Die-Namites, and 6 shades of Distress Oxide ink, plus a word die.


I started by blending the background.  I have found that a very smooth card stock works best for me.  I started with the lightest colors first.  In this case, it was the middle of the card, so it was the Squeezed Lemonade, then the Mustard Seed, the the Twisted Citron, then the Salty Ocean.  After that, I switched back to the lower part of the card, blending the Barn Door, and lastly, the Seedless Preserves.

The background was so colorful, that I decided to leave the Wide Vase die cut in white.  I liked the contrast of it against all the colors of the background.  I wanted a simple sentiment that wouldn't overpower the Wide Vase, so used this "Friends" from Elizabeth Craft, cutting it with a card stock that matched a color from the background.  Then, all I had to do was construct the card and add some pearl accents with my Ice White Viva Decor Pearl Pen.

I've had a large collection of Viva Decor Pearl Pens for years and I love them!  There are newer products on the market, but Viva Decor Pearl Pens work great.  It is very easy to control how large the dot of color is, the colors are rich and pure, and there is a lot of product in one pen.  The Dies R Us Store has a limited supply right now, but I hope they re-stock soon because they are one of my favorite supplies in the whole store!  If you haven't tried them, I hope you do.  Dies R Us also offers one of the lowest prices on these Pearl Pens that I've seen. 


Products used from the Dies R Us Store:


Seedless Preserves

That's it for my Flower Vase Friendship Card.  I hope you visit this blog each day to see the wonderful designs my fellow teammates create.  There is so much inspiration here!  Then, make your own creation and enter the Dies R Us Challenge Blog.  There are great prizes you can win! 

click below for:

Jul 7, 2019

Ahoy, Matey Birthday Card

Hello Crafty Friends -Annie here with a fun interactive birthday card.

Today's card is mostly Lawn Fawn Products. I wanted to create a fun child's birthday card. I used the Ahoy, Matey stamp set along with a few dies.


Lift the Flap -  by the X that marks the spot - to see the rest of the
 sentiment and of course the treasure!

Let's get started.

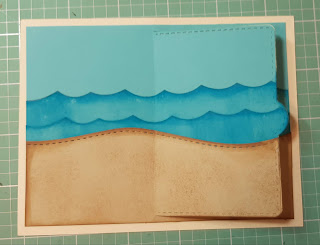
I stamped, colored, and fussy cut the images. I also die cut some waves into light blue cardstock and a stitched hill into tan cardstock. I die cut some clouds and sun as well.

Next, I added a bit of Distress Oxide ink in Mermaid Lagoon to the waves. The top of the light blue cardstock will become the sky. I add more ink to the wave caps the fade out toward the bottom.

Then, I add some Distress Oxide Ink in Vintage Photo to the sand hill. I used the sponge applicator for the top and sides. I then used a stencil brush and stippled the ink on to create the effect of sand.

Now, for the assembly of the card.  I puzzle piece the section back together using the card front panel as my base (the cream cardstock) for proper placement.  I use some washi tape to hold everything together so that I can die cut the flap. 


I place the Lift the Flap die in place, secure with some washi and run it through my die cutting machine. 

I die cut a second flap from light yellow cardstock for the inside. This will hide all the layers. I trim away the extra cardstock.


Next, I turn over the front panel and run adhesive down the back. 
I also adhered the yellow cardstock to the backside of the flap.

I put a bit more really close to the opening area. 

I then center the front panel onto the cream cardstock.

Then, I add some Distress Oxide in Vintage Photo with the stencil brush to the inside of the flap area.

Next, I start adding the images.
 First, I run most of the images through the Xyron 150 Sticker Maker.

I start with the inside of the flap area. I add the treasure chest, extra gold pieces, and jewels.

Then, I close the flap and start placing the other images to the front of the card. I tuck the little ship into the waves. layer the clouds and sun (so the sun is peeking out of the clouds) and the little mountains and palm trees. I added the parrot to one of the trees. As well as the small oasis. I then used some low profile foam tape to adhere the little boy and girl into place. Finally, I added the sentiment on the flap and inside the flap area over the treasure.


Materials Used:
Lawn Fawn - Ahoy, Matey Stamps

Lawn Fawn - Lift The Flap Dies

Lawn Fawn - Ocean Wave Borders Dies

Lawn Fawn - Simple Puffy Clouds Dies

Lawn Fawn - Spring Showers Dies

Lawn Fawn - Stitched Hillside Borders Dies

Distress Oxide Ink Pad - Fossilized Amber

Distress Oxide Ink Pad - Mermaid Lagoon

Distress Oxide Ink Pad - Vintage Photo


VersaFine Clair Ink Pad - Nocturne
Tsukineko Memento Ink: Tuxedo Black
Sakura Gelly Roll Pens: White, Black & Metallic Gold
Xyron Mega Runner Adhesive
Xyron 150 Sticker Maker
Tim Holtz Stamping Platform
Recollections Brand Cardstock: Cream, Light Blue, Light Yellow & Tan

Thank you for stopping by today. I hope you found some inspiration!

Don't forget to come and join in the fun at the Dies R Us Challenge Blog. There's a new challenge theme offered on the 1st and 15th of each month and one lucky randomly drawn winner will receive a gift voucher prize to the Dies R Us Store. For your convenience, all the important Dies R Us links are provided below.