Showing posts with label Shaker Card. Show all posts

Sep 15, 2021

Sue WIlson Shaker Card

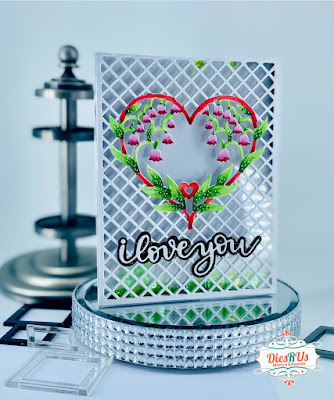
 Hi Dies R Us friends!! Today I am sharing an easy shaker card featuring a Sue Wilson Die. I hope you like it!

What I Used to Make this Card:
White Card Base
KaiserCraft Paper Pad, Rose Avenue, 6 1/2" x 6 1/2" {retired but available}
Sue Wilson Expressions Die, Hello, #CED5401 {out of stock, but this will work as well}
White Card
Foam Tape, doubled
Filler from Stash

This was an easy shaker card to make since the die I chose was rectangular; the hardest part

was cutting the foam tape!  I have a huge roll of foam tape I bought years ago at a convention and I consistently forget I have it; well, this time I remembered! Since the shaker fill has some little gems in it I doubled the foam tape, sticky side to sticky side, then cut it in about half to fit around the die thus allowing enough height for the fill to shake and not get stuck.  I chose sequins, gems and sparkly bits that didn't clash with the paper I covered the card base with. Once I made the shaker part of the card using the die cut, acetate, foam tape and the fill, I attached it to the base that I had covered with a pink paper with a geometric design lightly embossed on it, very pretty I think and the photos don't do it justice.

I certainly hope you enjoyed my card and that will encourage you to pull out some of your dies and make a card to join in on the monthly challenge; just be sure the die you use is from one of the companies Dies R Us carries {shouldn't be difficult, they carry everything!} and join in the fun!  Take care and stay safe! Until next time, Christi


Don't forget to come join in the fun at the Dies R Us Challenge Blog. There's a new challenge theme offered on the 1st and 15th of each month and one lucky randomly drawn winner will receive a gift voucher prize to the Dies R Us Store.  


For your convenience, all the important Dies R Us links are provided below.


click below for:

STORE

CHALLENGE BLOG

FACEBOOK

INSPIRATION BLOG

FRIENDS OF DIES R US PINTEREST PAGE


May 24, 2021

Framed Shaker


Happy Monday everyone and its another Monday make with Monica.  Today I am sharing a framed shaker card using Tutti Designs "Lily Heart Panel".  A die perfect for a card front all by  itself.

1.  First, I diecut the die using XpressIT paper or blending it paper  so that I could color the center with my copic pens.  I used YG06, YG23 and G28

2.  For the flowers I used R81, R83, R85 and R89 once I was done coloring I took a white gel pen and added some dots which adds a sort of sparkle look.
3.  I then adhered the diecut to a piece of acetate and use some foam tape for height and added some sequins for the shaker portion. 


Don't forget to come join in the fun at the Dies R Us Challenge Blog. There's a new challenge theme offered on the 1st and 15th of each month and one lucky randomly drawn winner will receive a gift voucher prize to the Dies R Us Store.  

 For your convenience, all the important Dies R Us links are provided below.

click below for:

STORE

CHALLENGE BLOG

FACEBOOK

INSPIRATION BLOG

FRIENDS OF DIES R US PINTEREST PAGE

Dec 29, 2020

Stitched Circle Cabin Shaker Card

 Happy Tuesday everyone! It's Rosie here today showing how I created this fun shaker card. Shaker cards are quite the eye candy and your recipient will love this card! I kept it mostly white for the snow effect...only adding color to certain elements. 

 
Let's get started!

Step 1: I cut white cardstock using the Stitched Circle Cabin Die. Be sure to keep the cabin cut-outs (front and side of cabin).

 
Step 2: My card base is 4.25 x 5.5. The blue cardstock is 4 x 5.25, and I trimmed the cabin cardstock to 3.75 x 5. I also cut a blue circle and clear acetate circle a little bigger than the cabin die-cut (about 3.5).

 
Step 3: I traced around the cabin onto scrap paper, and then colored it yellow. I fussy cut the cabin out slightly smaller than my outline.


Step 4: I colored the cabin cut-out pieces using Copic Markers to look like logs (E42, E44, E77). I used a black pen to draw in a door.


Step 5. I glued the yellow scrap piece on the backside of the cabin so the yellow showed through the die-cut.


Step 6: Then I glued the cabin pieces on top of the yellow so it would look like lights were on inside the cabin. If you want a sentiment on the front of your card, this is the point you want to stamp it (I forgot to take a picture of that step) before you add foam tape to the back. I stamped LET IT SNOW from the Lawn Fawn Snow Cool Stamps.


Step 7: Next, I flipped the panel over and glued the acetate to the back side of the cabin. I cut pieces of foam tape and placed it around the acetate. I didn't have any snowflake shaker elements, but I did have this bottle of sugar sprinkles so I decided to use them!
 

 Step 8: I filled in the open area with the snowflake sugar sprinkles, and pulled out any ones that were broken.


Step 9: I then pulled off the adhesive backing on the foam tape around the circle and placed the blue die-cut circle on top to seal the shaker. Next, I added more foam tape on the white cardstock.


Step 10: I assembled the card by placing the shaker panel on top of the blue cardstock. Then I used Scor-tape to adhere the blue cardstock to the card base.


FUN, right?! I hope this inspires you to create your own shaker cards!

Here are the products I used:

Memory Box Stitched Circle Cabin Die


Don't forget to come join in the fun at the Dies R Us Challenge Blog.  There's a new challenge theme offered on the 1st and 15th of each month, and one lucky randomly drawn winner will receive a gift voucher prize to the Dies R Us Store.  For your convenience, all the important Dies R Us links are provided below.

Thank you for stopping by! Have a great week!

Sep 11, 2020

Let's Shake

   Hello everyone Mandi here today. I am sad to say it will be my last post for the term. Today, I thought it would be fun to show how to use die cuts in a shaker card 
I am sure you are like me and you have rolls of washi tape to last a lifetime. Here is a little tip match the print up and create a pattern paper with it. Adhere this to a card base. My card is 7" x 4" so I did the pattern paper a 1/4" smaller. 
I love these edger dies. All I did was run it through my die cut machine and took a craft knife ad removed the inside to create a frame. Now on the back of the frame, you would want to use a strong double-sided adhesive to attach a piece of plastic, I used an old page protector. After, the plastic is in place cover the inner frame edge with a foam adhesive. Set aside while we create the confetti. 
Now with the mini dies I did multiple cuts of each. This will be part of the confetti filler in the shaker. 
In the center fill the card up with the confetti die cuts and sequins. Since this shaker fills the entire card front I added a lot of filler. 
   Now, remove the foam adhesive backing from the frame and carefully line it up to the card. Press the frame edges down firmly to ensure no confetti of escaping.  Give it a shake and you are now done. 

 Dies R Us Product Used:

Don't forget to come to join in the fun at the Dies R Us Challenge Blog.  There's a new challenge theme offered on the 1st and 15th of each month and one lucky randomly drawn winner will receive a gift voucher prize to the Dies R Us Store.  For your convenience, all the important Dies R Us links are provided below.


Click below for:


Apr 25, 2019

Summer Shaker Card w/ Elizabeth Craft


Hi Everyone, Kristina here with a bright and summery shaker card. I made my shaker window using the Elizabeth Craft Summer Drink die set. I die cut the drink glass 3 times out of some teal card stock, and cut the center of it out using an exacto knife. This was easy to do using the score line that is already imprinted from the die for texture. I glued the 3 layers aside and then cut the actual window from some white cardstock, and backed it with acetate. 

To create the well for the skaker bits I cut the die out 2 more times from some fun foam, which I glued together, and then down to the acetate window using some strong liquid adhesive. After filling the well with sequins and other bits, I covered the panel with foam tape.


From there I filled my well with shaker bits and carefully adhered the back panel down. I used the lines on my media mat as well as a stamp-a-majig to keep it aligned and straight. 


For my sentiment I stamped and die cut it with a banner die from my stash onto some pink paper that I thought matched nicely.  


I embellished the front further with the straw and pineapple die from the die set, and adhered everything down to a 110lb a2 card base for extra stability.

Thanks for stopping by!

Supplies


Elizabeth Craft Summer Drink
Shop at:
Dies R Us


Don't forget to come join in the fun at the Dies R Us Challenge Blog. There's a new challenge theme offered on the 1st and 15th of each month and one lucky randomly drawn winner will receive a gift voucher prize to the Dies R Us Store. For your convenience, all the important Dies R Us links are provided below.


click below for:


Nov 8, 2018

Holiday Shaker Card with Hero Arts Fancy Dies


Hi Everyone, Kristina here! This die has just been begging me to make it into a shaker card since I got it. This was my first time using the snowflake ornament fancy die. This is a two piece die that can be used multiple different ways. Whenever I get a multi use die like this, the first thing I like to do is cut it out of some scrap paper in all of the different possible combinations so I can see exactly what my options are. 


With this die you can cut either a solid ornament, a snowflake ornament, or like I did just cut the snowflake circle edge.

So here's how I put together this shaker

  • Starting with a a2 sized card front, I used a circle that matched the size of the snowflake die, to cut a mask from avery removable label paper and placed on the center of my card front where I would later cut out the snowflake die. 
  • Next, Using distress oxide inks I blended an ombre like dark to light base. I sprayed the ink based with some water droplets and lifted the ink up with a paper towel to add a little interest, as well as splattering on some white acrylic paint droplets. Once I liked the background I removed my masked and trimmed the base down to 4x5.25
  • Now it was time to cut out the snowflake die. I lined the die up into the white space left behind from my mask, and ran through my die cutting machine. I adhered a piece of acetate to the back to be my shaker window. 
  • To hold my shaker bits I took the same circle die I cut my mask with, and lined it up against a piece of fun foam so I could use this as a nice sturdy shaker base perfectly sized to my window. I adhered the die cut fun foam piece to my acetate backed card front
  • Now the fun part, filling the shaker! I added into the shaker window blue/silver/white sequins and glitter. To seal it all in I add another piece of acetate adhered down to the fun foam, and lastly I adhere the whole shebang down to an a2 sized card base.

Then it was time for my sentiment. I had to keep the sparkle going so I die cut the Hero Arts Holidays Fancy Die from some white glitter card stock and adhered it down to the card front before lining up and stamping a "Happy" from a misc. stamp set in my collection, which I heat embossed with white embossing powder. I wanted a little more dimension, so I coated the "Holidays" with glossy accents.


Thanks for stopping by today!

Supplies


Hero Arts Snowflakes & Ornament
Shop at:
Dies R Us
Hero Arts Holidays Word Die
Shop at:
Dies R Us
Distress Oxide Cracked Pistachio
Shop at:
Dies R Us
Distress Oxide Peacock Feathers
Shop at:
Dies R Us


Don't forget to come join in the fun at the Dies R Us Challenge Blog. There's a new challenge theme offered on the 1st and 15th of each month and one lucky randomly drawn winner will receive a gift voucher prize to the Dies R Us Store. For your convenience, all the important Dies R Us links are provided below.


click below for: