Showing posts with label Dawn Bennett. Show all posts

Sep 27, 2019

Merry Christmas

Hi everyone!! Dawn here with you today and I have a A Christmas card to share with you. 


I used the following dies:


Next I cut out the poinsettias 3 times out of some red mirror card stock and some leaves out of green mirror card stock. I also cut out the Merry Christmas out of some red mirror card stock .


Next assemble the poinsettias. 

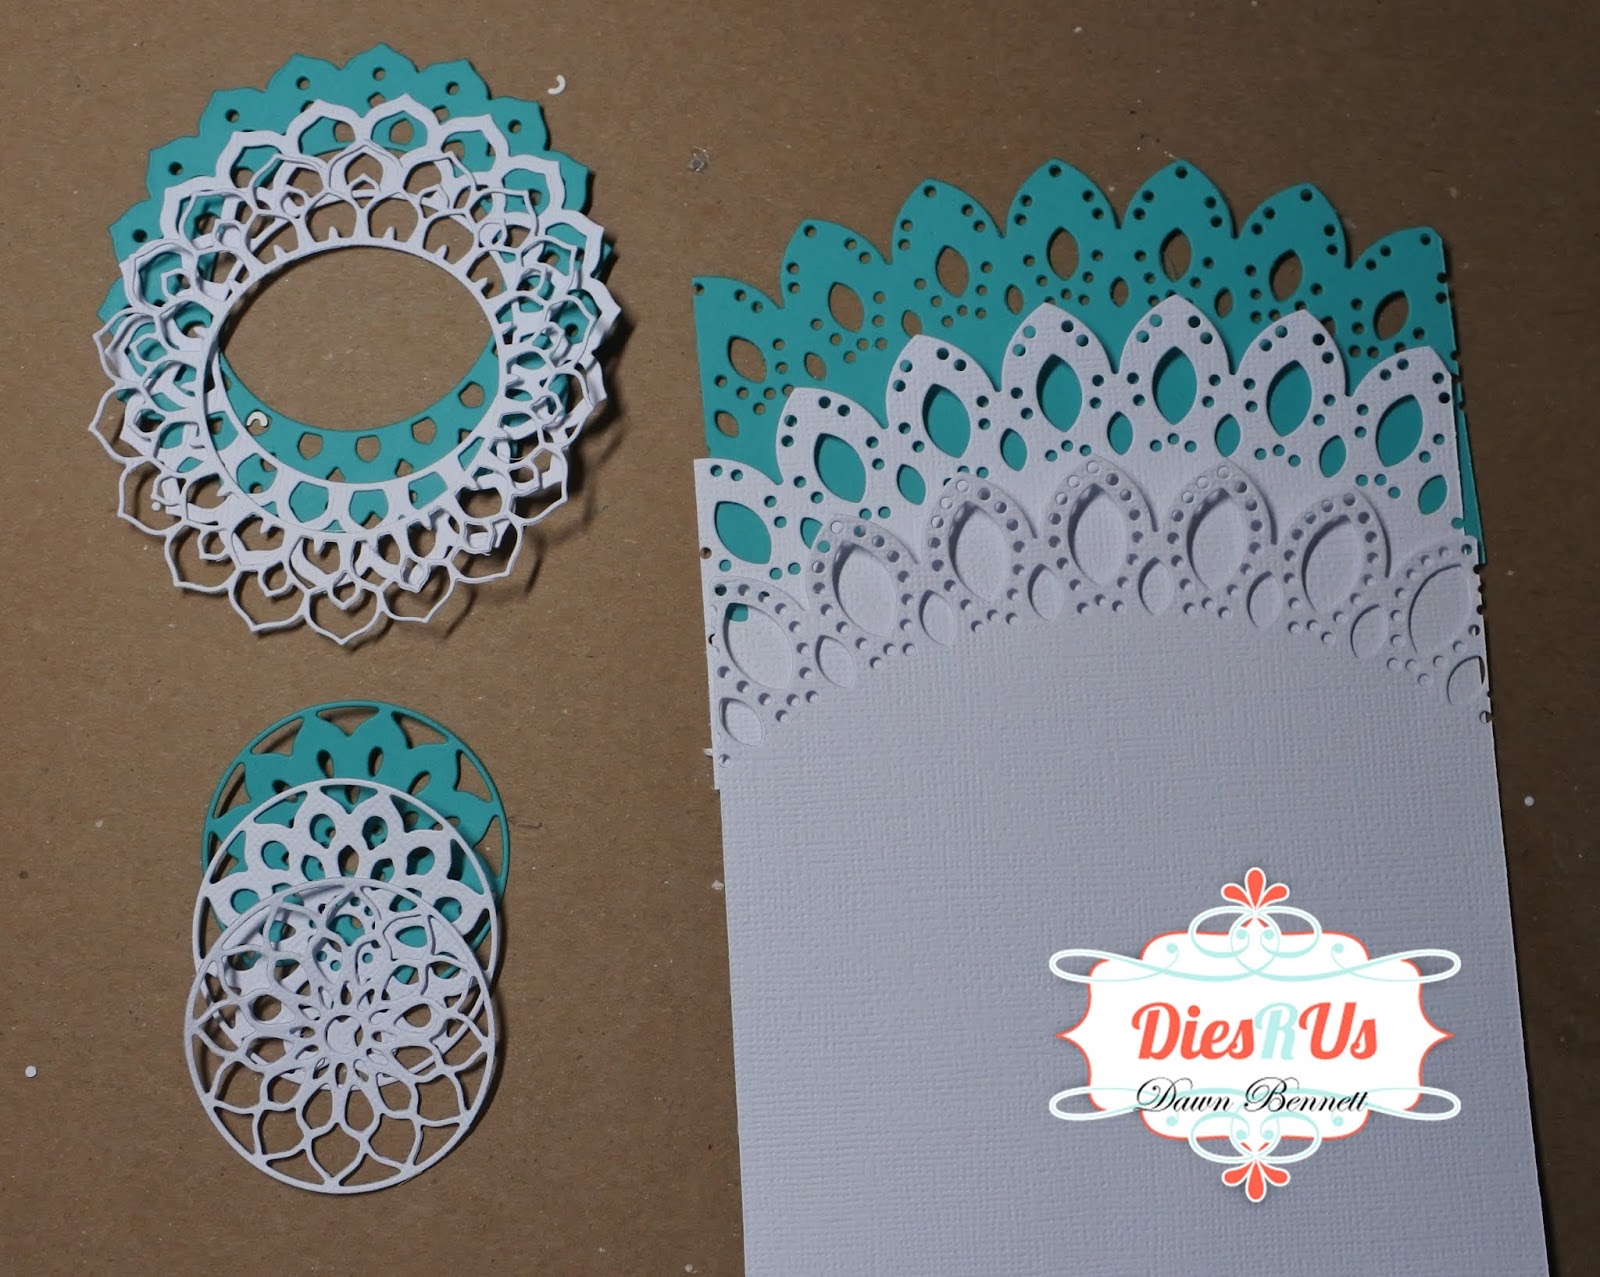
Next I layered some red mirror card stock on top of my card base of 6x6.  I then layered some pearl grey card stock on top of the red.  I then assembled my card. 


Below are the supplies that I used to make the card:

                   Karen Burniston - Dies - Merry Christmas


Karen Burniston - Dies - Merry Christmas


                Creative Expressions - Cut and Lift Collection -                                           Poinsettias Craft Die


Creative Expressions - Cut and Lift Collection - Poinsettias Craft Die


Don't forget to come join in the fun at the Dies R Us Challenge Blog. There's a new challenge theme offered on the 1st and 15th of each month and one lucky randomly drawn winner will receive a gift voucher prize to the Dies R Us Store. For your convenience, all the important Dies R Us links are provided below.
https://blogger.googleusercontent.com/img/b/R29vZ2xl/AVvXsEjygNLxcuoMF0QGkWjeKFQy4lZE9xPm4QkjkK4ZIy3_i6CUH4dbIlD2GtvtJDSNeEyKsnkATkFOo0ED3Uqr_dYSKeke1onYgxnGYC_PyWMxI9FSEcJGEYbPSTfYFWjlWZZWcd5jnDd6RmiC/s1600/-logo+collage.jpg


Thanks for stopping by and have a great day!

Sep 20, 2019

Thanks

Hi everyone!! Dawn here with you today and I have a A Thanks card to share with you.


Here are the dies that I used:


The first step is to line up the edge die with your card front.  I used a 5x7 card base.


Here are the die cuts:


I cut a piece of teal cardstock to 5x7 and attached that behind my card front so the die cut will stand out against the teal color.  I also attached my sentiment to the front of the card. 


Below are the supplies that I used to make the card:


Creative Expressions - Paper Cuts Collection - Daisy                                           Fairy Edger


Creative Expressions - Paper Cuts Collection - Daisy Fairy Edger


Sue Wilson Designs - Noble Expressions Collection - 

                                     Thanks

Sue Wilson Designs - Noble Expressions Collection - Thanks
Don't forget to come join in the fun at the Dies R Us Challenge Blog. There's a new challenge theme offered on the 1st and 15th of each month and one lucky randomly drawn winner will receive a gift voucher prize to the Dies R Us Store. For your convenience, all the important Dies R Us links are provided below.
https://blogger.googleusercontent.com/img/b/R29vZ2xl/AVvXsEjygNLxcuoMF0QGkWjeKFQy4lZE9xPm4QkjkK4ZIy3_i6CUH4dbIlD2GtvtJDSNeEyKsnkATkFOo0ED3Uqr_dYSKeke1onYgxnGYC_PyWMxI9FSEcJGEYbPSTfYFWjlWZZWcd5jnDd6RmiC/s1600/-logo+collage.jpg


Thanks for stopping by and have a great day!


Aug 30, 2019

Happy Birthday

Hi everyone!! Dawn here with you today and I have a A Happy Birthday card to share with you.


Here are the dies that I used:


Here are the die cuts:


Next assemble the card:


Below are the supplies that I used to make the card:

                        Elizabeth Craft Designs - Cupcakes


Elizabeth Craft Designs - Cupcakes


                           Tutti Designs - Word Set - Happy


Tutti Designs - Word Set - Happy

                        Tutti Designs - Word Set - Birthday


Tutti Designs - Word Set - Birthday

Don't forget to come join in the fun at the Dies R Us Challenge Blog. There's a new challenge theme offered on the 1st and 15th of each month and one lucky randomly drawn winner will receive a gift voucher prize to the Dies R Us Store. For your convenience, all the important Dies R Us links are provided below.
https://blogger.googleusercontent.com/img/b/R29vZ2xl/AVvXsEjygNLxcuoMF0QGkWjeKFQy4lZE9xPm4QkjkK4ZIy3_i6CUH4dbIlD2GtvtJDSNeEyKsnkATkFOo0ED3Uqr_dYSKeke1onYgxnGYC_PyWMxI9FSEcJGEYbPSTfYFWjlWZZWcd5jnDd6RmiC/s1600/-logo+collage.jpg


Thanks for stopping by and have a great day!


Aug 23, 2019

A Great Big Thanks


Hi everyone!! Dawn here with you today and I have a A Great Big Thanks card to share with you.


The first step is to stamp the images you want to use onto some white cardstock:


Next you want to color the images.  I chose to use Copics.


Next, using the dies that came with the stamp set, cut out the colored images and also the circle die cut out of some green cardstock:


Next assemble the card as you please. I used some foam tape to adhere the green circle die cut to make it look 3d.....


Below are the supplies that I used to make the card:


                 Stampendous - Stamp/Die Set - Elephant

Stampendous - Stamp/Die Set - Elephant


Thermoweb - 3D Foam Squares - White .25" 176/Pkg


Don't forget to come join in the fun at the Dies R Us Challenge Blog. There's a new challenge theme offered on the 1st and 15th of each month and one lucky randomly drawn winner will receive a gift voucher prize to the Dies R Us Store. For your convenience, all the important Dies R Us links are provided below.
https://blogger.googleusercontent.com/img/b/R29vZ2xl/AVvXsEjygNLxcuoMF0QGkWjeKFQy4lZE9xPm4QkjkK4ZIy3_i6CUH4dbIlD2GtvtJDSNeEyKsnkATkFOo0ED3Uqr_dYSKeke1onYgxnGYC_PyWMxI9FSEcJGEYbPSTfYFWjlWZZWcd5jnDd6RmiC/s1600/-logo+collage.jpg


Thanks for stopping by and have a great day!


Aug 2, 2019

Hello

Hi everyone!! Dawn here with you today and I have a Hello card to share with you.


Here is a picture of the dies that I used:


I cut out the C layerr die out of teal cardstock and layers A and B out of white cardstock. Here are the die cuts that I used:


Assemble the layers:


I then assembled my card:


Below are the supplies that I used to make the card:

Birch Press Designs - Kessa Arch Layer set

This was a special order item. You too can get to order special items if you subscribe to the newsletter.

Birch Press Designs - Calen Layer set 

This also was a special order item. You too can get in on the special order items if you subscribe to the newsletter.

Birch Press Designs - Big Hello Sugar Script 

This also was a special order item. You too can get in on the special order items if you subscribe to the newsletter.


Sticky Specks Micro Adhesive 8 A5 Sheets


Don't forget to come join in the fun at the Dies R Us Challenge Blog. There's a new challenge theme offered on the 1st and 15th of each month and one lucky randomly drawn winner will receive a gift voucher prize to the Dies R Us Store. For your convenience, all the important Dies R Us links are provided below.
https://blogger.googleusercontent.com/img/b/R29vZ2xl/AVvXsEjygNLxcuoMF0QGkWjeKFQy4lZE9xPm4QkjkK4ZIy3_i6CUH4dbIlD2GtvtJDSNeEyKsnkATkFOo0ED3Uqr_dYSKeke1onYgxnGYC_PyWMxI9FSEcJGEYbPSTfYFWjlWZZWcd5jnDd6RmiC/s1600/-logo+collage.jpg


Thanks for stopping by and have a great day!


Jul 26, 2019

Pinwheel Hello

Hi everyone!! Dawn here with you today and I have a Pinwheel Hello card to share with you.


 Here’s how I created my card:
Creating the card base – 

1. Cut a piece of white cardstock that is 6 inches by 12 inches. Score along the 12 inch side at 6 inches and fold.
Cut a piece of teal cardstock that is 5 3/4 inches square. Adhere to the folded white card.
Cut a piece of designer paper that is 5 1/2 inches square, adhere to the teal card as per photo above

2. Using the largest die from the Stitched Hexagons die set and die cut from teal cardstock.
Using the next size down from the Stitched Hexagons die set and die cut from white cardstock.
Cut out sentiment using the Hello die set from Birch Press designs.
Layer the white hexagon onto the teal hexagon using foam tape.  Adhere the sentiment to the white hexagon. 
Attach to the card front using foam tape


3. Using the PInwheel die from the PInwheel die set, cut the following:
(3) Pinwheels from the checked designer paper.
(3) PInwheels from the Pink/Green designer paper
Assemble the pinwheels using a pink brad through the holes on each top point of the pinwheel and the center hole.
Attach the PInk/Green pinwheels to the bottom of the checked pinwheels using some foam tape.
Attach the pinwheels to the left side of the hexagon using some foam tape on the front of the card.


Below are the supplies that I used to make the card:

                    Elizabeth Craft Designs - Dies - Pinwheel

Elizabeth Craft Designs - Dies - Pinwheel


             Elizabeth Craft Designs - Dies - Stitched Hexagons

Elizabeth Craft Designs - Dies - Stitched Hexagons


Don't forget to come join in the fun at the Dies R Us Challenge Blog. There's a new challenge theme offered on the 1st and 15th of each month and one lucky randomly drawn winner will receive a gift voucher prize to the Dies R Us Store. For your convenience, all the important Dies R Us links are provided below.
https://blogger.googleusercontent.com/img/b/R29vZ2xl/AVvXsEjygNLxcuoMF0QGkWjeKFQy4lZE9xPm4QkjkK4ZIy3_i6CUH4dbIlD2GtvtJDSNeEyKsnkATkFOo0ED3Uqr_dYSKeke1onYgxnGYC_PyWMxI9FSEcJGEYbPSTfYFWjlWZZWcd5jnDd6RmiC/s1600/-logo+collage.jpg


Thanks for stopping by and have a great day!