Showing posts with label Birch Press Design. Show all posts

Sep 17, 2021

Say what... a spider wreath?!

Hello, crafty Dies R Us fans! Leslie here from Love To Scrap 2 and I’m delighted to be back on the blog today with another awesome DT inspiration project! I created a fun Halloween card featuring a wreath created with the amazing Birch Press Design Roundabout Layer Set in black, orange and yellow, with eeeky spiders! 


This was a super fun one, so let's get started!

1. Cut the wreath layers using the Birch Press Design Roundabout Layer Set from black, orange and yellow cardstock.


2. Assemble the wreath, add spider sequins with tiny orange gemstones, and set it aside.


3. Cut a standard A2 size top-folding card base and an inside layering panel from white cardstock. Cut front and inside layering panels and embellishing strips from orange cardstock. Cut front layering panel and strip along with an inside embellishing strip from Halloween patterned paper. Grab a roll of Halloween washi tape. 


4. Adhere front layering panels and strips together, add washi tape, and adhere wreath. Adhere inside embellishing strips to left side of white layering panel, then adhere to orange layering panel. 


5. Stamp front and inside sentiments in black ink.


6. Adhere front panel to front of card base, and add three orange gemstones to the bottom. Adhere inside panel to inside of card base, and your fun Halloween card with eeeky spiders is complete! ;)


Dies R Us products used:
Birch Press Design Roundabout Layer Set

Don't forget to come join in the fun at the Dies R Us Challenge Blog. There's a new challenge theme offered on the 1st and 15th of each month and one lucky randomly drawn winner will receive a gift voucher prize to the Dies R Us Store. For your convenience, all the important Dies R Us links are provided below.

https://blogger.googleusercontent.com/img/b/R29vZ2xl/AVvXsEjCjT8pw_L9T-z6-KjvbFtjxltch0jDrbOVSRoR7-pMeQw8lEYfIDENxvu0UYve6R3ZP9GqtyyTDEJbdtSMk3bGQBx_Y3u5-ayMxatDG7IHMgflmEHGKjuk1fXzqacoc_aa78anm5BPmKz1/s320/*logo%2Bcollage.pages.jpg

click below for:

STORE

CHALLENGE BLOG

FACEBOOK

INSPIRATION BLOG

FRIENDS OF DIES R US PINTEREST PAGE


Thanks so much for stopping by today - we'll see you next time!

Scrappy hugs,
Leslie


Aug 20, 2021

Bright and bold thank you!

Hello, crafty Dies R Us fans! Leslie here from Love To Scrap 2 and I’m thrilled to be back on the blog today with another awesome DT inspiration project! I created a clean and simple thank you card featuring the Birch Press Design Petal Triangle Layer Set that I used in a very bright and bold manner with a red, orange and yellow color combo! It's extremely rare that I don't have some white in my cards and this one has absolutely no white whatsoever! 


This is a CAS design so let's do it up!

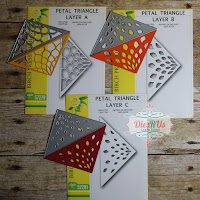
1. Using the Birch Press Design Petal Triangle Layer Set, die cut the layers from yellow, orange and red cardstock, and adhere them together.


2. Cut a standard A2 size side-folding card base and an inside embellishing strip from red cardstock, front and inside layering panels as well as an inside embellishing strip from yellow cardstock, and an inside layering panel and embellishing strip from orange cardstock. 


3. Adhere the front yellow layering panel to the red cardstock base. Adhere the red, yellow and orange embellishing strips to the yellow inside layering panel, then adhere the panel to the orange cardstock layer.


4. Adhere the Petal Triangle focal to the front of the card and stamp the sentiment at an angle in orange ink. Stamp the inside sentiment on the inside panel.


5. Add some red gemstones to finish the front. Adhere the inside panel to the inside of the card base, and your lovely bold and bright thank you card is complete! ;)


Dies R Us products used:
Birch Press Design Petal Triangle Layer Set

Don't forget to come join in the fun at the Dies R Us Challenge Blog. There's a new challenge theme offered on the 1st and 15th of each month and one lucky randomly drawn winner will receive a gift voucher prize to the Dies R Us Store. For your convenience, all the important Dies R Us links are provided below.

https://blogger.googleusercontent.com/img/b/R29vZ2xl/AVvXsEjCjT8pw_L9T-z6-KjvbFtjxltch0jDrbOVSRoR7-pMeQw8lEYfIDENxvu0UYve6R3ZP9GqtyyTDEJbdtSMk3bGQBx_Y3u5-ayMxatDG7IHMgflmEHGKjuk1fXzqacoc_aa78anm5BPmKz1/s320/*logo%2Bcollage.pages.jpg

click below for:

STORE

CHALLENGE BLOG

FACEBOOK

INSPIRATION BLOG

FRIENDS OF DIES R US PINTEREST PAGE


Thanks so much for stopping by today - we'll see you next time!

Scrappy hugs,
Leslie

Aug 10, 2021

A Fairy Hello

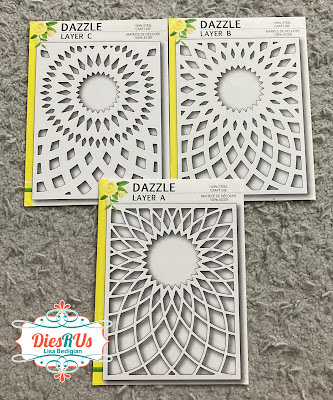
Happy Tuesday everyone!  Lisa here, with a fun fairy hello card.  The fairy isn't even the star of the show, the layered background dies from Birch Press are!!!  Check out how Dazzle-ing they are.


Aren't they amazing?  These are the Birch Press Dazzle layering dies.  You get a set of three and omg they're all fabulous because yes, you can use them individually, but layered is pure papery greatness!!


So let me tell you how this card even came to be.  I was going to do something completely different but I got some new cardstock and when I saw these three colors together, the card just kind of blew up from there.


I found that the layers were missing something, so I cut the top out of black glitter paper instead of the textured cardstock and added it on top for dimension.  I don't find the centers of these dies really need a lot of adhesive, so instead of putting adhesive on the paper before cutting the dies, I just put Scor Tape all around the frame and a few pieces in the center.  Easy Peasy!


I wanted to add a fairy, so I pulled out my Tutti Designs Mini Fairies set.  I had a hard time deciding which one to use and where to put him or her.


My card needed a sentiment so I pulled out an oldie but goodie, Lawn Fawn Scripty Hello.  I decided here to cut off the flowers in the hands of the fairy on the left.  I wanted it to look like the fairy was holding the greeting.


The final finishing touch it needed was some bling!  I used three sizes of clear AB gems to accent the sentiment on the card.  I love how it came together.

I hope this card inspires to check out all the amazing Birch Press layering dies that Dies R Us carries.  They're so fun and versatile.  --Lisa


Products Used:


Don't forget to come join in the fun at the Dies R Us Challenge Blog. There's a new challenge theme offered on the 1st and 15th of each month and one lucky randomly drawn winner will receive a gift voucher prize to the Dies R Us Store.  


 For your convenience, all the important Dies R Us links are provided below.


click below for:

STORE

CHALLENGE BLOG

FACEBOOK

INSPIRATION BLOG

FRIENDS OF DIES R US PINTEREST PAGE


Jun 9, 2021

Dies Two Ways with Birch Press Designs

Hello everyone!

I hope this post finds you well! I've made these two cards using Birch Press Design dies that can be found at Dies R Us to show how different two cards can be using the same dies, just different colors. I love the simplicity of Birch Press dies and Dies R Us has a wonderful selection; please take a look when you have a chance!


What I Used to Make Both my Cards:
White Card Base
Birch Press Designs Grandiose Dies, Bundle of 3, #56102

After making both the purple and grey layered piece I just customized each card using the items linked below. In addition to showing how colors can change a card completely, I was also going for one feminine card and one masculine card. Here is the information on each card:

Missing You {grey card}
Simon Says Stamp Floral Garden, #SSS202304 {sentiment}
Tutti Designs Stitched Nested Rectangles, #TUTTI-217 {out of stock, but other options are TUTTI-414 and TUTTI-410}
Distress Ink in Hickory Smoke
Shades of Grey Card


Once the panel was made for this card, I made a frame using the rectangle dies, to go around it. As you can see from the picture, it's very easy to do as long as you have some low tack tape to hold the dies in place. I attached the frame to the panel, the panel to the card base and then adhered the sentiment, which was stamped and trimmed. 

Just for You {purple card}
Creative Expressions by Sue Wilson, Just for You, #CEDME028
Shades of Purple Card


All I needed to make this super easy card was a sentiment, which I cut out of the darkest purple I used in the panel. I attached that to the card and it's ready to send off!

Thank you so much for stopping by to see my cards! Remember, the challenge at Dies R Us is always anything goes using a die that they stock; that leaves you with plenty of options to play! I hope that you are inspired by our creations and join the challenge, all the links you need are on the right hand side of this blog :)


Fondly, 

Christi


Jun 4, 2021

Let's make a Christmas trifold window card!

Hello, crafty Dies R Us fans! Leslie here from Love To Scrap 2 and I’m stoked to be back on the blog today with another awesome DT inspiration project! I created a fun trifold window card featuring the amazing Birch Press Design Wreath Layer Set as the focal, along with a sentiment and bow from the Sizzix Christmas Ribbon Thinlits, some pretty coordinating Christmas papers, and lots of bling. Seems I'm in Christmas mode all year long so it's definitely not too early to get started on those cards!


Okay, let's do it up!

1. Using the Birch Press Design Wreath Layer Set, die cut the wreath from dark green cardstock for Layer A, light green cardstock for Layer B, white cardstock for Layer C and red cardstock for Layer D, and assemble it. Using the Sizzix Christmas Ribbon Thinlits, die cut the sentiment and bow from red cardstock with red foil cardstock bow loops and tails. 


2. Cut a standard A2 size top-folding card base and layering panel from white cardstock, a folded panel for the inside cut from dark green cardstock, a layering panel and embellishing strip for the front along with a narrow embellishing strip for the inside cut from red cardstock, diagonally-cut glitter and patterned paper pieces for the front along with embellishing strips for the inside. 


3. Adhere the dark green cardstock folded panel to the inside of the card base with the fold at the bottom. Open it up, adhere the white cardstock layer, and embellish it with the embellishing strips. Add the die cut sentiment. 


4. Adhere the patterned papers to the red cardstock panel, add the diagonal embellishing strip, and then die cut a large circular aperture in the layers with a Tutti Designs Dotted Nesting Circle die. Trace the circular aperture on the front flap and then cut a slightly larger circular aperture on the front flap and adhere the layered panel to it. Add the bow to the bottom of the aperture. 


5. This is what the trifold card should look like so far.


6. Fold the bottom panel upwards into the card base, fold down the top flap, and adhere the wreath focal into the opening. Add a stamped sentiment, and then add tiny clear gemstones to the wreath and some larger ones to the diagonal strip, along with a large red gemstone in the center.


Dies R Us products used:
Birch Press Design Wreath Layer Set 
Sizzix Christmas Ribbon Thinlits
Tutti Designs Dotted Nesting Circles

Don't forget to come join in the fun at the Dies R Us Challenge Blog. There's a new challenge theme offered on the 1st and 15th of each month and one lucky randomly drawn winner will receive a gift voucher prize to the Dies R Us Store. For your convenience, all the important Dies R Us links are provided below.

https://blogger.googleusercontent.com/img/b/R29vZ2xl/AVvXsEjCjT8pw_L9T-z6-KjvbFtjxltch0jDrbOVSRoR7-pMeQw8lEYfIDENxvu0UYve6R3ZP9GqtyyTDEJbdtSMk3bGQBx_Y3u5-ayMxatDG7IHMgflmEHGKjuk1fXzqacoc_aa78anm5BPmKz1/s320/*logo%2Bcollage.pages.jpg

click below for:

STORE

CHALLENGE BLOG

FACEBOOK

INSPIRATION BLOG

FRIENDS OF DIES R US PINTEREST PAGE


Thanks so much for stopping by today - we'll see you next time!

Scrappy hugs,
Leslie


May 12, 2021

Simple Slimline Thank You Card

Hi everyone! 

While I do love to get out my markers and a bunch of stamp and dies, there are times when I just need to make something a bit easier.  I love using paper packs and Birch Press Designs dies when I need to make a quick card; I especially love that the intricate nature of the dies make it look like I worked for ages to make the card, yet all it typically takes is a few turns of my die cutting machine.  This week for my Dies R Us design team post I am showing you this simple, yet elegant, thank you card:


What I Used to Make my Card:
Slimline White Card Base
DCWV Paper Stack, 12" x 12", Peri & Peach
Birch Press Designs Flora Heart Layer Set, #56120
(you could also use Caprice Heart Layer SetDahlia Heart Layer Set or Petal Heart Layer Set)
Birch Press Designs Big Thanks Sugar Script, #57142 
Nuvo Delux Adhesive
Sequins from Stash

Once I had made my slimline card base, I set that aside and cut out a bunch of the hearts using all of the beautiful papers in the paper stack.  I recommend keeping each layer separate while you are doing this as it is easier to assemble them, I have a tendency to mix up some of the layers and don't realize it until I begin to put the layers together.  I use a toothpick to dot the adhesive onto thin die cuts like these but have found the tip of the Nuvo glue works so well with dispensing a tiny dot that I have been able to cut down on using  tooth picks! In the past I've tried the needle precision tips {and a bunch of others} but they always clog on me, not so with this glue! Putting these hearts together was a breeze! I had cut enough layers to make 5 complete hearts so I saved the other two to be used later.  I chose to use the "thanks" sentiment rather than a more formal sentiment to keep the card playful and not too fancy.  Dies R Us carries an amazing selection of Birch Press Designs Dies at the best prices I have found online - my collection is growing quite fast now!  I hope this little tutorial finds you and yours healthy and happy! 

Fondly, 

Christi


Apr 2, 2021

Sparkly 'merry & bright' snowflake Christmas cards!

Hello, crafty Dies R Us fans! Leslie here from Love To Scrap 2, and I’m absolutely thrilled to be a new Dies R Us design team member! My debut project that I'm sharing with you today is a pair of  Christmas cards featuring the amazingly gorgeous Birch Press Design Mini Snowflake Frame Layer Set! I am so in love with this entire line of dies!


Okay, so let's get started!

1. Die cut two sets of Mini Snowflake Frame Layer Sets from Stardream Metallic Aquamarine cardstock, Stardream Metallic Lagoon cardstock and Silk Glitter Silvermist cardstock. Reverse the top and middle layer colors so the top layer of one snowflake is the slightly darker teal color and the other one is the lighter teal. The base layer for both sets is the silver glitter cardstock. 


2. Adhere the snowflake frame layers together with Layer C on the bottom, Layer B in the middle and Layer A on the top. 


3. Cut a standard A2 size card base from Neenah Classic Crest 110# Solar White cardstock for each  card along with an inside layering panel from Neenah Classic Crest 80# Solar White cardstock and front layering panels from Basis Teal cardstock and teal double-sided patterned paper. Reverse the sides of the patterned paper for each card. Also cut embellishing strips for the inside from leftover Basis Teal cardstock and the teal double-sided patterned paper. 


4. Adhere the Basis Teal cardstock and teal double-sided patterned paper layers together
for the front of each card, and adhere a snowflake frame to each panel. Stamp the sentiment twice in Versamark on Basis Teal cardstock and heat emboss in white. Cut into strips and adhere one to each front panel with Scotch 3M foam tape. For the inside of each card, adhere the Basis Teal cardstock and Neenah Classic Crest 80# Solar White cardstock layers together, and embellish each panel with a strip of teal double-sided patterned paper and narrow strip of teal cardstock used on the front. Then stamp the sentiment in teal ink. 


5. Adhere the panels to the front and inside of each card base, and voila - you're done! ;)


Don't forget to come join in the fun at the Dies R Us Challenge Blog. There's a new challenge theme offered on the 1st and 15th of each month and one lucky randomly drawn winner will receive a gift voucher prize to the Dies R Us Store. For your convenience, all the important Dies R Us links are provided below.

https://blogger.googleusercontent.com/img/b/R29vZ2xl/AVvXsEjCjT8pw_L9T-z6-KjvbFtjxltch0jDrbOVSRoR7-pMeQw8lEYfIDENxvu0UYve6R3ZP9GqtyyTDEJbdtSMk3bGQBx_Y3u5-ayMxatDG7IHMgflmEHGKjuk1fXzqacoc_aa78anm5BPmKz1/s320/*logo%2Bcollage.pages.jpg

click below for:

STORE

CHALLENGE BLOG

FACEBOOK

INSPIRATION BLOG

FRIENDS OF DIES R US PINTEREST PAGE


Thanks so much for stopping by today - we'll see you next time!

Scrappy hugs,
Leslie