Sep 15, 2021
Nine Patch & Leaf Thank you Card
Nov 4, 2020
Give Thanks
Hello Friends,
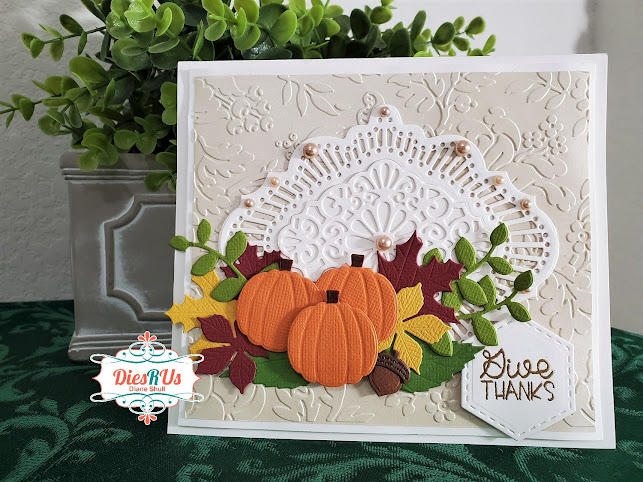
Diane here to share with you a Thanksgiving or Autumn card using several wonderful die sets available at Dies R Us. For this card I used all solid color card stock making it easy to duplicate.
My top folding white card base measures 6 1/4 X 5 1/2. I then cut piece of white card measuring 5 7/8 X 5 1/4. I cut a piece of metallic beige card measuring 5 5/8 X 5 and embossed it using an Anna Griffin embossing folder called Thistle Bouquet. Next, I cut the background die. I used the Creative Expression, craft die by Sue Wilson called, "Californian Collection - Beverly Hills", CED1105. This focal die is available at Dies R Us. I cut all three dies out with 110 lb. white cardstock. I then took the center medallion and glued it to a piece of 65 lb. white cardstock and carefully fussy cut it out.
Then using the Karen Burniston, "Autumn Elements - 1059" eight piece die set, available at Dies R Us, I cut out all my embellishments using a variety of colored cardstock. I also cut a few elements using the Impression Obsession dies, DIE095-D. Next, I stamped my sentiment, Give Thanks, and cut it out using the "Stitched Nesting Hexagons" by Tutti designs, Tutti-616.
Then I put everything together. First I glued the embossed panel to the white cardstock panel. Next I glued down my Sue Wilson die cut being careful placing down the center medallion. Next, I added my sentiment to the lower right hand corner using pop dots. Now, I can carefully place all my die cut elements into a pleasing fall bouquet. I popped the pumpkins, so I could tuck the leaves under them. After I glued all that down, then I placed my card front onto my card base with pop up foam pieces (pop dots). And for the very last touch I added some flat backed pearls to the card. I hope you will give this card a try.
Now lets take a look at the supplies I used:
Karen Burniston Autumn Elements: https://www.diesrus.com/products/karen-burniston-dies-autumn-elements?_pos=2&_sid=74b038609&_ss=r
Impression Obsession Leaf dies: https://www.diesrus.com/products/impression-obsession-dies-leaves?_pos=1&_sid=cb1af07ed&_ss=r
Tutti Design Stitched Nesting Dies: https://www.diesrus.com/search?q=Stitched+Nesting
Creative Expressions, Sue Wilson California Dies: https://www.diesrus.com/search?q=Creative+Expressions+Sue+Wilson+California
The embossing folder and sentiment stamp is from my own stash. These elements are easy to replace with your own selections.
I hope I was able to inspire you today,
Blessings and Hugs,
Don't forget to come join in the fun at the Dies R Us Challenge Blog. There's a new challenge theme offered on the 1st and 15th of each month and one lucky randomly drawn winner will receive a $10 gift certificate to the Dies R Us Store. For your convenience, all the important Dies R Us links are provided below.
 |
click below for: |


