Showing posts with label #dierus. Show all posts

Feb 12, 2021

Happy Heart Day

Hello crafty friends,

Mary back with another Valentine's Day card, but even if you don't celebrate Valentine's Day, you will find tons of use for this big Happy Heart Collage die by Memory Box.  I made it the focus of my A2 card front.  

Note:  the rays didn't completely fit the heart shape, but I made do with what I had on hand.  Looking though the store, I think the Shifter Rays stencil by Tim Holtz I would have worked, because the center of the stencil is smaller than the heart, so as long as I centered the stencil in the middle of the heart on my card front, the rays would align perfectly.  The stencil I used was 12x12 and the center was bigger than the heart, which is why the rays didn't align. 

Not counting the issue of the stenciled rays, this was a super easy card to make.  Die cutting the heart from the front of the card was a no-brainer.  On the inside I used a gnome w/a heart from my stash making sure to align him, so that his heart could be seem through the Happy Heart Collage's opening. 

In order to avoid bleeding through my inside card panel, I stamped my gnome on a separate piece of paper (mixed media) and fussy cut him out.  Lawn Fawn has a ton of cute critters stamp/dies that would be perfect for the inside of this card.

Thanks for stopping by.  To visit my personal blog just clink on my name Mary Moisan

Until next time... Take care. 


Don't forget to come join in the fun at the Dies R Us Challenge Blog.  There's a new challenge theme offered on the 1st and 15th of each month and one lucky randomly drawn winner will receive a gift voucher prize to the Dies R Us Store.  For your convenience, all the important Dies R Us links are provided below.


click below for:

Jan 15, 2021

More HAPPY New Year Cards

 Hello crafty friends,

Since we're still in January and I feel it's totally acceptable to wish people "HAPPY NEW YEAR" throughout the month of January, I'm back with two more "HAPPY NEW YEAR" cards today. 


For the above card I used Grand Hour Glass die by Poppystamps and the Roman Clock by Frantic Stamper.  The Roman Clock is not currently available, but the IO Clock Face die is.  

I started by die cutting the clock and using it as a stencil over my card front.  Next, I die cut the body of the hour glass to create my shaker window.  I backed the window with acetate and added tiny gun metal and black star sequins.  I also added a hand written "HAPPY NEW YEAR" message inside the hour glass shaker.  Once my shaker card front was attached to my card, I glue sections of the inked clock to the card, overlapping the hour glass in some places.


I stayed with hour glass theme, this time using the Small Hour Glass by Poppystamps and the Happy Happy Happy by Frantic Stamper. 

I created five small hour glass shakers and top the card with the Happy Happy Happy sentiment.  


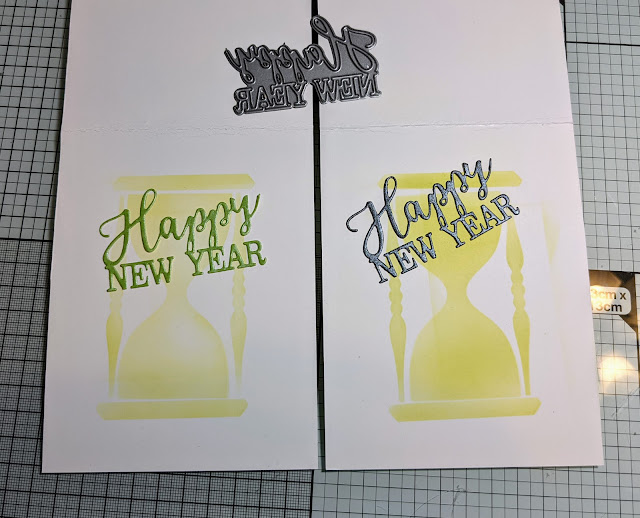
On the inside of both cards I used the Happy New Year die from Merry Christmas set by Impression Obsession.  I also created a stencil from the Grand Hour Glass to ink both cards.


Here's a side by side of the Grand Hour Glass and the Small Hour Glass dies.
 
Thanks for stopping by.  To visit my personal blog just clink on my name Mary Moisan
Until next time... Take care. 


Don't forget to come join in the fun at the Dies R Us Challenge Blog.  There's a new challenge theme offered on the 1st and 15th of each month and one lucky randomly drawn winner will receive a gift voucher prize to the Dies R Us Store.  For your convenience, all the important Dies R Us links are provided below.


click below for:

Jan 8, 2021

Happy 2021

  Hello crafty friends,

I hope everyone had a nice end to 2020.  


For my first Design Team card for 2021 I wanted to make a Happy New Year card, but my go to Happy New Year die by Impression Obsession wasn't going to give my the look I wanted, which was a block style stand alone "happy" that I could cover the front of the card with.  

I ended up using the "happy" from the Happy Mother's Day die by Impression Obsession, it wasn't exactly want I wanted, but close enough.  I colored several pieces of scrap mixed media paper and die cut it my happies. I die cut a circle opening to show my stamped inside card image (Newton Celebrates)  

Until next time... Take care. 


Don't forget to come join in the fun at the Dies R Us Challenge Blog.  There's a new challenge theme offered on the 1st and 15th of each month and one lucky randomly drawn winner will receive a gift voucher prize to the Dies R Us Store.  For your convenience, all the important Dies R Us links are provided below.


click below for:


Nov 20, 2020

Pine Forest

 Hello crafty friends,  

Mary back with three cards showcasing the Aspen & Pine Forest die by Impression Obsession and a couple of other dies.   

Starting with this first card, on which I used the die to create a shaker element.  


I die cut the panel from 110lb white card stock which I covered with score tape first, so that I would be able to attached it to it blue background pattern paper easily, which I did.  I also die cut the top part of the panel (trees) from green card stock and trimmed away the non birch trees.  This die cut also was backed with score tape, so it was super easy to cover the white birch trees w/the greens ones adding interest to my background. Next I added two layers of foam tape around the frame of the die


I added my "snow" mixture and die cut the "frame" to top my shaker from silver glitter paper... tip:  to save glitter paper I fuzzy cut the center of the glitter paper since I didn't need it when die cutting the die this time.  I only needed the border/frame.  I fuzzy cut anything that wasn't the frame. 

.


On card 2 I used the same technic trees, only this time I left the birch trees white and covered the "pine" trees with a second layer of green card stock.  I backed the Cute Rudolph by Frantic Stamper with white card stock. 


For card 3, I wanted to see if I could make the Aspen & Pine Forest die work on a slim card. 


I started by die cutting the panel twice from green card stock.  Using my card panel for size reference I looked for a place I could join the two die cuts without it looking weird and trimmed the excess off.  I ended up getting rid of the bottom parts of the die realizing I should have used white card stock (snow).

I backed the die cuts with blue pattern paper and using a white gel pen painted some of the trees white.  I inked the bottom of the "ground" with white distress ink.  The "Winter Cheer" is from a Penny Black die set that unfortunately is not currently available, but the Joyful Winter set is.  The cute house and sleigh is an unmounted stamp from Purple Onion Designs by Stacey Yacula.  


Don't forget to come join in the fun at the  Dies R Us Challenge Blog.  There's a new challenge theme offered on the 1st and 15th of each month and one lucky randomly drawn winner will receive a gift voucher prize to the Dies R Us Store.  For your convenience, all the important Dies R Us links are provided below.


click below for:

                                                            Thanks for stopping by! 


Nov 13, 2020

Candy Canes

 Hello crafty friends,

It's my turn at bat today, actually you don't want me batting, I'm terrible at sports, but I'm good at card making, so that's what I do and that's what I have for you today... a Christmas card featuring this fun Candy Canes die from Tutti. 


The die measures 2.85" x 4", so it makes a great focal point on a card.  I die cut it twice from red glitter card stock for my slim card. 


I used Distress Oxide Ink and a Christmas word background stamp to create a background for my Candy Canes dies using two free handed cut circle post-it note masks to keep to areas white, so that the bows of the die cuts would differ a little. Until next time... Take care. 


Don't forget to come join in the fun at the Dies R Us Challenge Blog.  There's a new challenge theme offered on the 1st and 15th of each month and one lucky randomly drawn winner will receive a gift voucher prize to the Dies R Us Store.  For your convenience, all the important Dies R Us links are provided below.


click below for:

Thanks for stopping by! 

Aug 21, 2020

Hello Paris


Mary back today with a cheerful greeting, which is sadly not coming to you from Paris, but once this pandemic is over my plans to visit Paris will be back on track and all the dies and stamps I purchased to document the trip will get lots of used in my Paris Travel Journal.   In the meantime, I will showcase the dies and stamps on my cards here and on my blog.  


For today's card I used distressed inks and an stitched oval die to create a front shaker card panel.


I placed a white glitter die cut La Tour Eiffel die by Frantic Stamper in the center of my oval window and a white glitter die cut hello die by Spellbinders along the top left arch of the oval.  Here's a link all the hello dies currently available... I'm off to find a French hello die :)


Don't forget to come join in the fun at the Dies R Us Challenge Blog.  There's a new challenge theme offered on the 1st and 15th of each month and one lucky randomly drawn winner will receive a gift voucher prize to the Dies R Us Store.  For your convenience, all the important Dies R Us links are provided below.


click below for:

Aug 20, 2020

Let's build a house

 Hello Everyone.


It is my, Alycia, from My Craft Addiction.  Today I bring you Let's build a house.


This die is Winter house pop up easel set by Poppy Stamps. This die set has so many potentials.  Choosing a winter scene was something I could use for my Christmas card collection. I used the background stencil from lawn fawn but you could use the Heffy Doodle Brick by Brick stencil.  I used the Pumice Stone Distress ink by Ranger.  

I would use any glitter paper for the snow die from this set.  You could also use any type of glitter with some liquid glue.  Cosmic Shimmer glitter would work wonderful with the Quickie Glue Roller Pen.  Using the glue will allow for as much or as little glitter you want.  I love adding ALOT of glitter on a Christmas Card


Thank you for crafting with me.  

Have a wonderful day

Alycia
My Craft Addiction

Don't forget to come to join in the fun at the Dies R Us Challenge Blog.  There's a new challenge theme offered on the 1st and 15th of each month and one lucky randomly drawn winner will receive a gift voucher prize to the Dies R Us Store.  For your convenience, all the important Dies R Us links are provided below.


Click below for:


Jul 24, 2020

Wacky Window Backgrounds

Hello craft friends,

Mary here with two different sized card backgrounds using the Wacky Window Card Panel die.


The A2 (4.25 x 5.5) card was quick and easy to make.  After I ran the die through, I kept all the inner windows in place adding tape to the back of the panel, because I didn't want any of the inner windows to move while I brushed inked on them while holding the die over the panel. Inking the windows this way was faster, kept the card cleaner and gave each inner window a tiny white border.  Next I mounted the panel on black and then onto the card front.  I finished the card with a black card stock die cut Happy Happy Happy by Frantic Stamper and a black card stock die cut Flower Wish by Tutti Designs.


The slim (3.75 x 8) card took a little longer to make, but it was the first one I made.  I cut a piece of card stock (I used mixed media paper) a little wider and longer than the 3.75 x 8 size I needed and ran the die through the first time die cutting the top of the slim panel.  Next, I measured how many more inner windows my slim card would need length wise and aligned the die for it's second pass, this time positioning the top cutting plate away from where I didn't want it to cut into any of my previously die cut areas.  


Unless you are going for a very clean look, don't worry is your partial die cutting leaves blemishes or marks, in most cases, you'll be able to hide them with other elements you'll be adding to your card. 


I used a rainbow selection of Distress inks for my inner windows and finished the card with a couple of black card stock die cuts Happy Happy Happy by Frantic Stamper


Don't forget to come join in the fun at the Dies R Us Challenge Blog.  There's a new challenge theme offered on the 1st and 15th of each month and one lucky randomly drawn winner will receive a gift voucher prize to the Dies R Us Store.  For your convenience, all the important Dies R Us links are provided below.


click below for:
FRIENDS OF DIES R US PINTEREST PAGE

Thanks for stopping by!

Jul 3, 2020

Red White and Blue

Hello craft friends,

Mary here with a watering can full of red and white flowers on a background of blue for a patriotic weekend card. 


I used the following four sets of dies on my card: 

the Grand Water Can by Poppy, die cut from white card stock
the Lacy Poppies by Elizabeth Craft Designs, die cut from white and red card stock
the Star Spray by Creative Expressions, die cut from red card stock
the Lg Staghorn Coral by Frantic Stamper, die cut from white card stock

This card requested a few die sets, but once all the elements were die cut, came together super fast.  I  started by covering the background with blue pattern paper leaving a small white border, next placing the watering can (with a little foam tape in the center) and arranging all the die cut elements into it.  This fun card is going on our mantle this holiday weekend.  Do you use cards to decorate your space?


Don't forget to come join in the fun at the Dies R Us Challenge Blog.  There's a new challenge theme offered on the 1st and 15th of each month and one lucky randomly drawn winner will receive a gift voucher prize to the Dies R Us Store.  For your convenience, all the important Dies R Us links are provided below.


click below for:
FRIENDS OF DIES R US PINTEREST PAGE

Thanks for stopping by!

Jun 26, 2020

Ocean Waves

Hello crafty friends,

Mary back with a fun summer card that showcases the Layered Background Ocean Wave dies from Creative Expressions containing two dies both measuring 4.4x3 inches.  Additionally, I used on old Die-Versions' Seahorse die, which is not currently available, but here's a link to one that is.   If you want more options, here's the result of a search for "seahorse".   I also wanted to show you some options if you are looking for some dotted rectangle dies  


Here's the video on how I created this card:


Don't forget to come join in the fun at the Dies R Us Challenge Blog.  There's a new challenge theme offered on the 1st and 15th of each month and one lucky randomly drawn winner will receive a gift voucher prize to the Dies R Us Store.  For your convenience, all the important Dies R Us links are provided below.


click below for:
FRIENDS OF DIES R US PINTEREST PAGE

Thanks for stopping by!