Jul 27, 2018

Life is Better at the Beach

Hello All and welcome back to the Dies R Us Inspiration Blog!
Darlene with you today filling in for DT member Felicita.
 
Wow!  Here we are at the end of July already ... where is summer going?
Never fear, there is still time to hit the beaches and soak up those rays!  LOL
And, that is what my card is all about today!

 Oh yes!  
I'm not a big sun worshiper but I do love listening to the waves crashing against the shore and getting my feet wet as I walk along the surf!

I'm so happy with this card ... here's a peek at it's creation.

First I pulled all my pieces together ... creating my 'water' background first using watercolor paper and Tim Holtz Distress Oxide ink  ... Salty Ocean.


I then die cut the Memory Box 'Oceana Corner' from white card stock and proceeded to color in the fish/shells for a touch of color.


And, of course there are two things you need when heading for the beach ... swim wear & flip flops!  I just love the new Cheery Lynn Designs Flip Flops & Board Shorts die set ... are those flip flops cute or what!!!!  LOL
 
 Cheery Lynn Designs - Flip Flops & Board Shorts
I spotted this scrap piece of designer paper and thought it would be perfect for the shorts.  
What do you think?  
 
 
 There is a bow for the shorts that cuts out on the die, but I thought I would add a little more dimension and texture by using a piece of baker's twine and tie my own bow.  I also popped the shorts up using Thermoweb 3d Foam Squares.


 All that was missing was my sentiment and this Impression Obsession sentiment die was PERFECT!!
 
 
I hope you've enjoyed what I've shared today!

Don't forget to come join in the fun at the Dies R Us Challenge Blog.  There's a new challenge theme offered on the 1st and 15th of each month and one lucky randomly drawn winner will receive a gift voucher prize to the Dies R Us Store.  For your convenience, all the important Dies R Us links are provided below.
click below for:

Thanks so much for stopping by today and as always . . .
 

Jul 26, 2018

Cat Sympathy

Hello DRU fans! Welcome back to our fabulous Inspirational Blog! 
This is America, and I'm back to share a special Cat Sympathy Card.

Gone... but never forgotten!
Card Recipe
Very easy to make with these die cuts. Just add some dry embossing, layering and a bow.

D R U Products used...
Sue Wilson Designs - Shadow Boxes -  Stitched Lattice Frames

Memento Dye Ink Pad - Tuxedo Black
*** Other Products ***
Stamps: ODBD - "Never Forgotten" set
Papers used: Kraft, Black and White Cardstock
Embellishments; White Satin Ribbon, Flat-back Pearls
Creative Expressions "Pawprint Lattice" Embossing Folder by Sue Wilson
**********************************************************
Step-by-Step Tutorial
 Start by die-cutting the cats in black, white and textured cardstocks.
Now cut the grids, top panels, stamp a sentiment and die-cut from the Frames and Tags Piereced Flags die set,  and adhere in this manner, (leaving portion of flag end to fold under panel's edge for a cleaner look). The cat cuts are shown here just to give an idea of where to place them once all the panels have been adhered together.

 Prepare the black base panel by die-cutting with the Stitched Lattice Frames. Then dry-emboss a white panel with the Lattice EF (or any pet themed EF). Back with Kraft Paper to continue the colors.   Then adhere top panels as shown here.
 Now adhere and layers, using foam adhesive behind the top grid panel to give the card dimension. At this point, adhere all those adorable cats layered together add foam tape to back of each and place on each mini grid section. The card will start to come together like this.
 The finishing touches were a bow and 3 small pearls on the sentiment panel.

That's it! Hope you liked the simplicity and will give these dies a try!
*********************************************************************
For more inspiration, please stop by the Dies R Us Challenge Blog.  There's a new challenge theme offered on the 1st and 15th of each month and one lucky randomly drawn winner will receive a gift voucher prize to the Dies R Us StoreFor your convenience, all the important Dies R Us links are provided below.
Come check these out! Click below for:

Jul 25, 2018

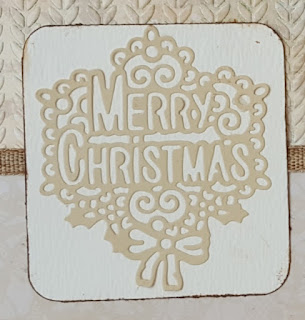
Christmas in July

Colleen from Scrappin Granny today with a Christmas card for you.  I have always like starting to make my cards in July so thought I would share a fast and easy card with you.


I love to use my scraps so I just dug in and pulled out a couple that worked well together.  I started by using the Cable Knit by Taylored Expression embossing folder and gluing that on my cardstock using the Best Glue Ever.


I just added a second piece of pattern paper to the bottom of the card  and then added a piece of ribbon to join the two papers together.

Then die cut out the sentiment using the Holly Jolly die by Yvonne Creations.


Once I had the sentiment cut out I backed it with another piece of cardstock and mounted it on the card.


Just added some paper embellishments and inked around the edges to finish off the card.


Don't forget to come join in the fun at the Dies R Us Challenge Blog. There's a new challenge theme offered on the 1st and 15th of each month and one lucky randomly drawn winner will receive a gift voucher prize to the Dies R Us Store. For your convenience, all the important Dies R Us links are provided below.


click below for:


Jul 24, 2018

Mermaid Wishes And Starfish Kisses


Good Morning, Donna Phelan back again. 

Check out my latest Shaker card!


I found this wonderful  Cheapo Dies Mermaid die in the Dies R Us Store.
She is magical AND affordable!


Cheapo Dies - Mermaid


And she complimented these Frantic Stamper Beach Comber shell dies beautifully.


Frantic Stamper - Dies - Beach Comber Icons


Here's how I created her:  


I cut all the dies from White card stock.


All cuts were colored with Copic Markers.


Adding Stickles for lots of sparkle and shine, which can be found in the Dies R Us Store.


Using Spellbinders dies in Standard and Lacy Circles I cut my layers to create the Shaker portion of my card.  Teal Backdrop, White Insert, Fun Foam Frame, Acetate, Teal Frame.


My ocean background was created by sponging Oxide Inks on to White card stock.
I also added water drops to lift some of the ink and then splattered White Craft Paint using and old toothbrush.  I assembled my Shaker part and added glitter and sequins in all shades of Blues and Greens.  Adding my shells as a border below my Shaker. 

Using the Best Glue Ever I placed my beautiful Mermaid on the Acetate.  Adding Adhesive Pearls to my Mermaid, creating a necklace and waistline and a few on the card base and shell border.


Inside Shell Border stamped in Bermuda Bay ink.


Lots of dimension!


She is magical!


Here's what I used:


Cheapo Dies - Mermaid


Frantic Stamper - Dies - Beach Comber Icons


Stickles Glitter Glue - Gold


Best Glue Ever


Distress Oxide Ink Pad - Broken China


***And Don't Forget***

***  The Dies R Us Store not only carries a wide variety of fantastic Dies, but it also carries Embossing Folders, Paper Pads, Inks, and Adhesives to name just a few of your paper crafting needs.  Click right HERE and you will see a whole list of amazing products that the Dies R Us Store carries at amazing prices! ***


Thanks for popping in!


Enjoy~~


Come join in all of the fun at the Dies R Us Challenge Blog.  There's a new challenge theme offered on the 1st and 15th of each month and one lucky randomly drawn winner will receive a gift voucher prize to the Dies R Us StoreFor your convenience, all the important Dies R Us links are provided below.

click below for: